How to use all the AI editing tools in Google Photos
Magic Editor is gone, but there are plenty of AI tools ready to take its place.
Google Photos just turned 10, and that anniversary brought a complete redesign for the app's editing tools. Magic Editor, a staple of the Google Photos app introduced with the Google Pixel 8 series, is now split up into various separate tools. There's Magic Eraser for object removal and Move or Reimagine for generative editing, plus a slew of other AI tricks.
If you're thrown off by the new interface, this complete guide with help you master the AI features in the Google Photos app. Many of them are available to anyone with a Google account, so you don't need a Google Pixel phone or subscription for access. Let's dive in!
Google Photos: Features and availability
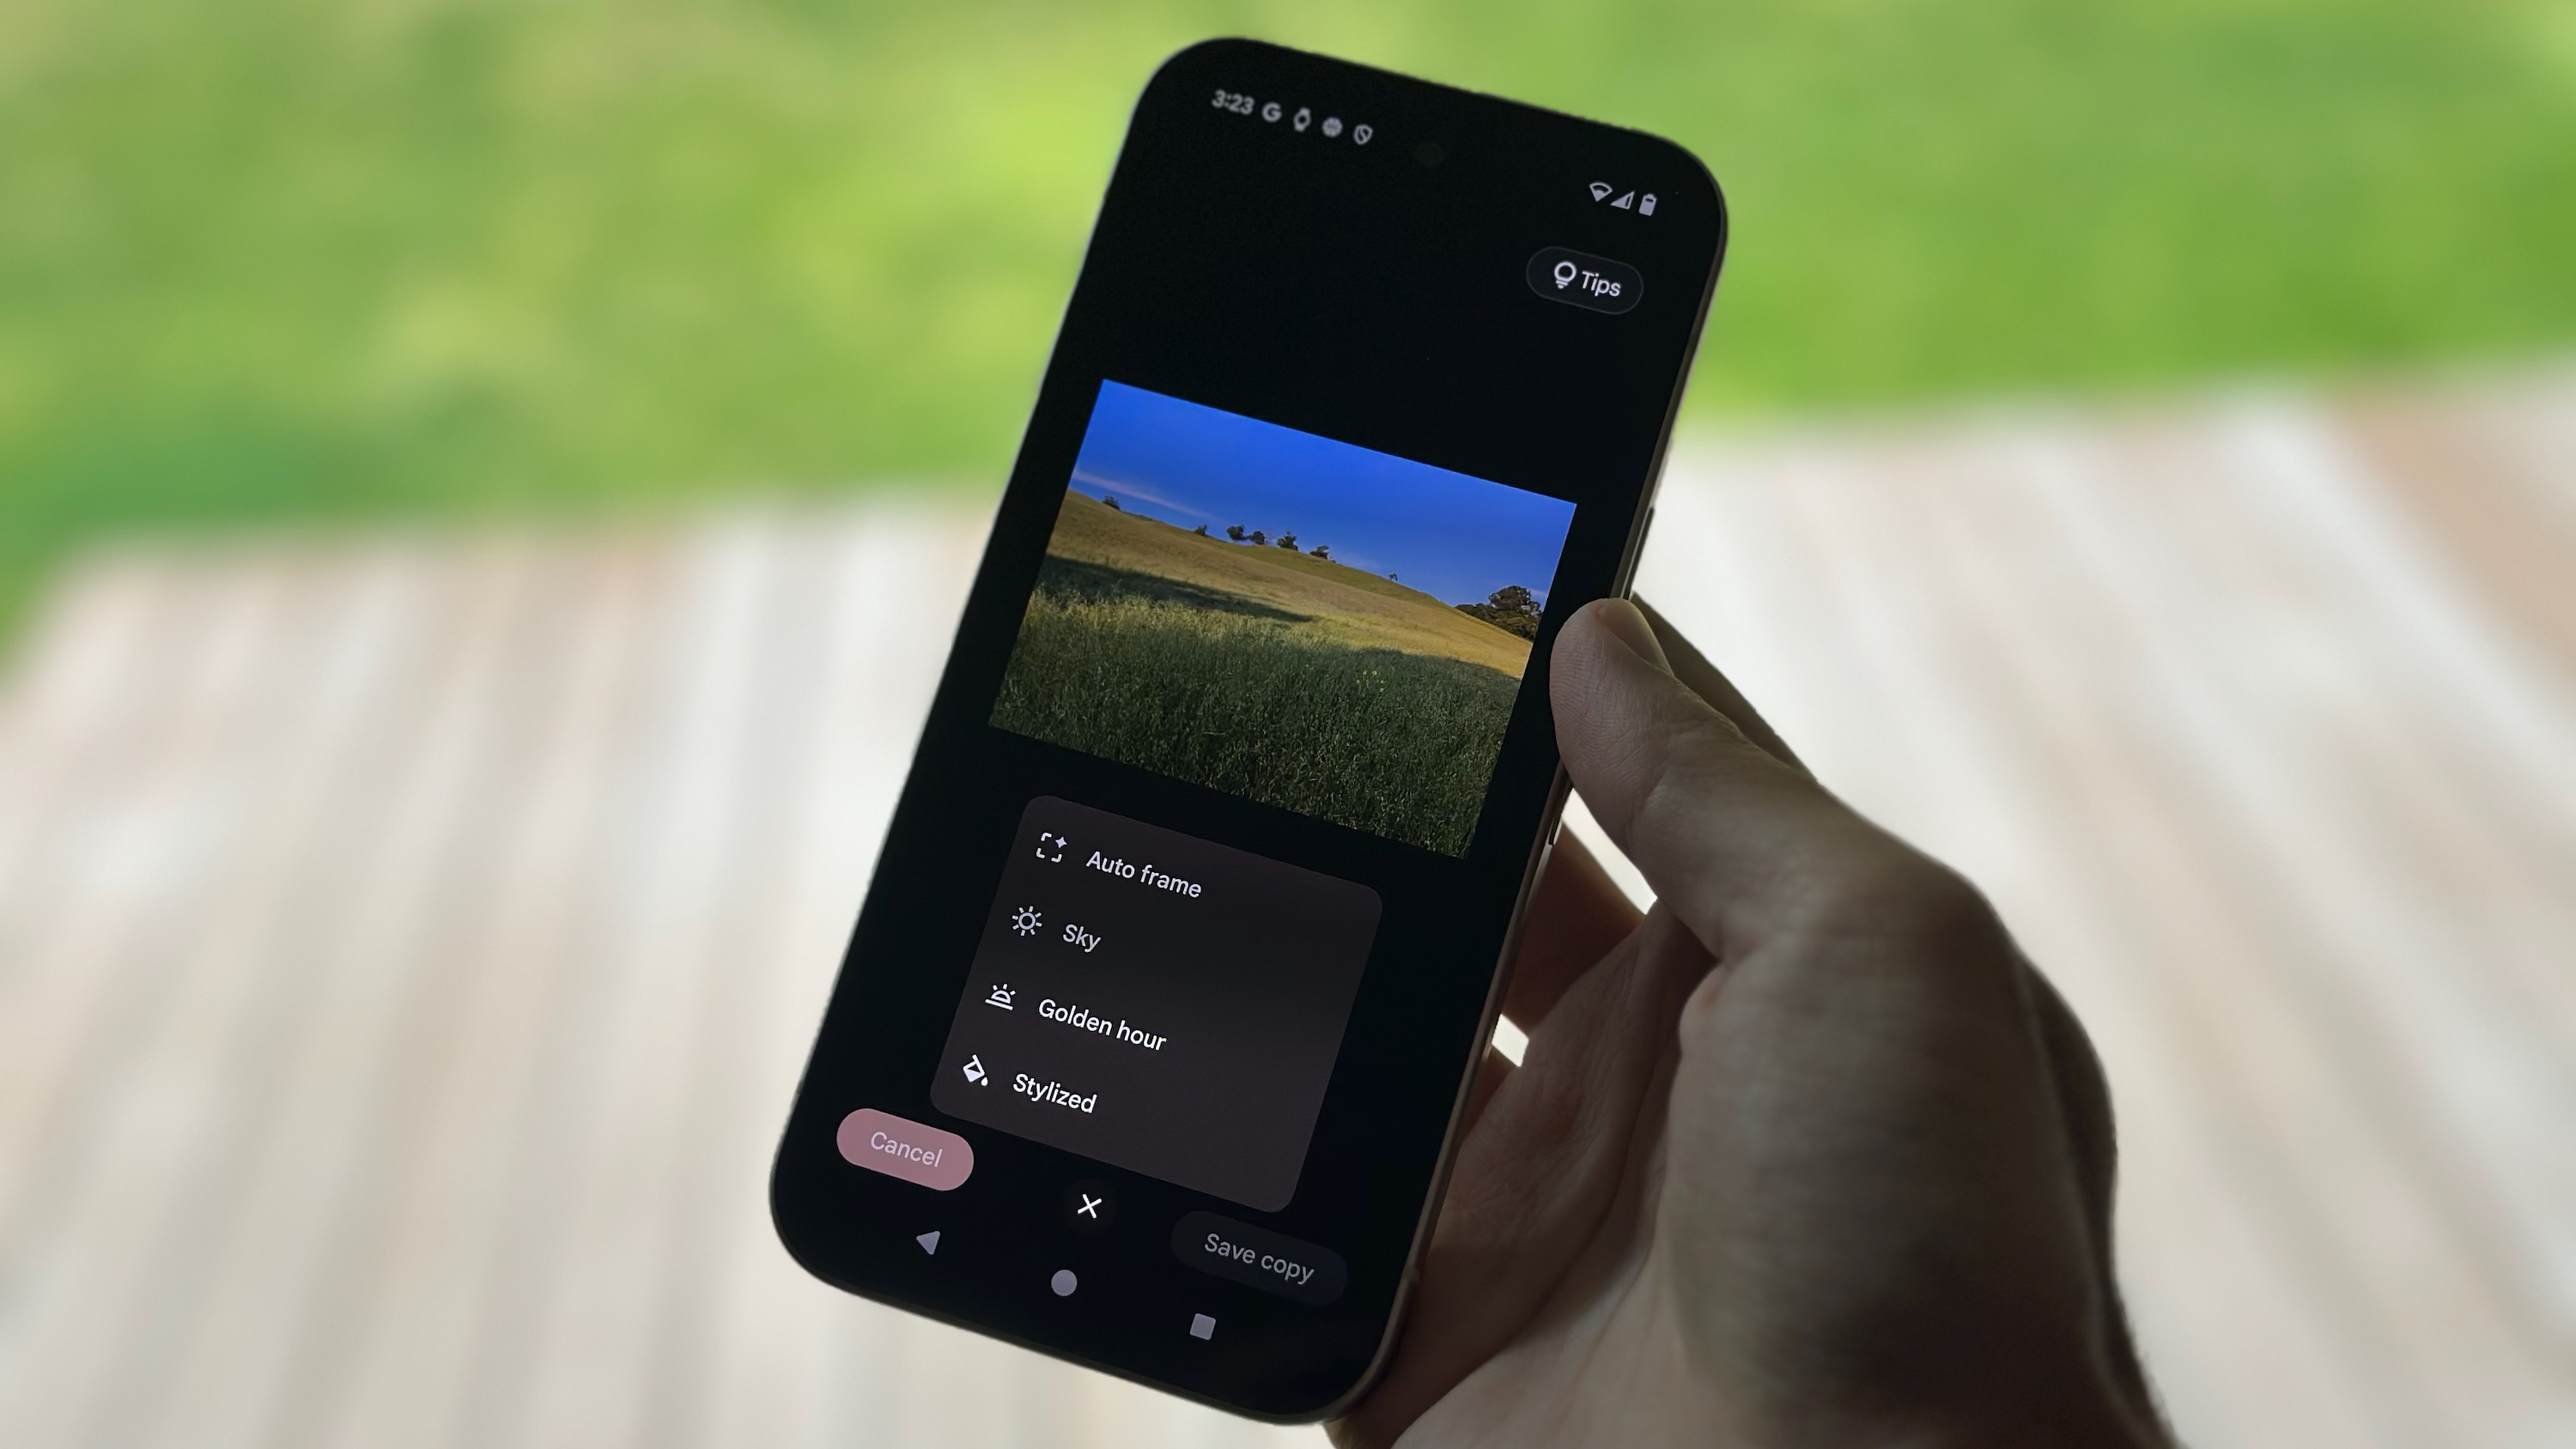
The Google Photos app in Android 16 now sports the new editing interface, which you access by selecting a photo and tapping the Edit button in the toolbar. Instead of having a dedicated Magic Editor button in the Edit interface, there's a new toolbar with Auto, Actions, Markup, Filters, Lighting, and Color tabs. Beside the toolbar is a Search button that lets you search for the specific tool you need, which is always great to keep in mind if you can't find something in the new interface.
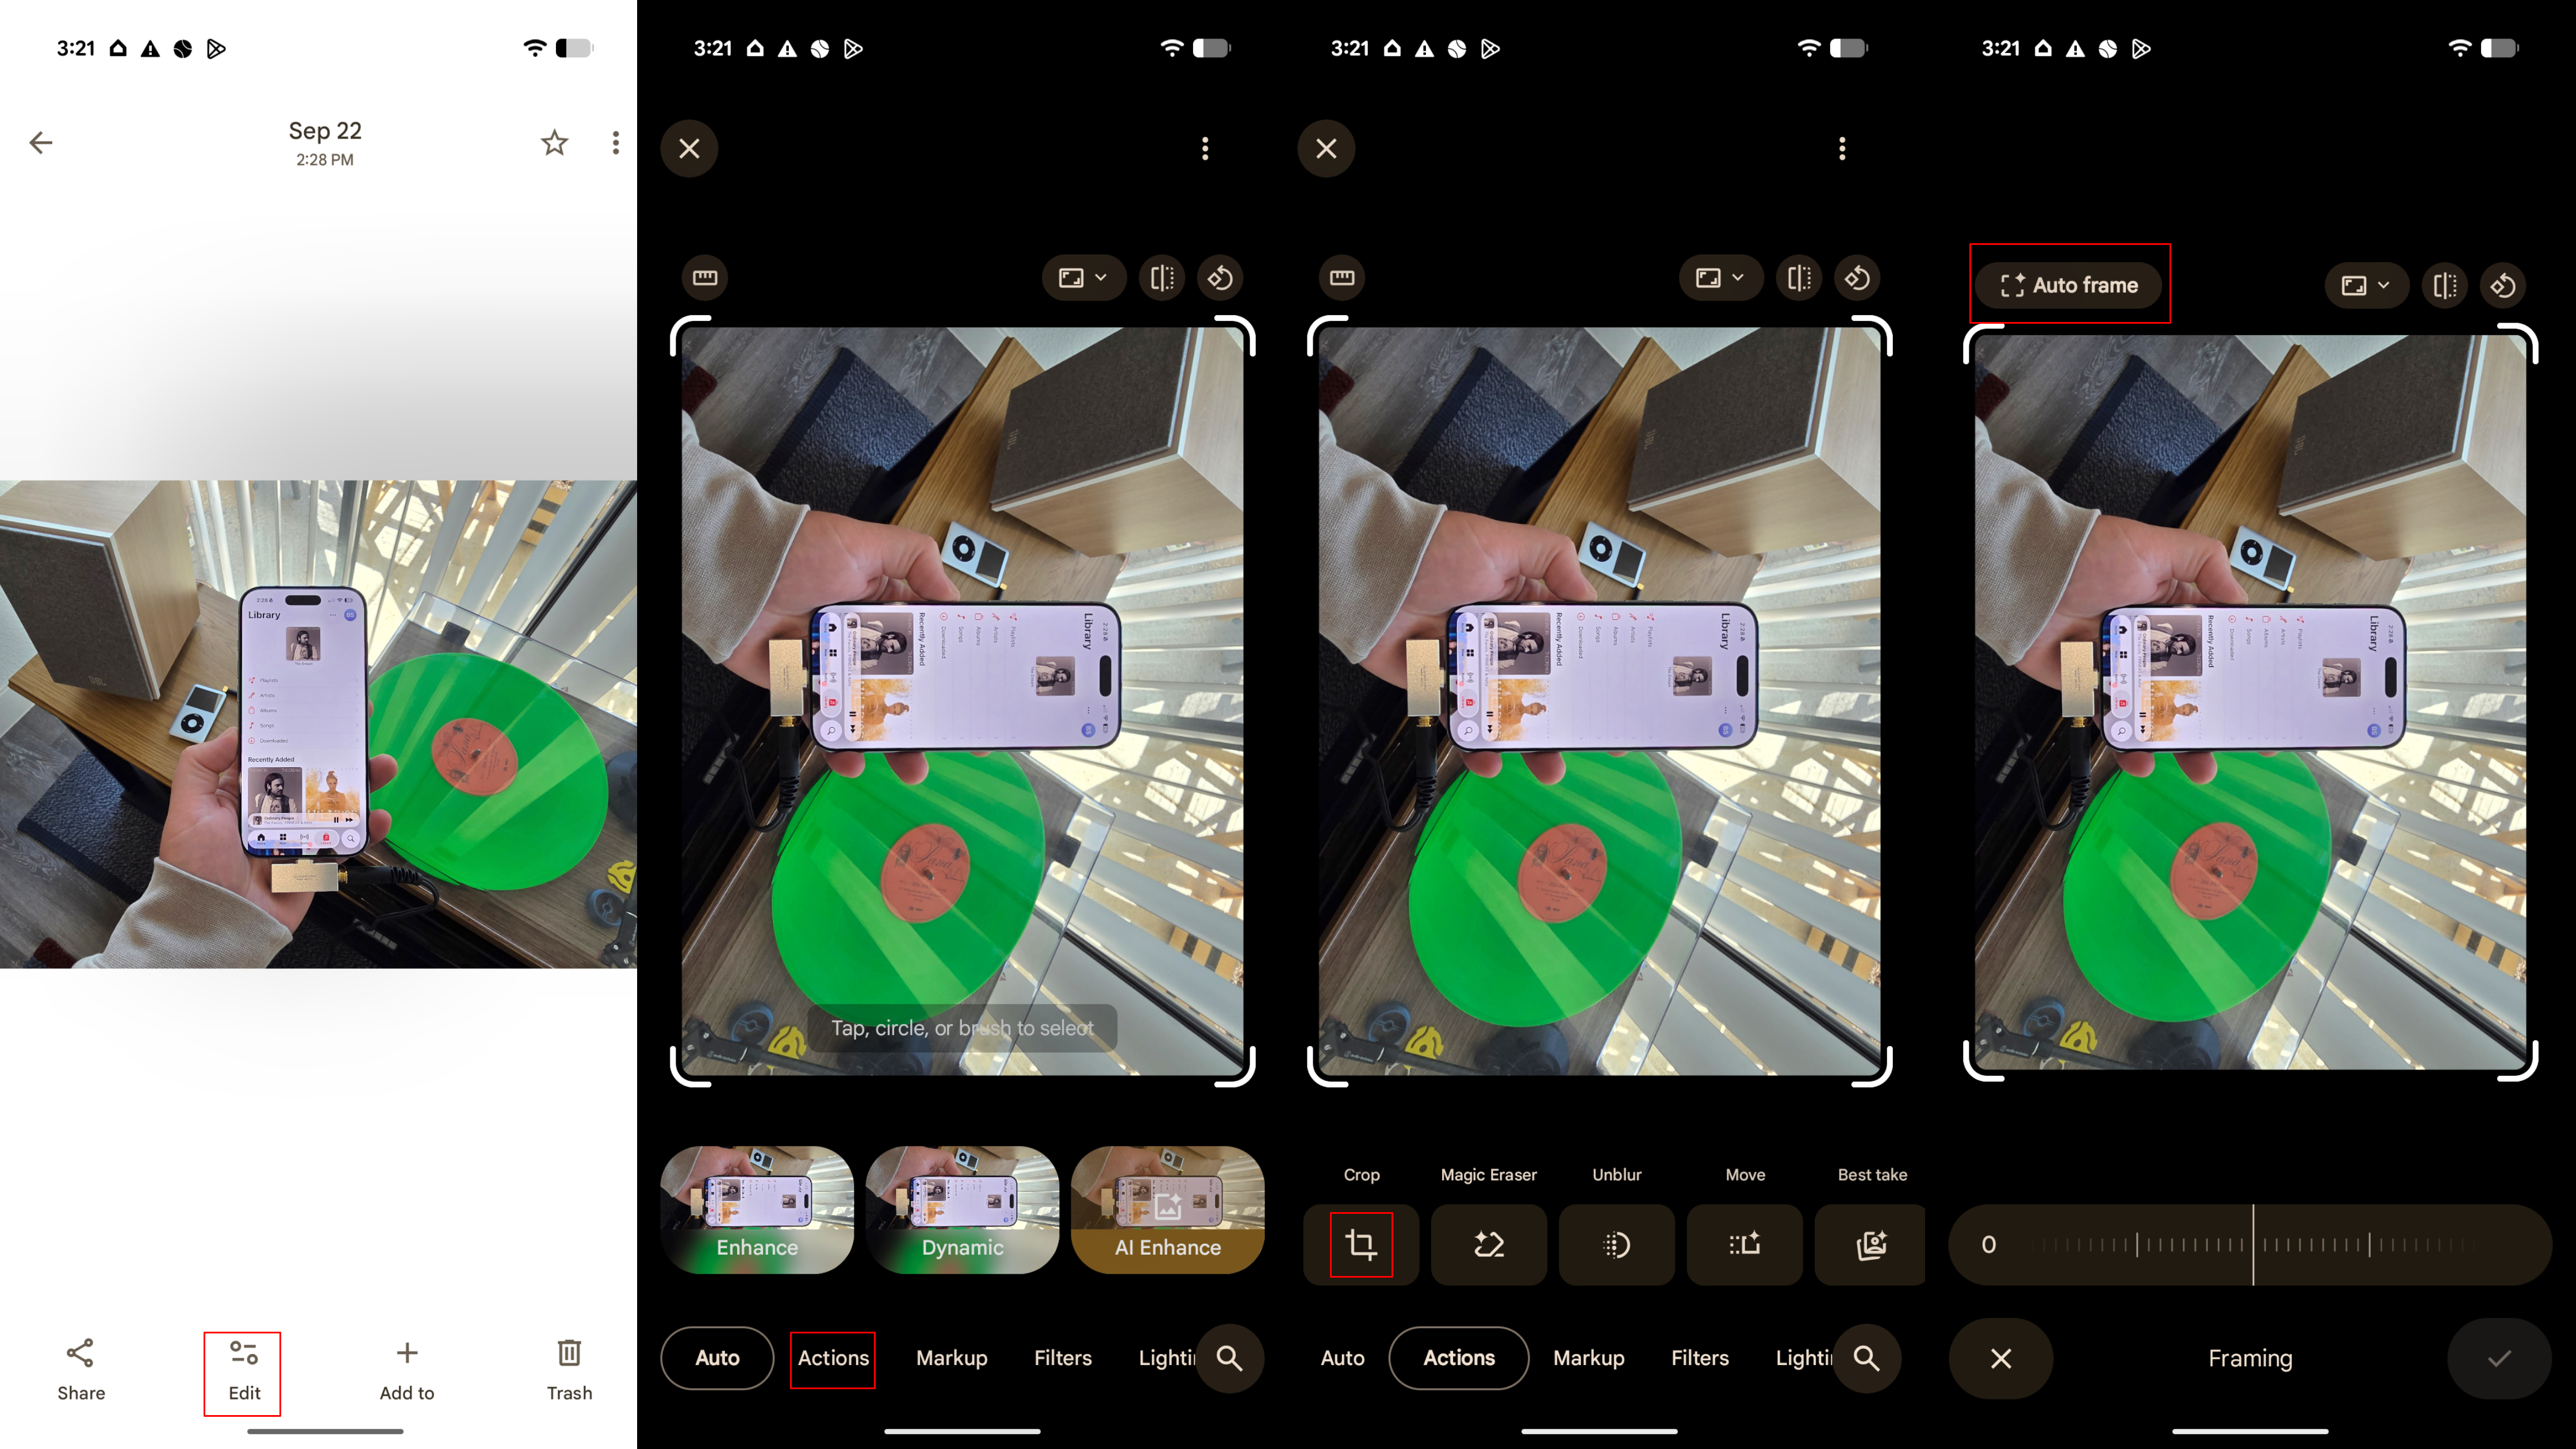
Magic Editor is gone, but its core features are still present under new names and locations. If you tap or circle an area of a photo with the editor open, you'll see options for Erase, Move, and Reimagine. Effectively, the new version of Magic Eraser replaces the basic Magic Editor object removal tool, while Move and Reimagine remain. The last Magic Editor tool, Auto frame, is now hidden behind the Crop interface in the Actions toolbar.
You'll see this new Google Photos editor after updating your Android phone to the latest version of Android 16. For now, the iOS version of the Google Photos appears to have the old interface with Magic Editor still available.
Google Photos: How to use Magic Eraser
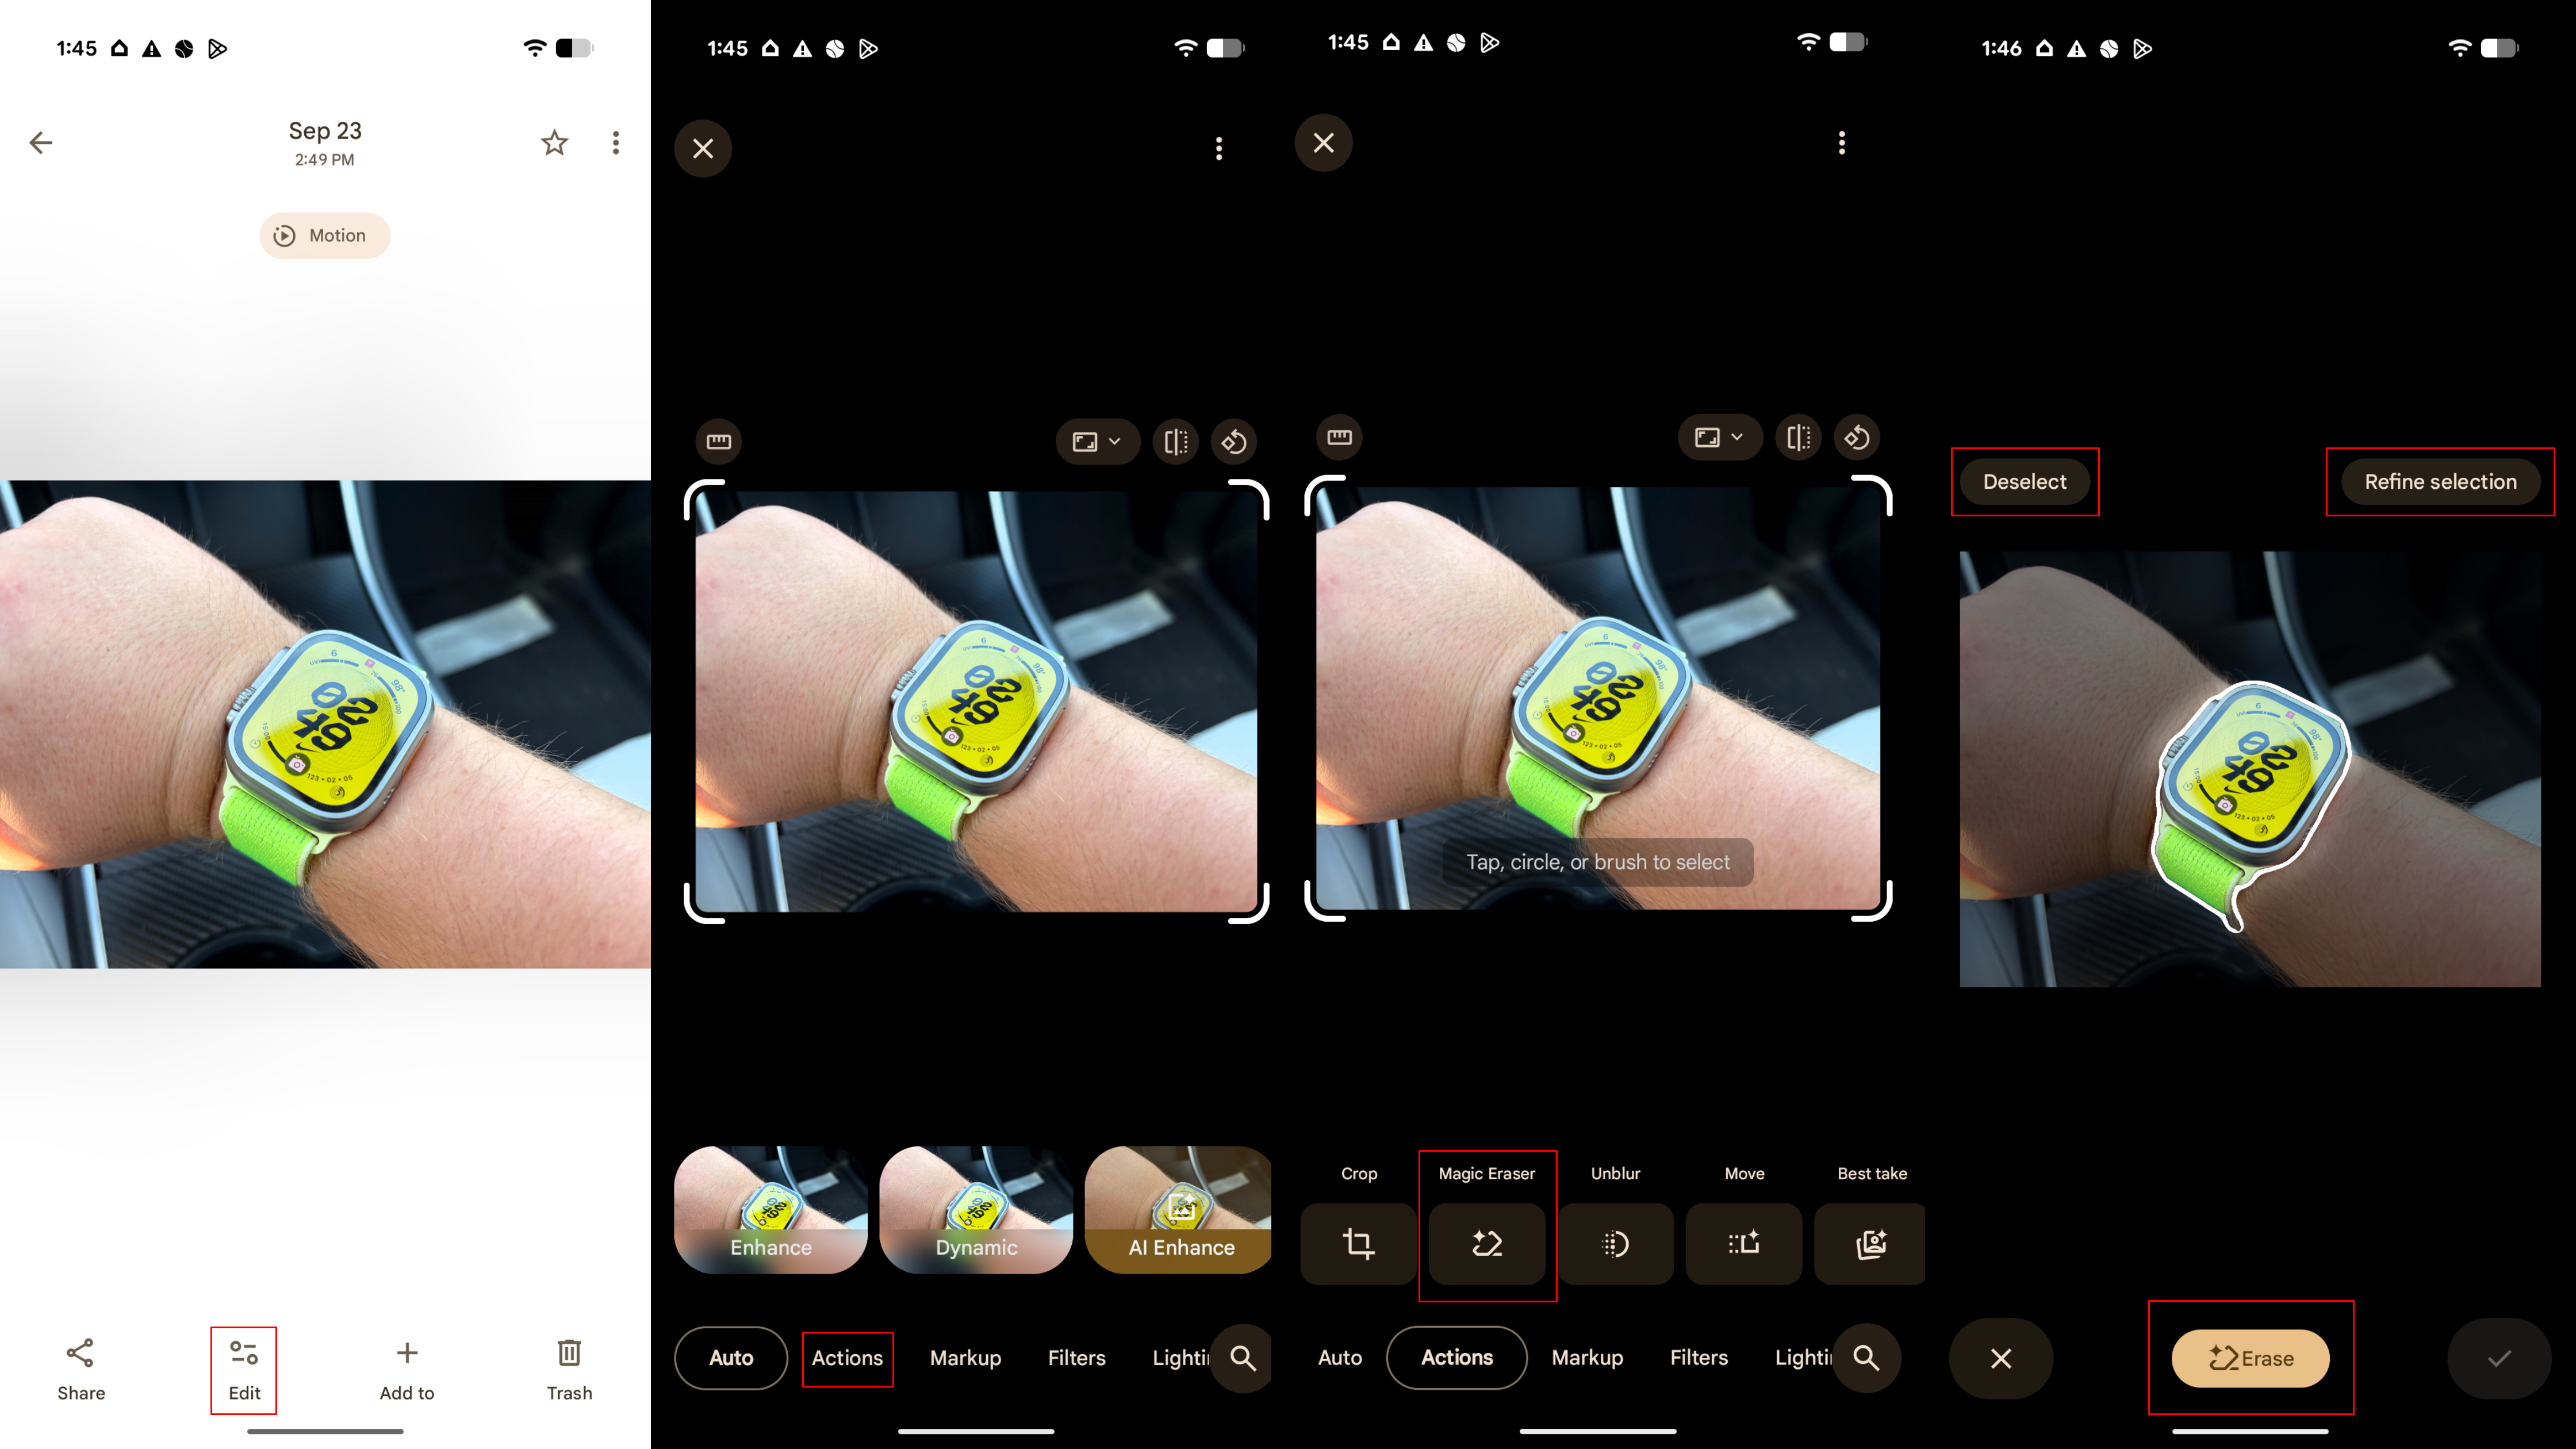
Magic Eraser is the new home for object removal in Google Photos, and there are two ways to use it. Here's how to do it:
1. Open the Google Photos app and select a photo.
Get the latest news from Android Central, your trusted companion in the world of Android
2. Tap the Edit button in the toolbar.
3. Open the Actions tab and select Magic Eraser. Alternatively, tap or circle the part of the photo you want to modify and press Erase.
4. If you haven't already, tap or circle the part of the image you want to erase.
5. Tap Erase to use Magic Eraser, or press Deselect or Refine selection if the editor didn't identify the object correctly.
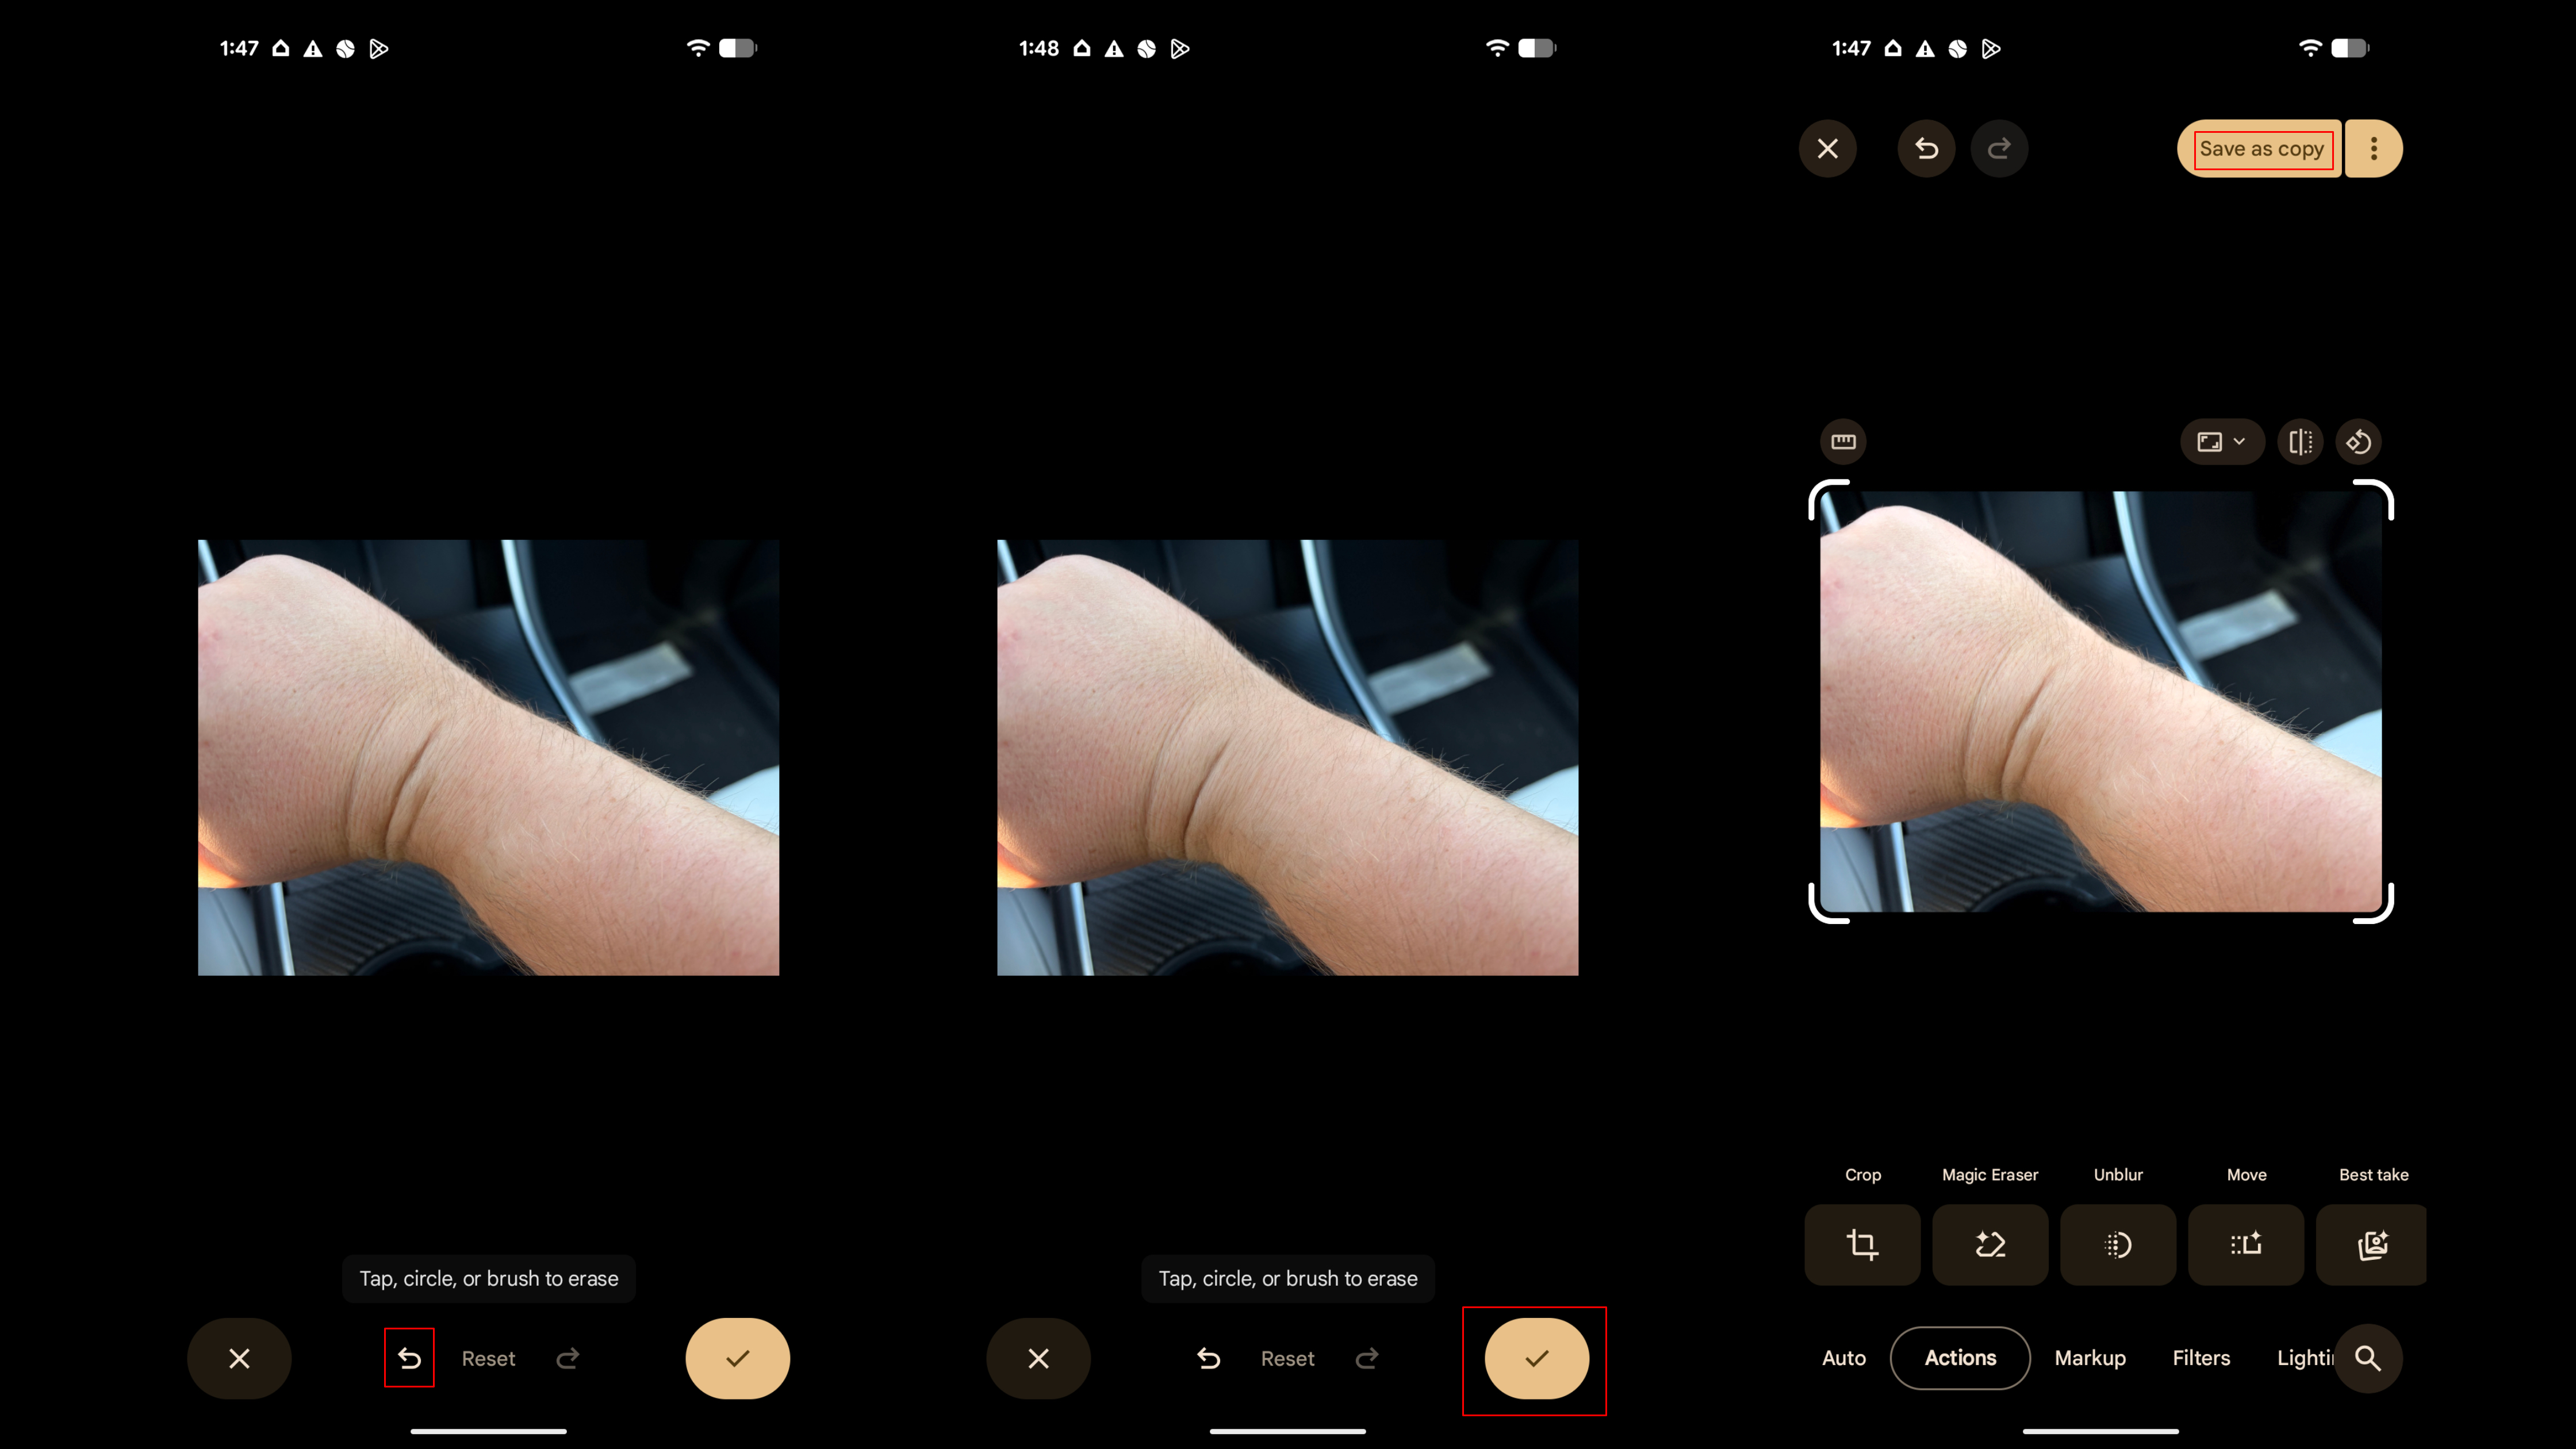
6. Press the checkmark to accept the edited version or tap the back button to try again.
7. Tap Save as copy to add the new version to your Google Photos library.
Google Photos: How to use Photo Unblur
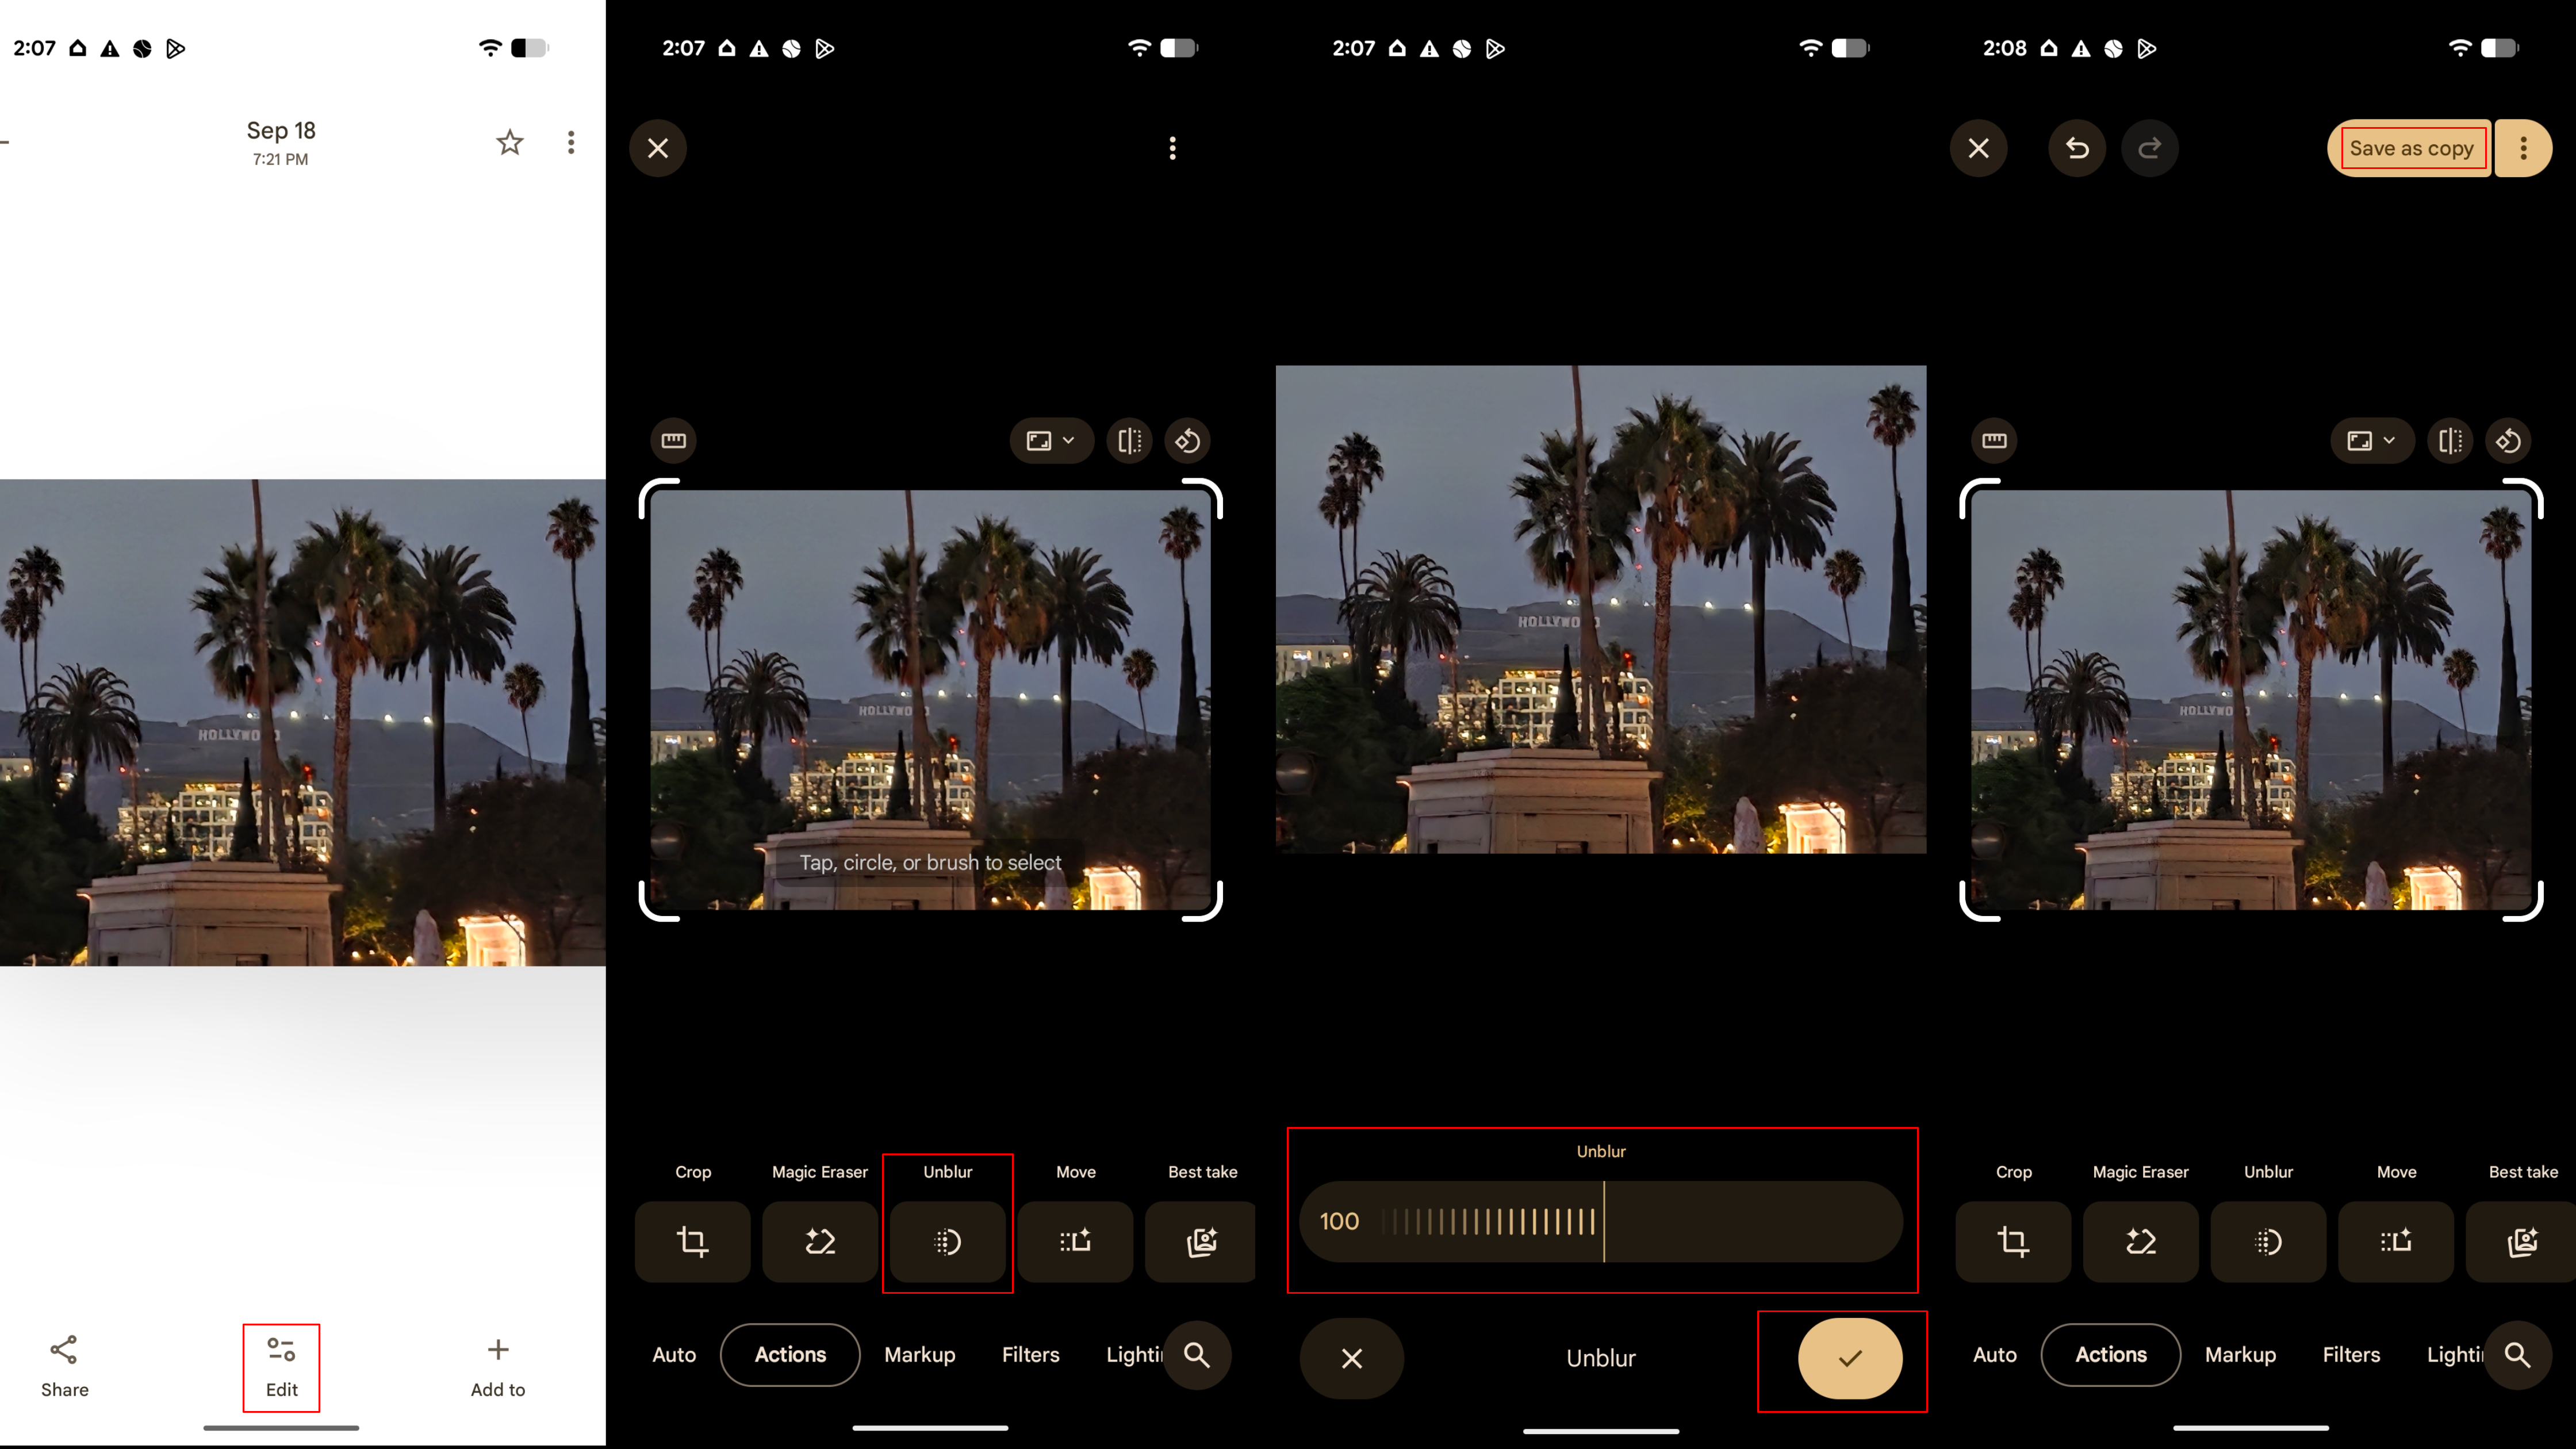
Photo Unblur is a handy feature that uses AI clean up blurry images, and it works best with older photos that suffer from motion blur. It's in a new spot in the Google Photos app, but here's how to use it:
1. Open the Google Photos app and select a photo.
2. Tap the Edit button in the toolbar.
3. Open the Actions tab and select Photo Unblur.
4. Once finished, use the slider to adjust intensity, and tap Save as copy to add the unblurred photo to your gallery.
Google Photos: How to use Reimagine
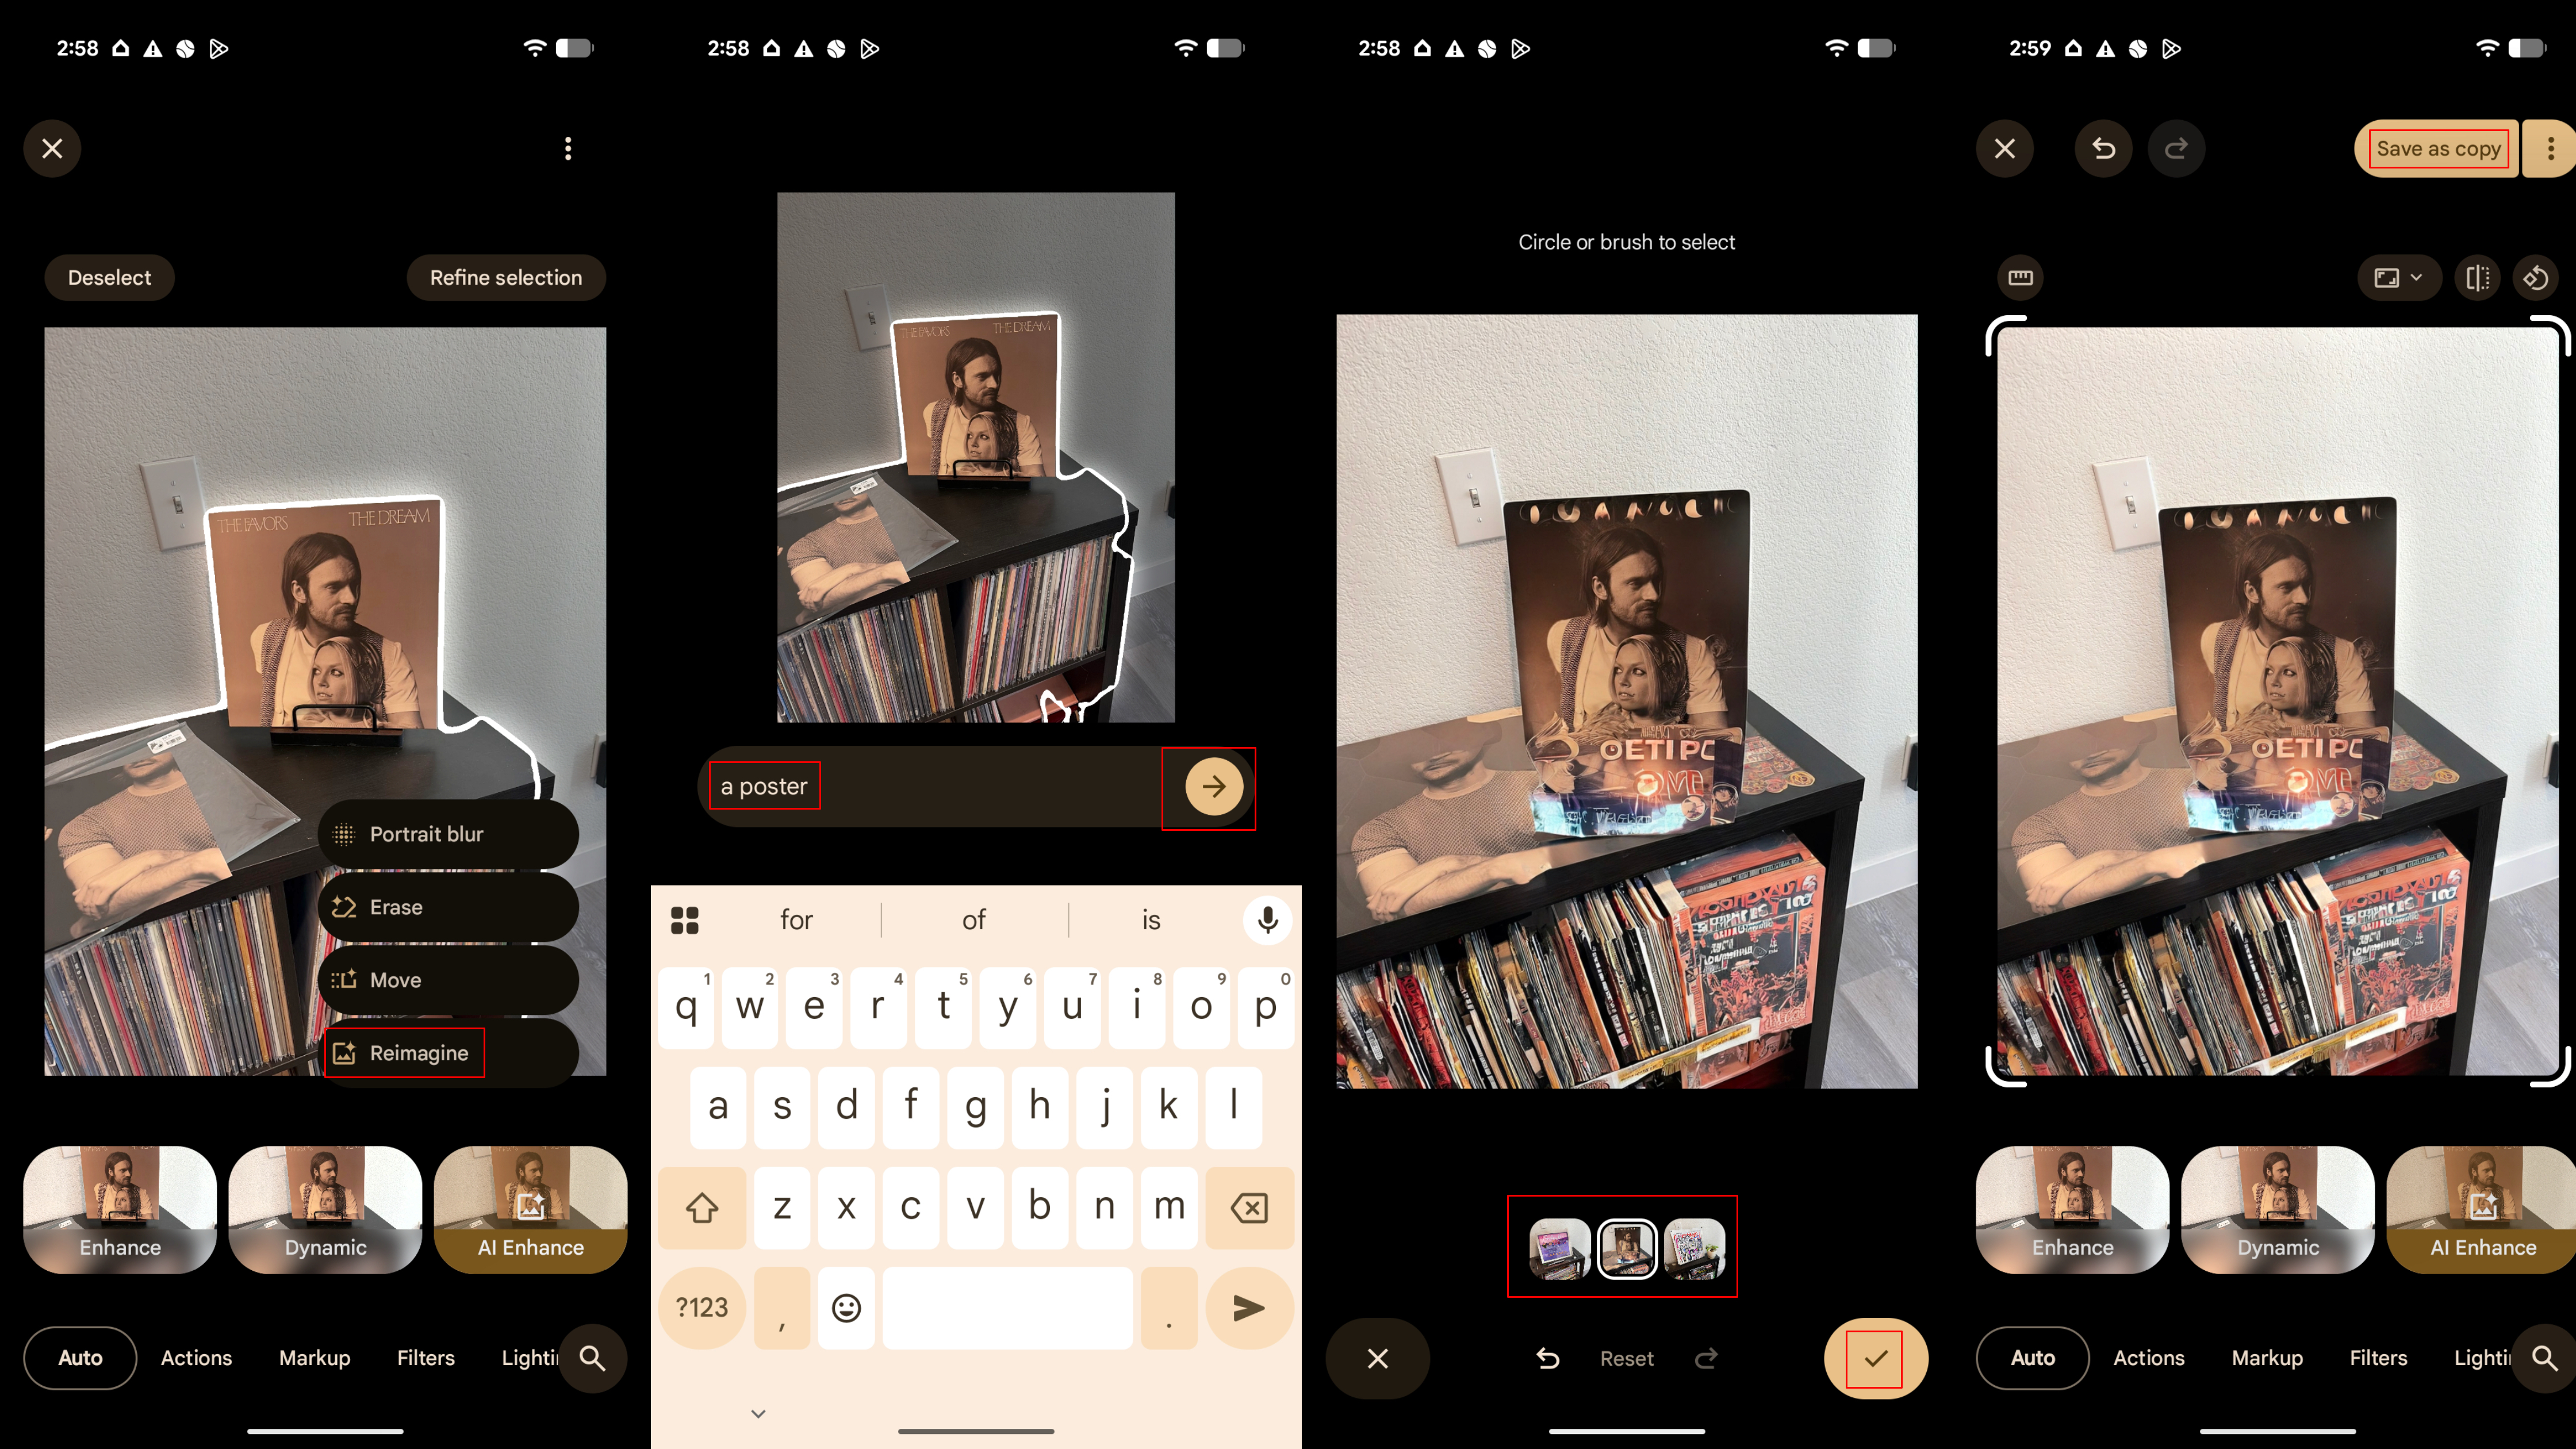
Reimagine is a generative AI tool built into the Google Photos editor. Rather than merely erasing objects, Reimagine changes your image by modifying and adding things to the photo using generative fill. You can try it by following the steps below:
1. Open the Google Photos app and select a photo.
2. Tap the Edit button in the toolbar.
3. Tap or circle the part of the photo you want to modify and press Reimagine.
4. Type a prompt into the Reimagine text box and press the arrow to continue.
5. Choose an option and press the checkmark when finished. Alternatively, go back and type a new prompt to get better results.
6. Tap the Save as copy button to add the new image to your Google Photos library.
Google Photos: How to use Auto Frame
Not sure how to crop and frame an image to get the perfect look? Auto frame can do it for you automatically within the standard Google Photos crop tool. Here's how to use it:
1. Open the Google Photos app and select a photo.
2. Tap the Edit button in the toolbar.
3. Open the Actions tab and select Crop.
4. Press Auto frame.
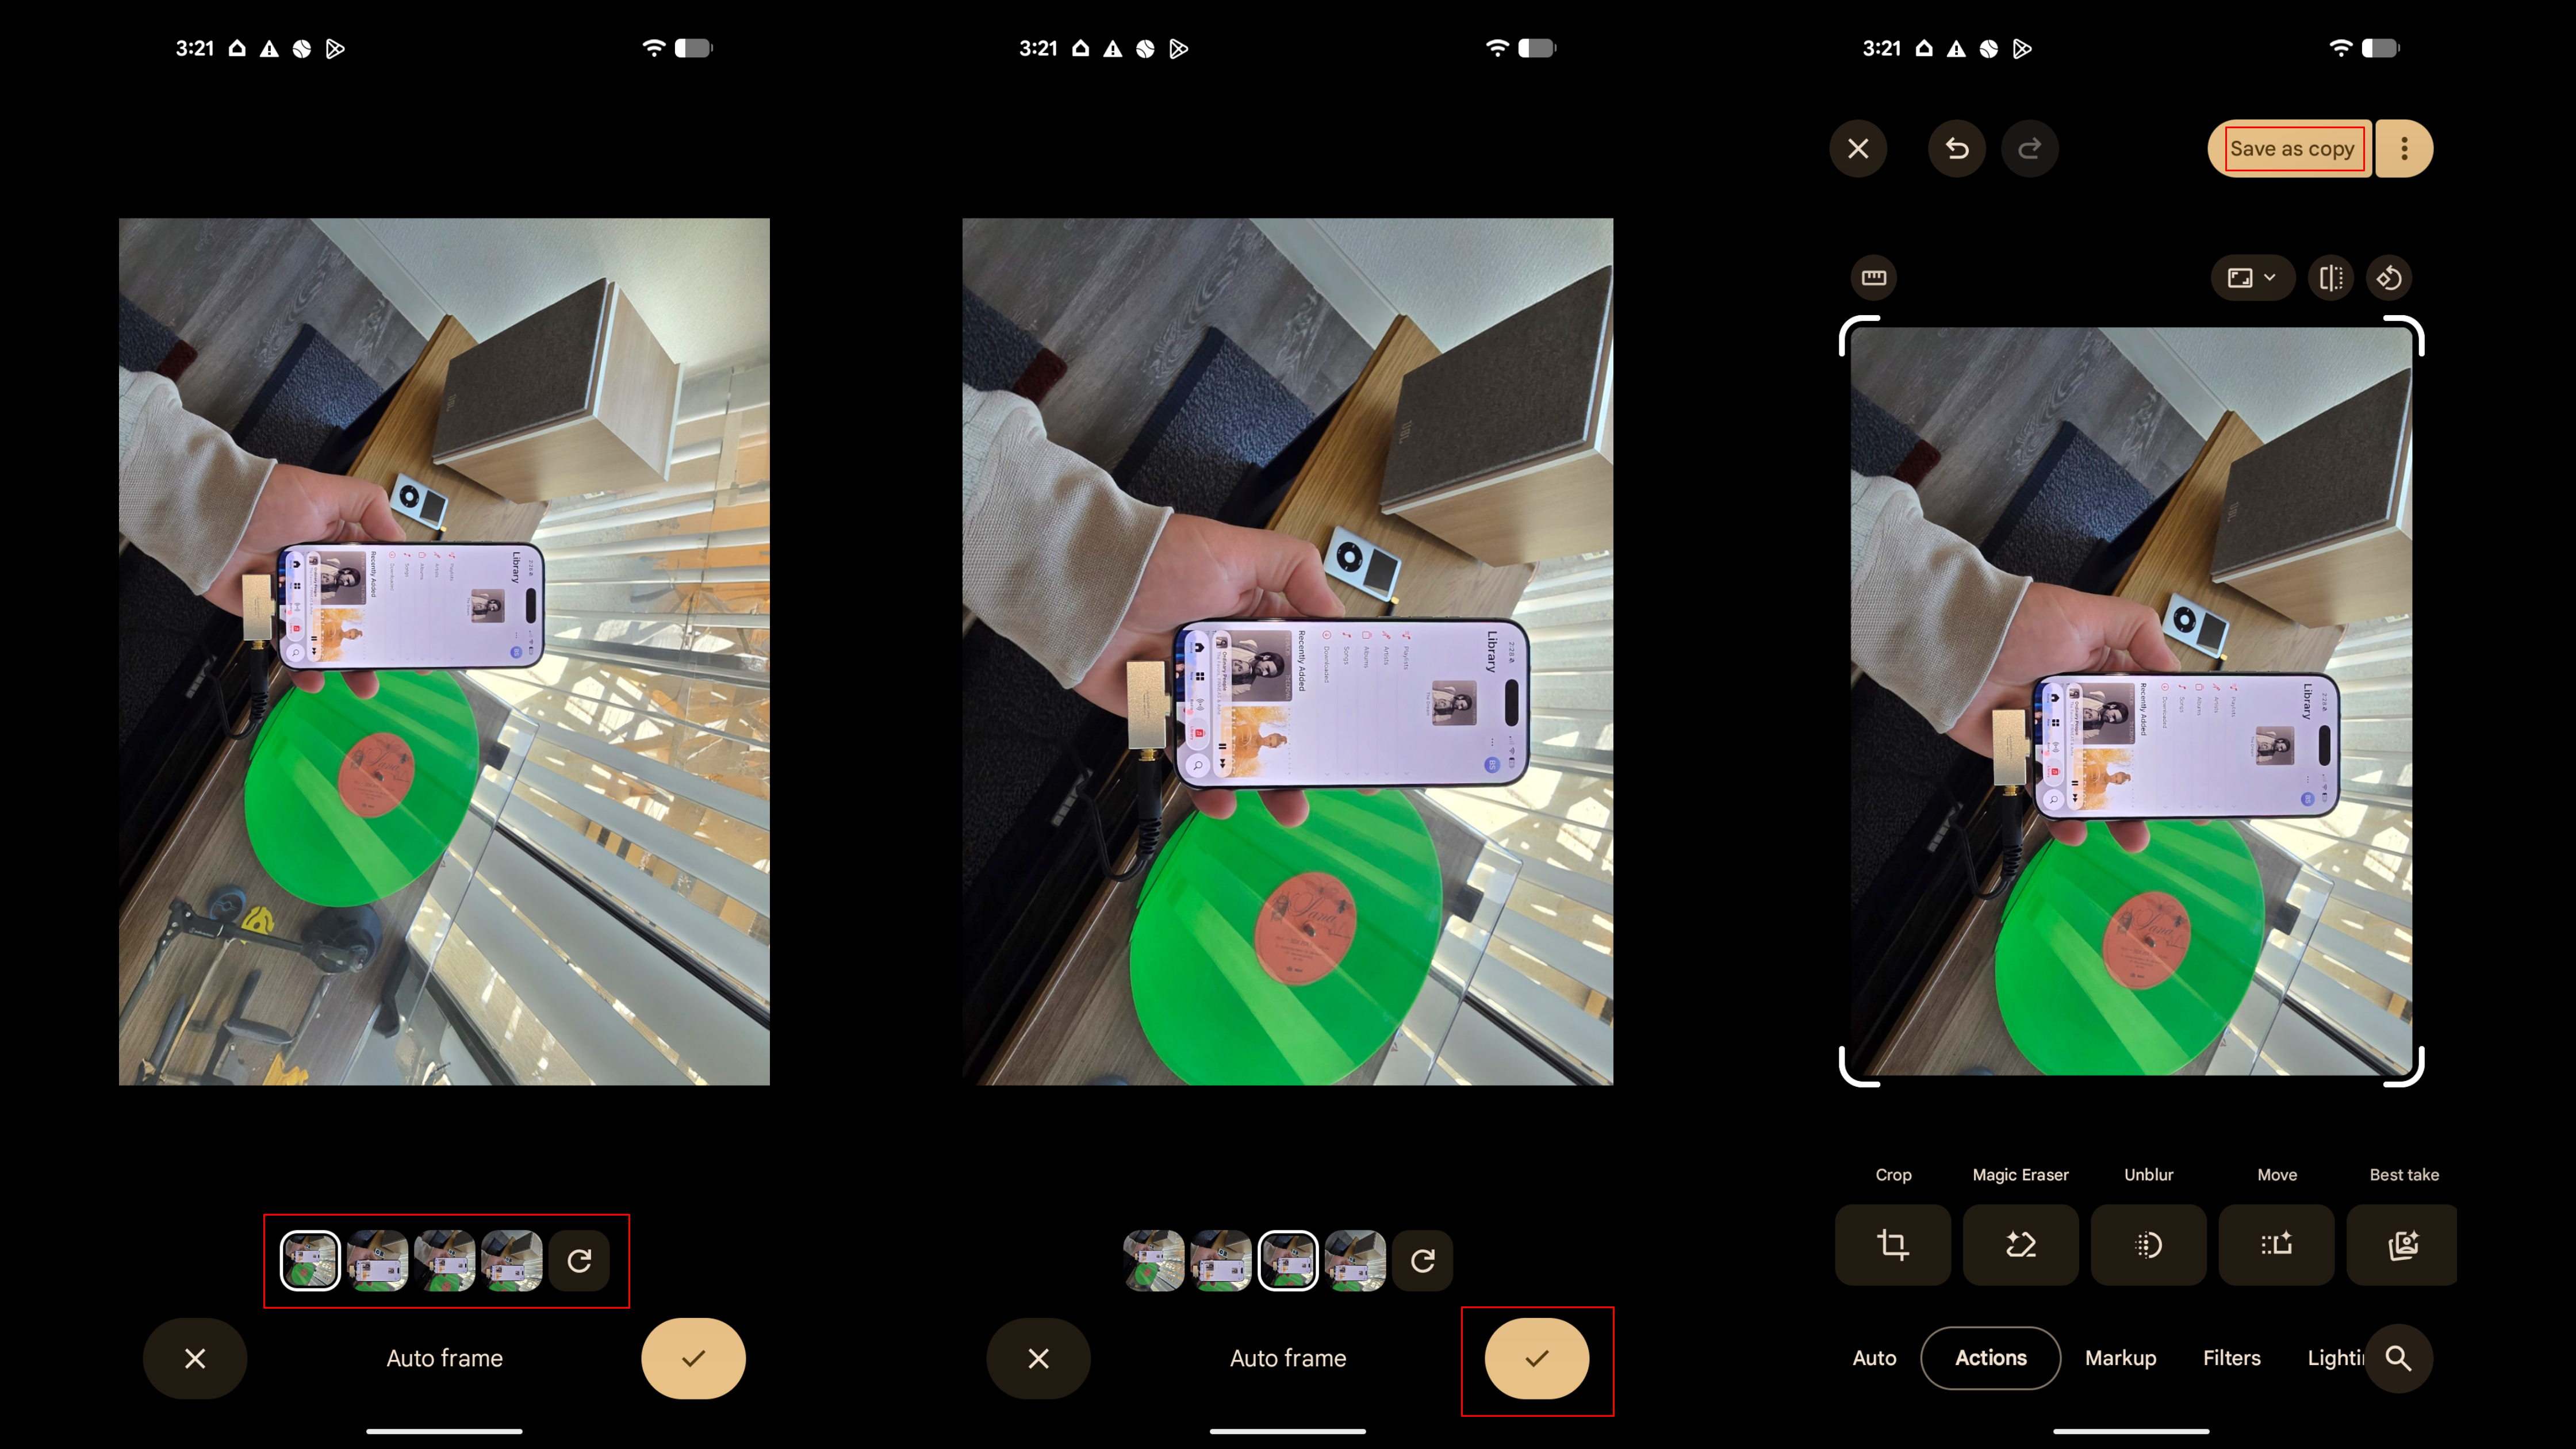
5. Wait for Auto frame to generate options, then select your favorite.
6. Tap the checkmark to continue.
7. Press the Save as copy button to add the new image to your Google Photos library.
Google Photos: How to use Move
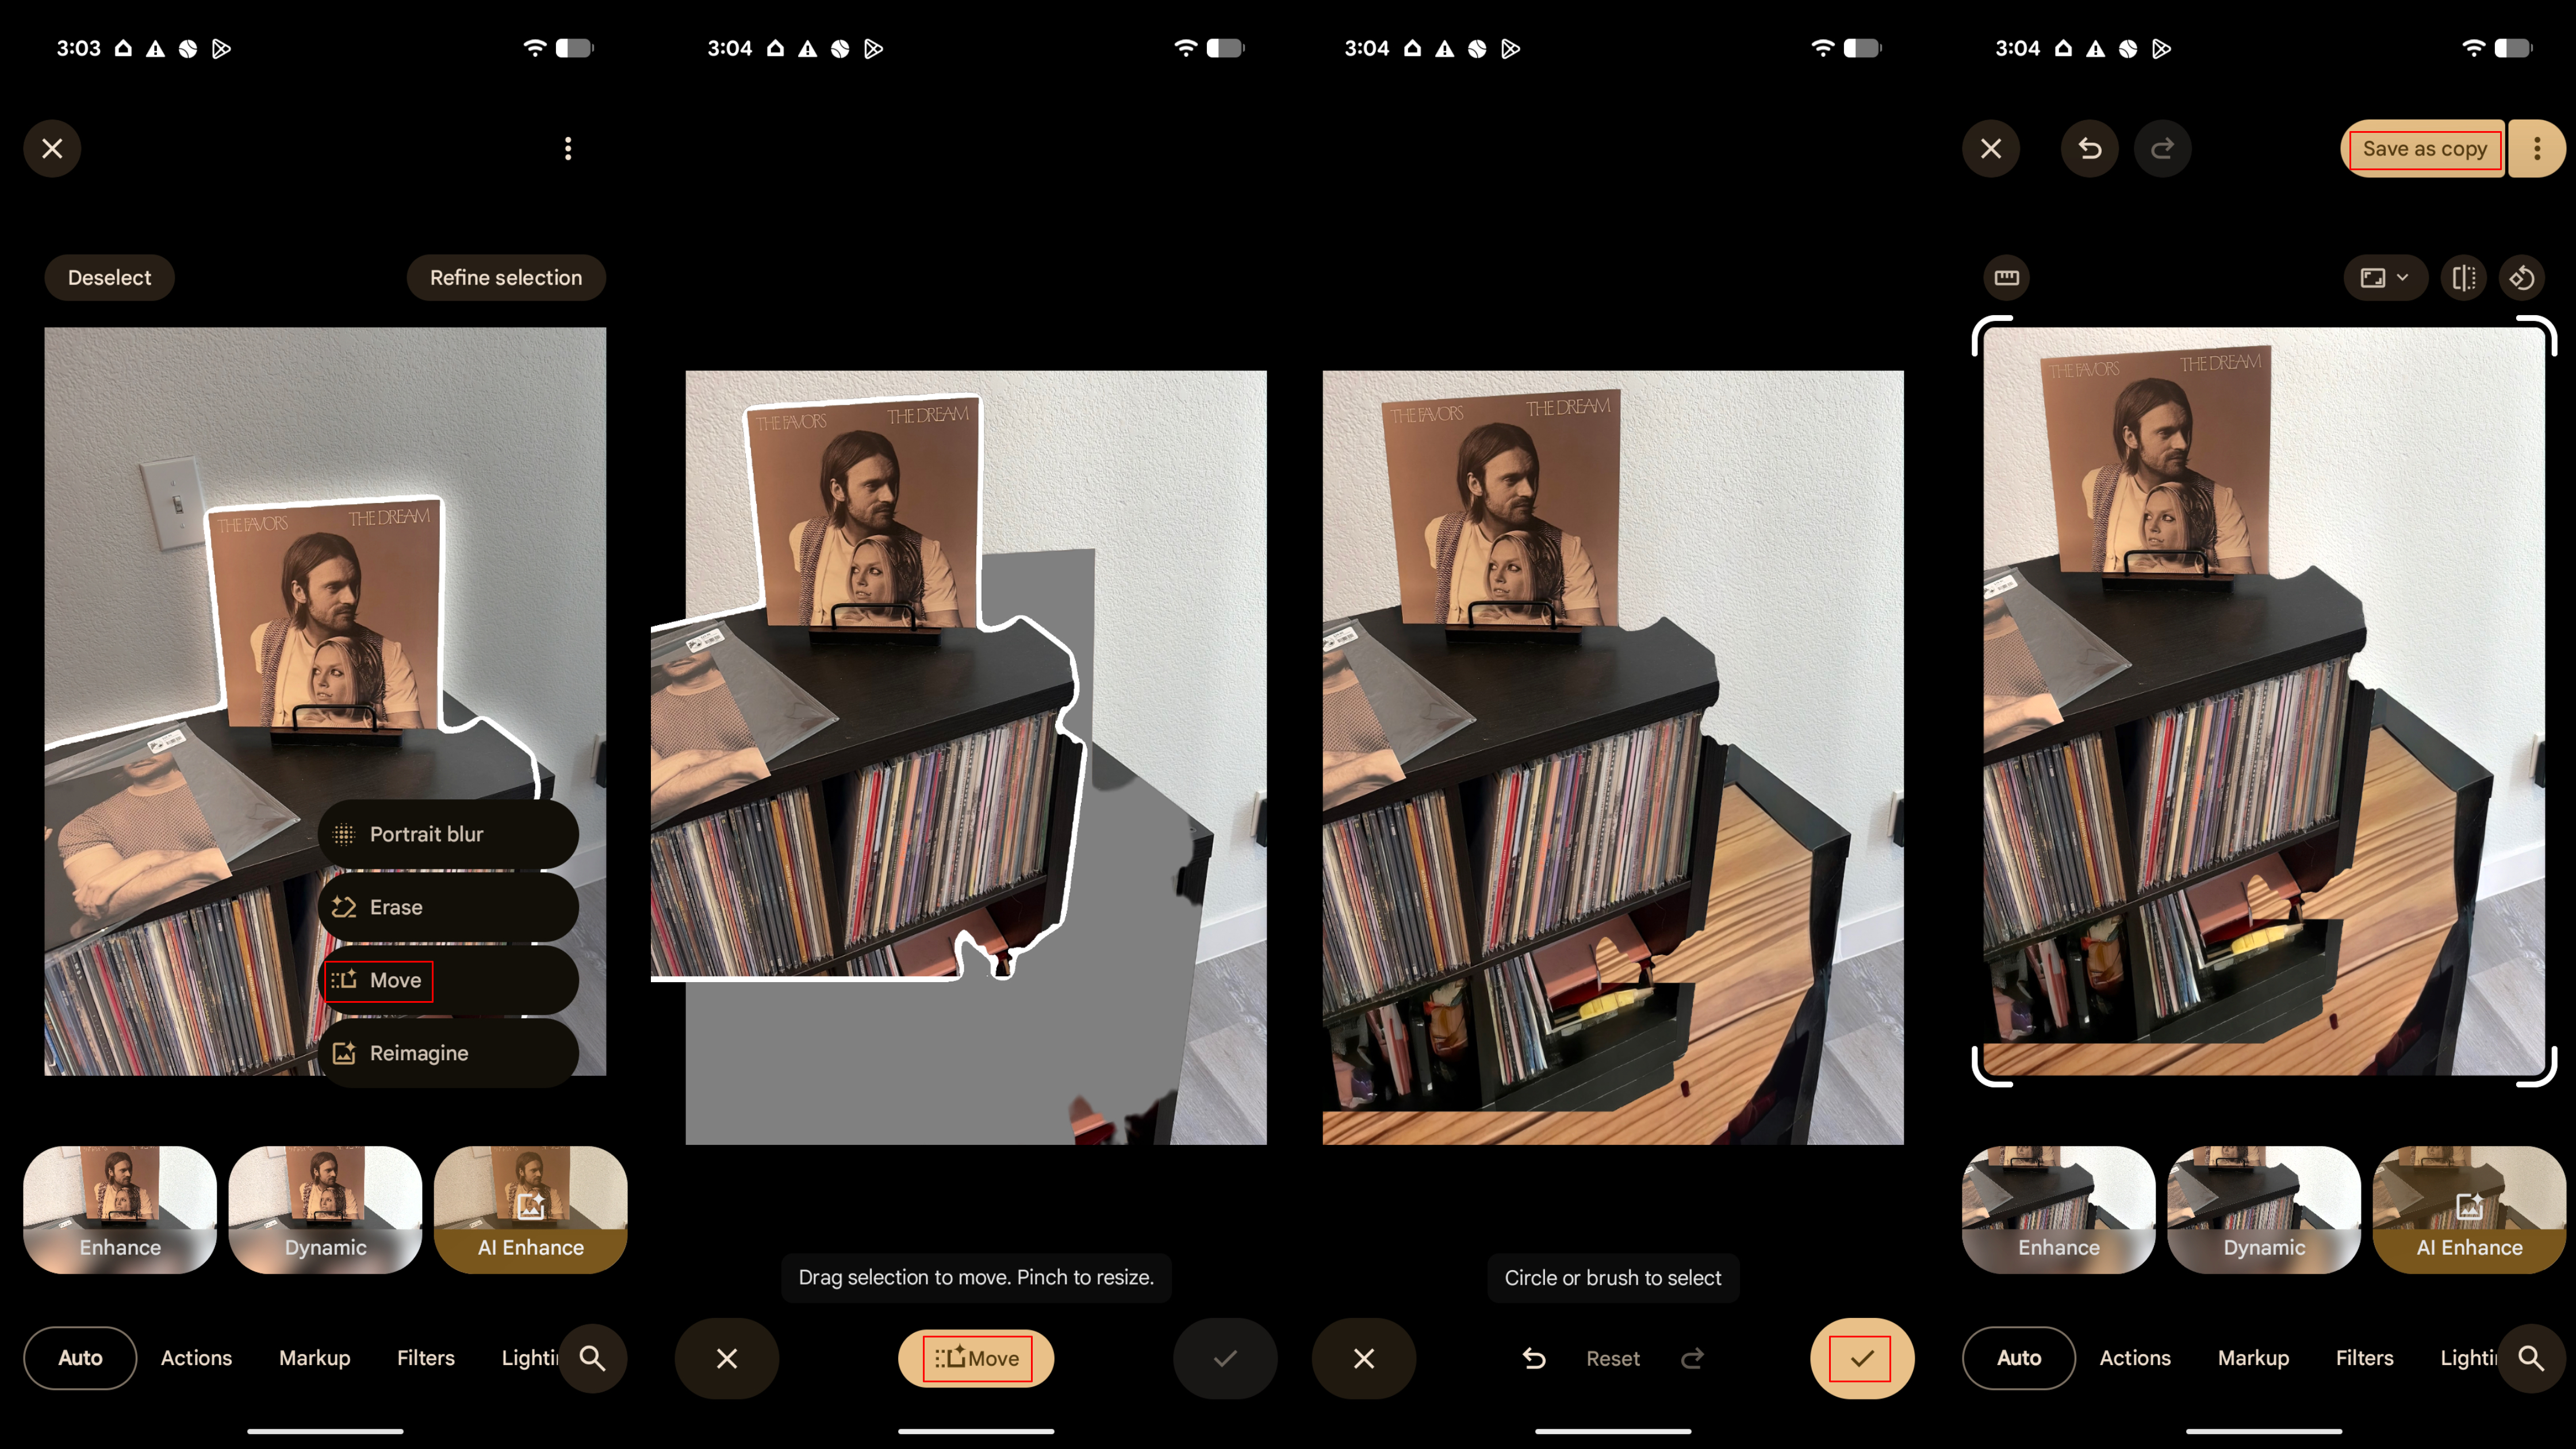
To adjust the location of something in your photo, the Google Photos editor has a tool called Move. It essentially allows you to select an object, drag it to where you want it, and use AI to fill in the empty spot left behind. Here's how to use it:
1. Open the Google Photos app and select a photo.
2. Tap the Edit button in the toolbar.
3. Tap or circle the part of the photo you want to modify and press Move.
4. Touch and hold to move the part of the photo, and pinch to resize. Then tap Move when finished.
5. Press the checkmark if you're happy with the results, or tap the back button to try again.
6. Tap the Save as copy button to add the new image to your Google Photos library.
Google Photos: How to use Zoom Enhance
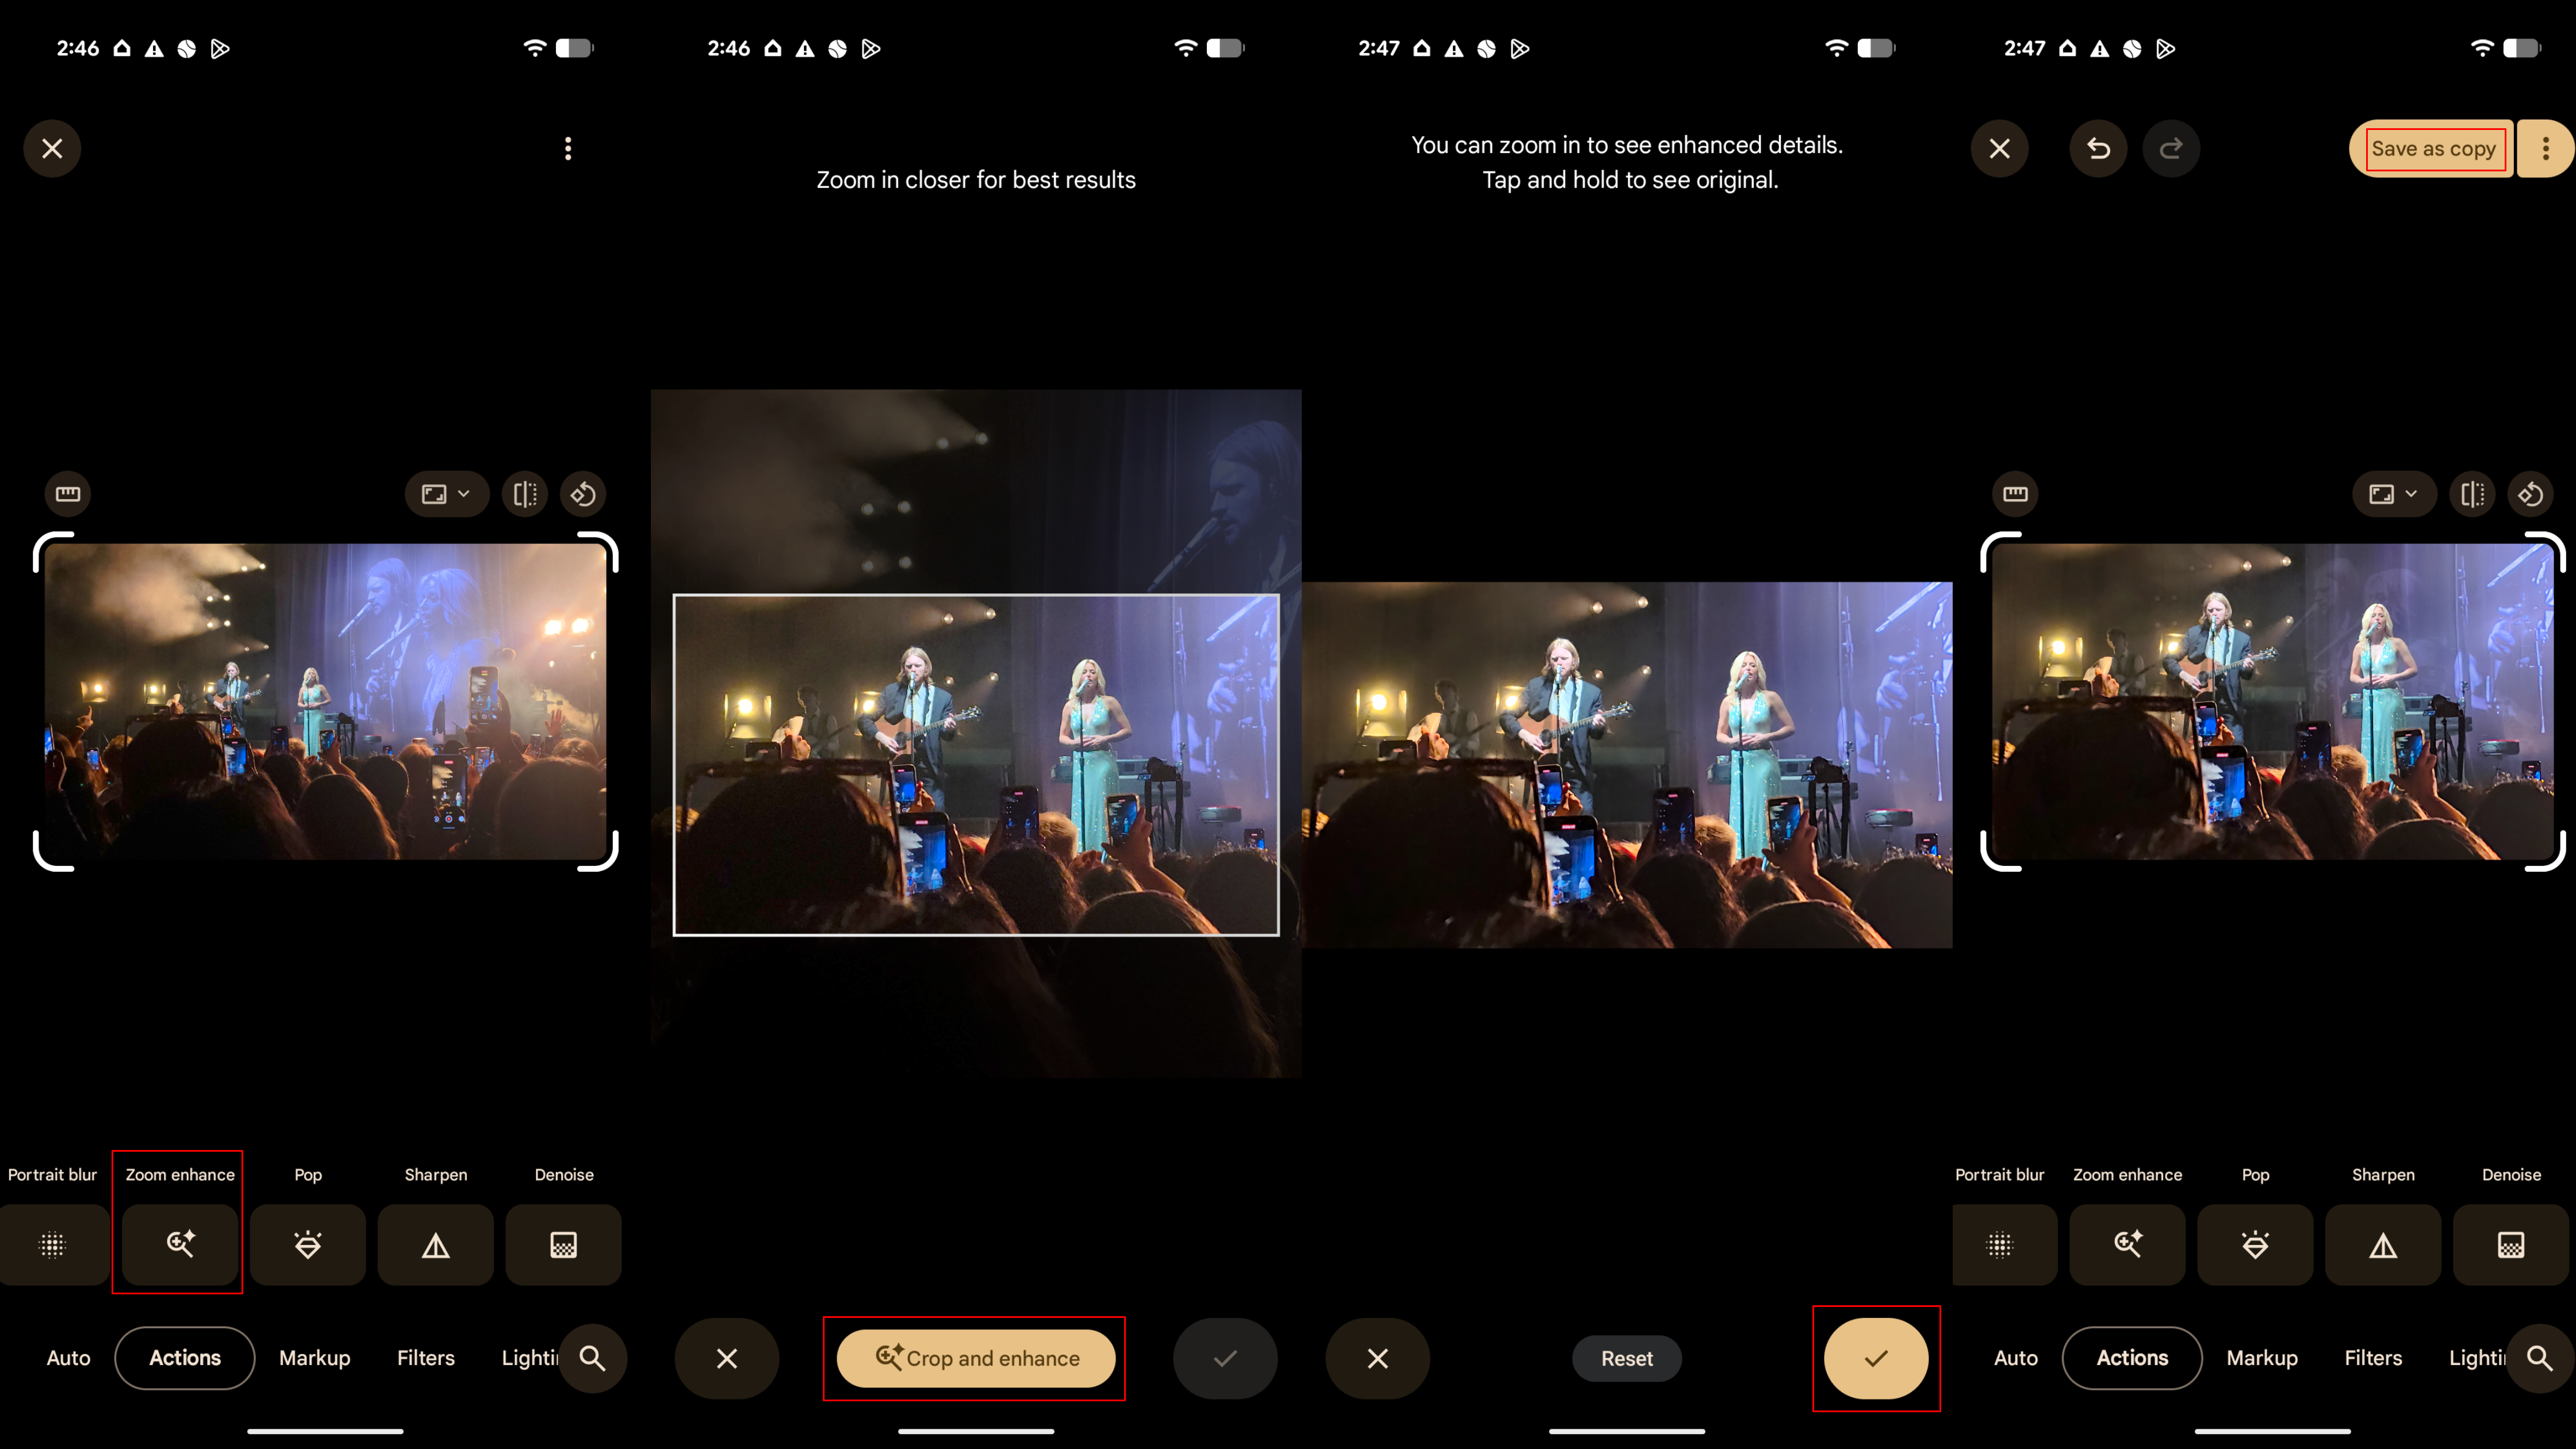
Zoom Enhance uses AI to improve your crops and digital zoom by enhancing the photo and removing grain and artifacting. Since digital zoom is lossy, the artificial intelligence aims to preserve as much of the original detail as possible by filling the gaps with generation. Here's how to use it:
1. Open the Google Photos app and select a photo.
2. Tap the Edit button in the toolbar.
3. Open the Actions tab and select Zoom Enhance.
4. Zoom in and tap Enhance Details.
5. After the image finishes enhancing, tap the checkmark to finish, and tap and hold to compare to the original.
6. Press Save as copy to add the zoomed and enhanced photo to your gallery.
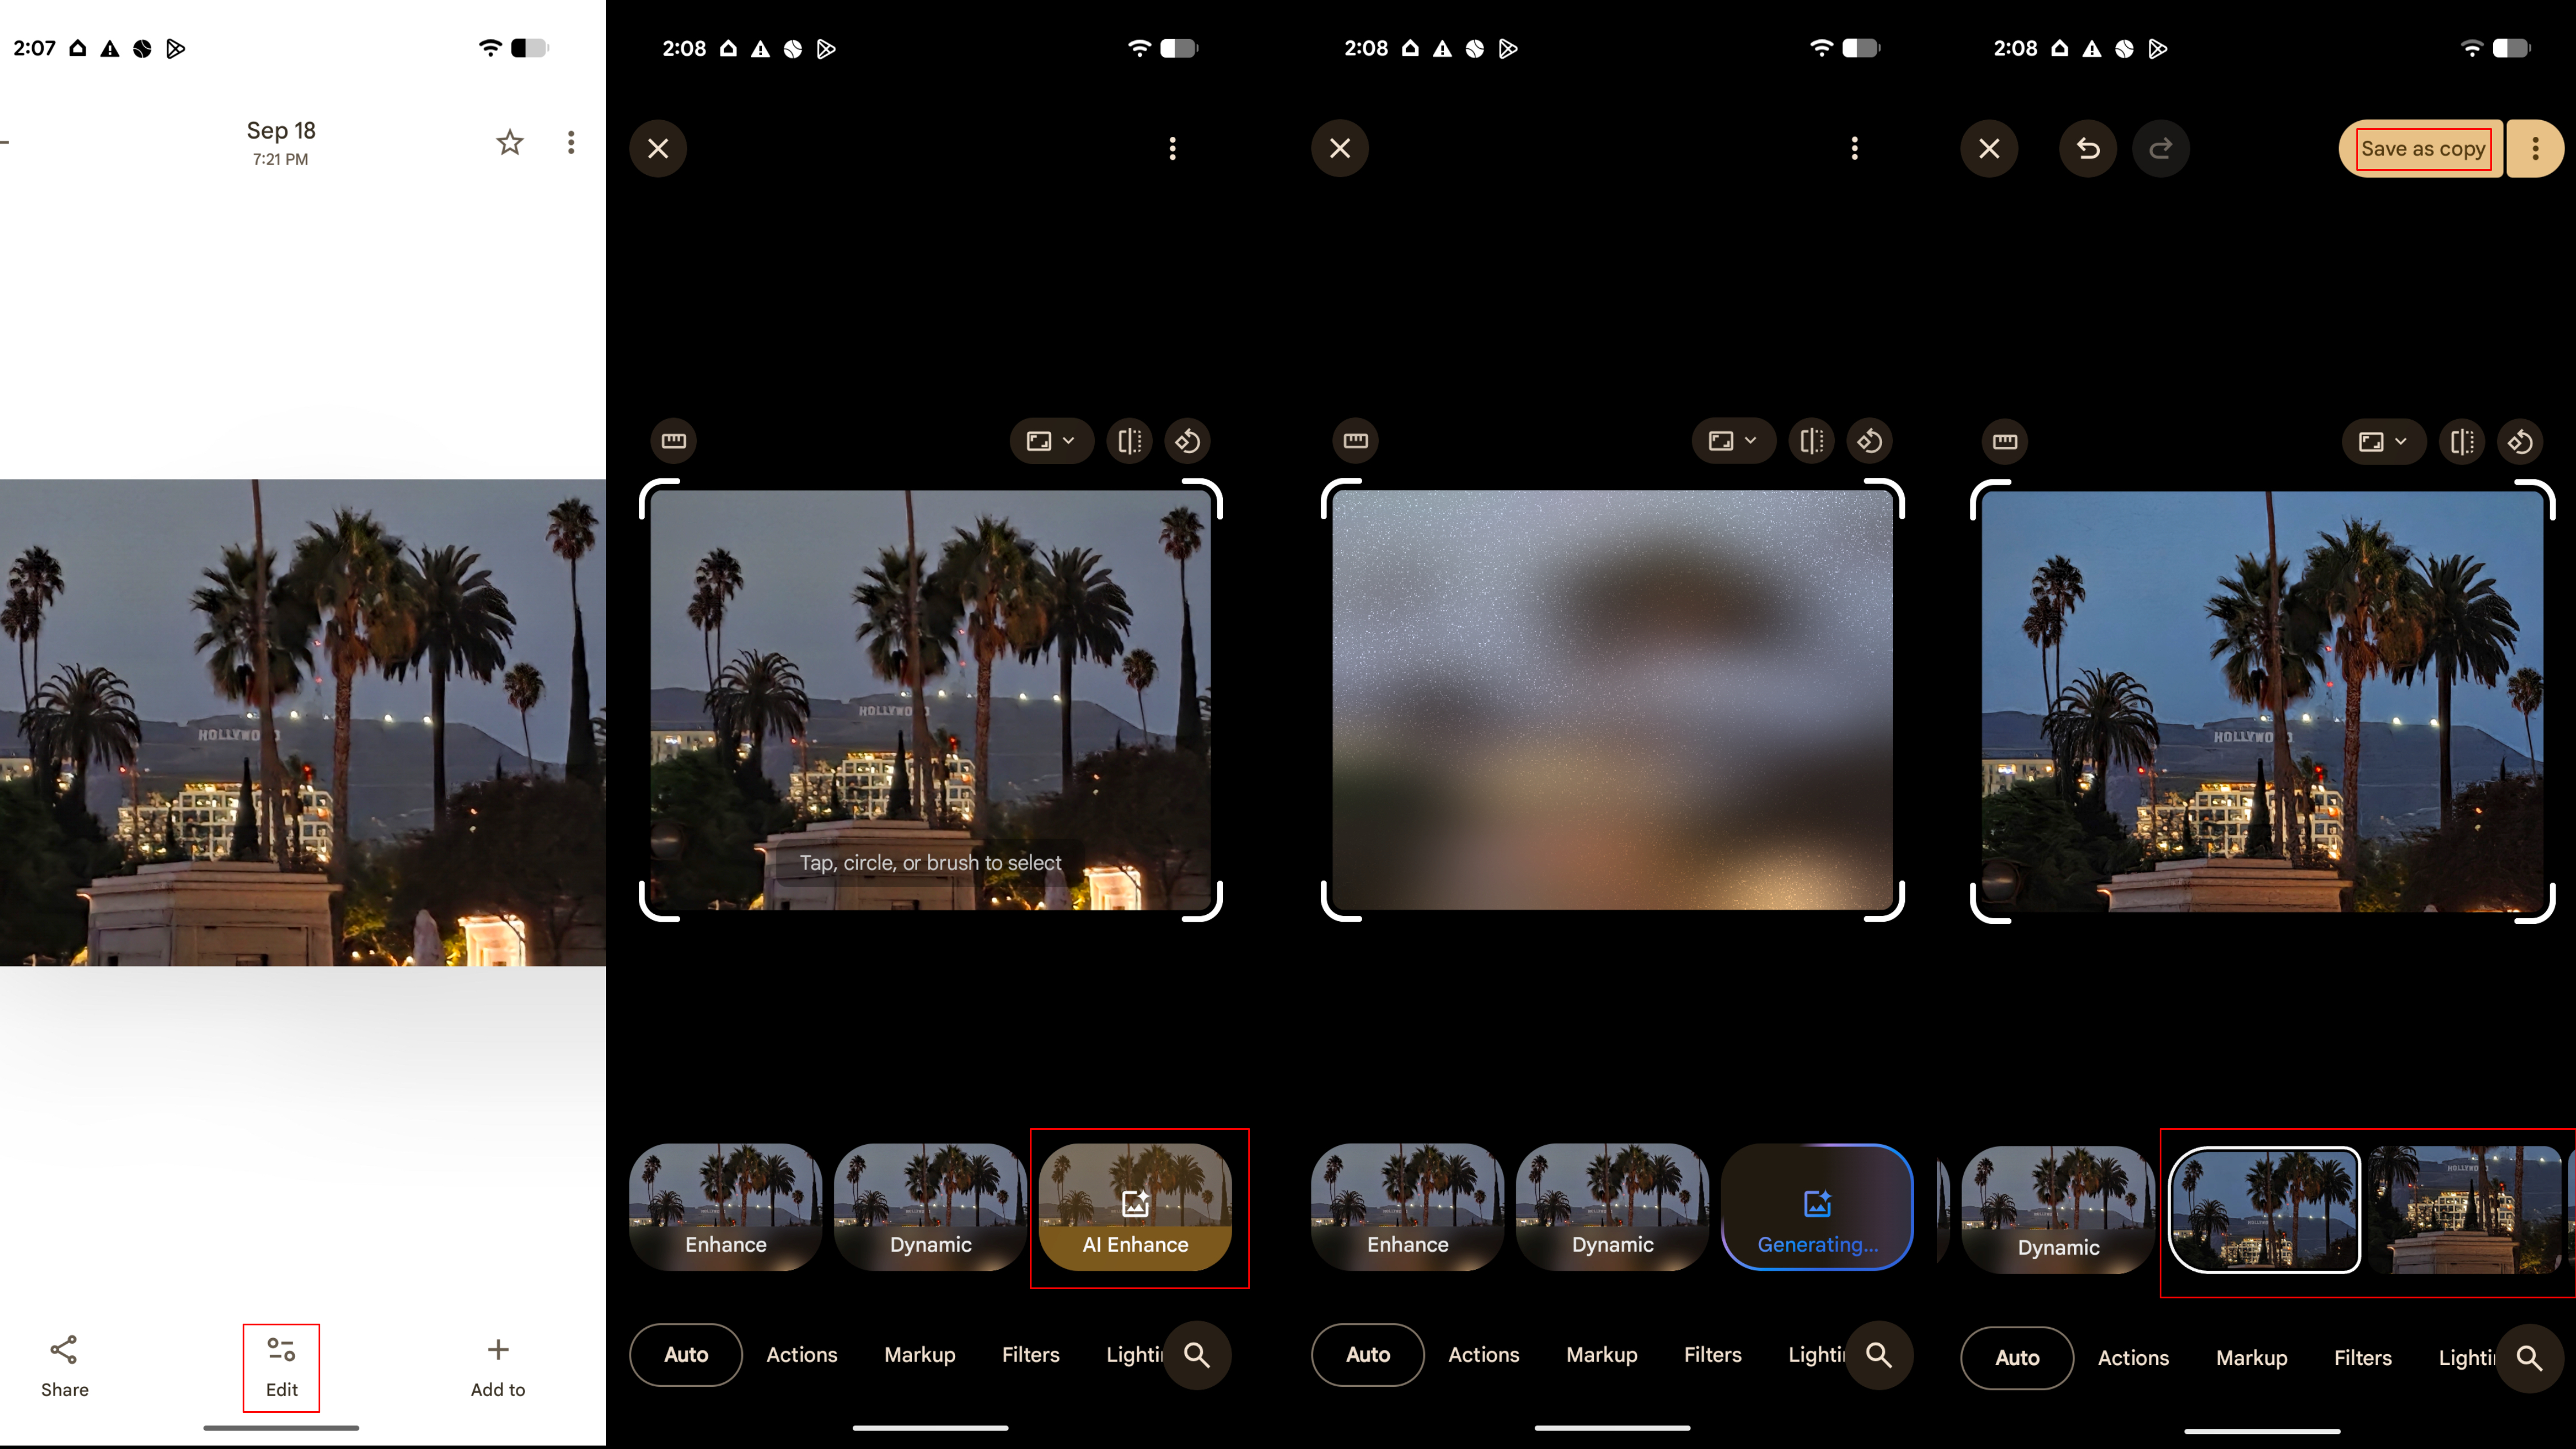
Google Photos: How to use AI Enhance
AI enhance is a quick way to improve the quality of an image in Google Photos, as it can adjust colors, lighting, and add clarity all at one. Here's how to use it:
1. Open the Google Photos app and select a photo.
2. Tap the Edit button in the toolbar.
3. Press AI Enhance to enhance the image.
4. Swipe through the options and tap Save as copy when finished.
Google Photos: Tips & tricks
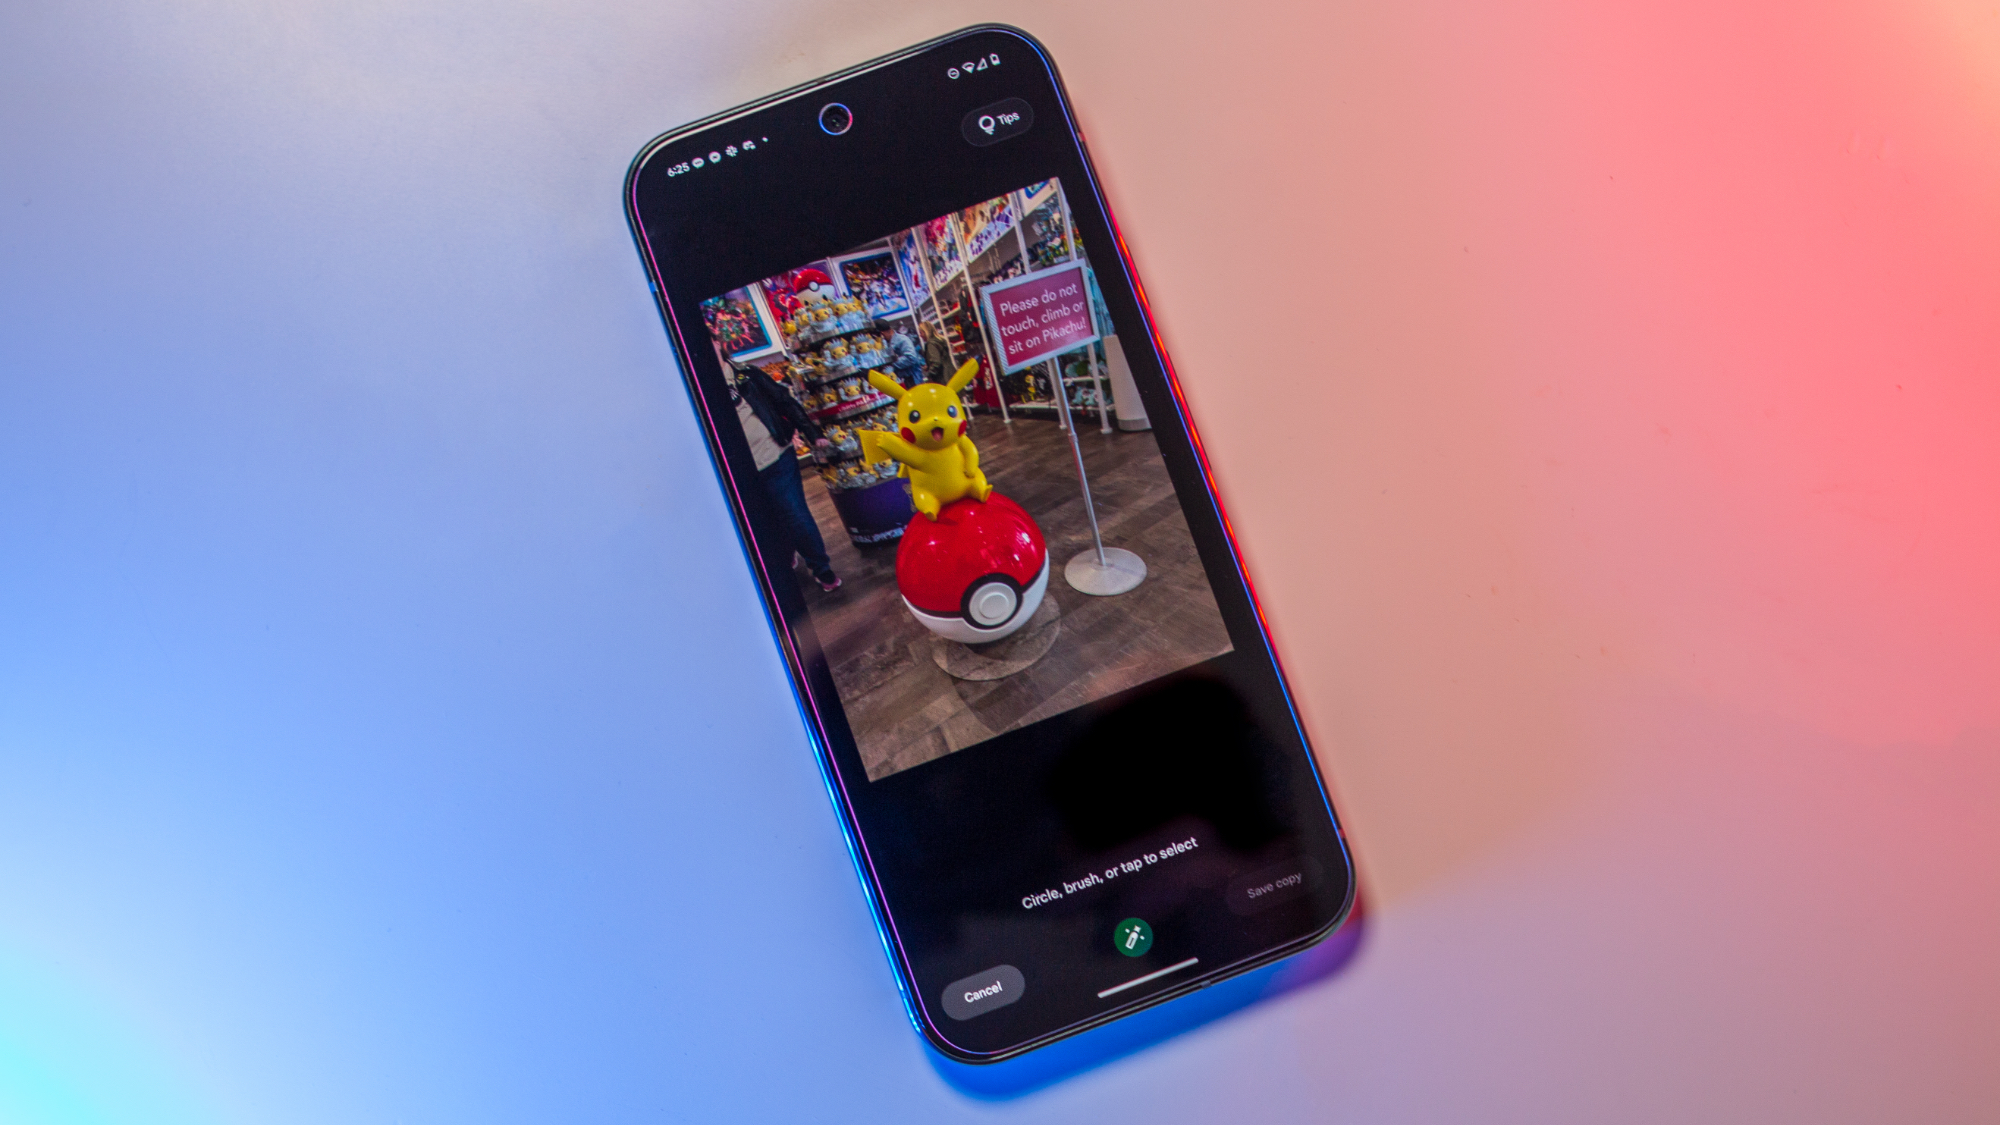
The best trick for navigating the redesigned Google Photos editor is the search bar. It's clutch for quickly accessing an AI editing tool that you can't find in the toolbar. After you open the search bar, you'll see a scrollable list of edit tools that is much easier to navigate than the toolbar with multiple menus. As you type in your search query, the list shrinks to only include the tools that match your request.
Also, keep in mind that Google maintains Magic Editor isn't removed, but rather split up into the standalone features of Magic Eraser, Auto frame, Move, and Reimagine. While the Magic Eraser tool was formerly known as a lesser version of Magic Editor, that isn't the case anymore following the update. All your favorite AI editing tools are still here, they may just be in a different spot or listed under a different name.
While many of these features are crossplatform, for the best experience, you may need a Google Pixel phone or a Google AI Pro subscription.
The best Google Photos experience
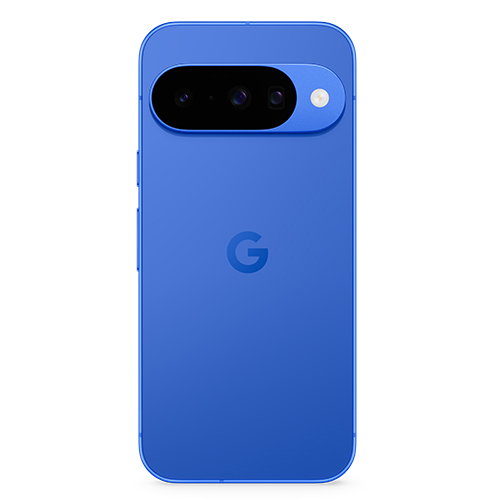
To get all the latest AI editing features in Google Photos, you'll need the Pixel 10. It comes with all the tools we've covered in this article, plus extras like Camera Coach, which helps you take better photos before you press the shutter.

Brady is a tech journalist for Android Central, with a focus on news, phones, tablets, audio, wearables, and software. He has spent the last three years reporting and commenting on all things related to consumer technology for various publications. Brady graduated from St. John's University with a bachelor's degree in journalism. His work has been published in XDA, Android Police, Tech Advisor, iMore, Screen Rant, and Android Headlines. When he isn't experimenting with the latest tech, you can find Brady running or watching Big East basketball.
You must confirm your public display name before commenting
Please logout and then login again, you will then be prompted to enter your display name.
