How to set up and get started with Google Tez
Get the latest news from Android Central, your trusted companion in the world of Android
You are now subscribed
Your newsletter sign-up was successful
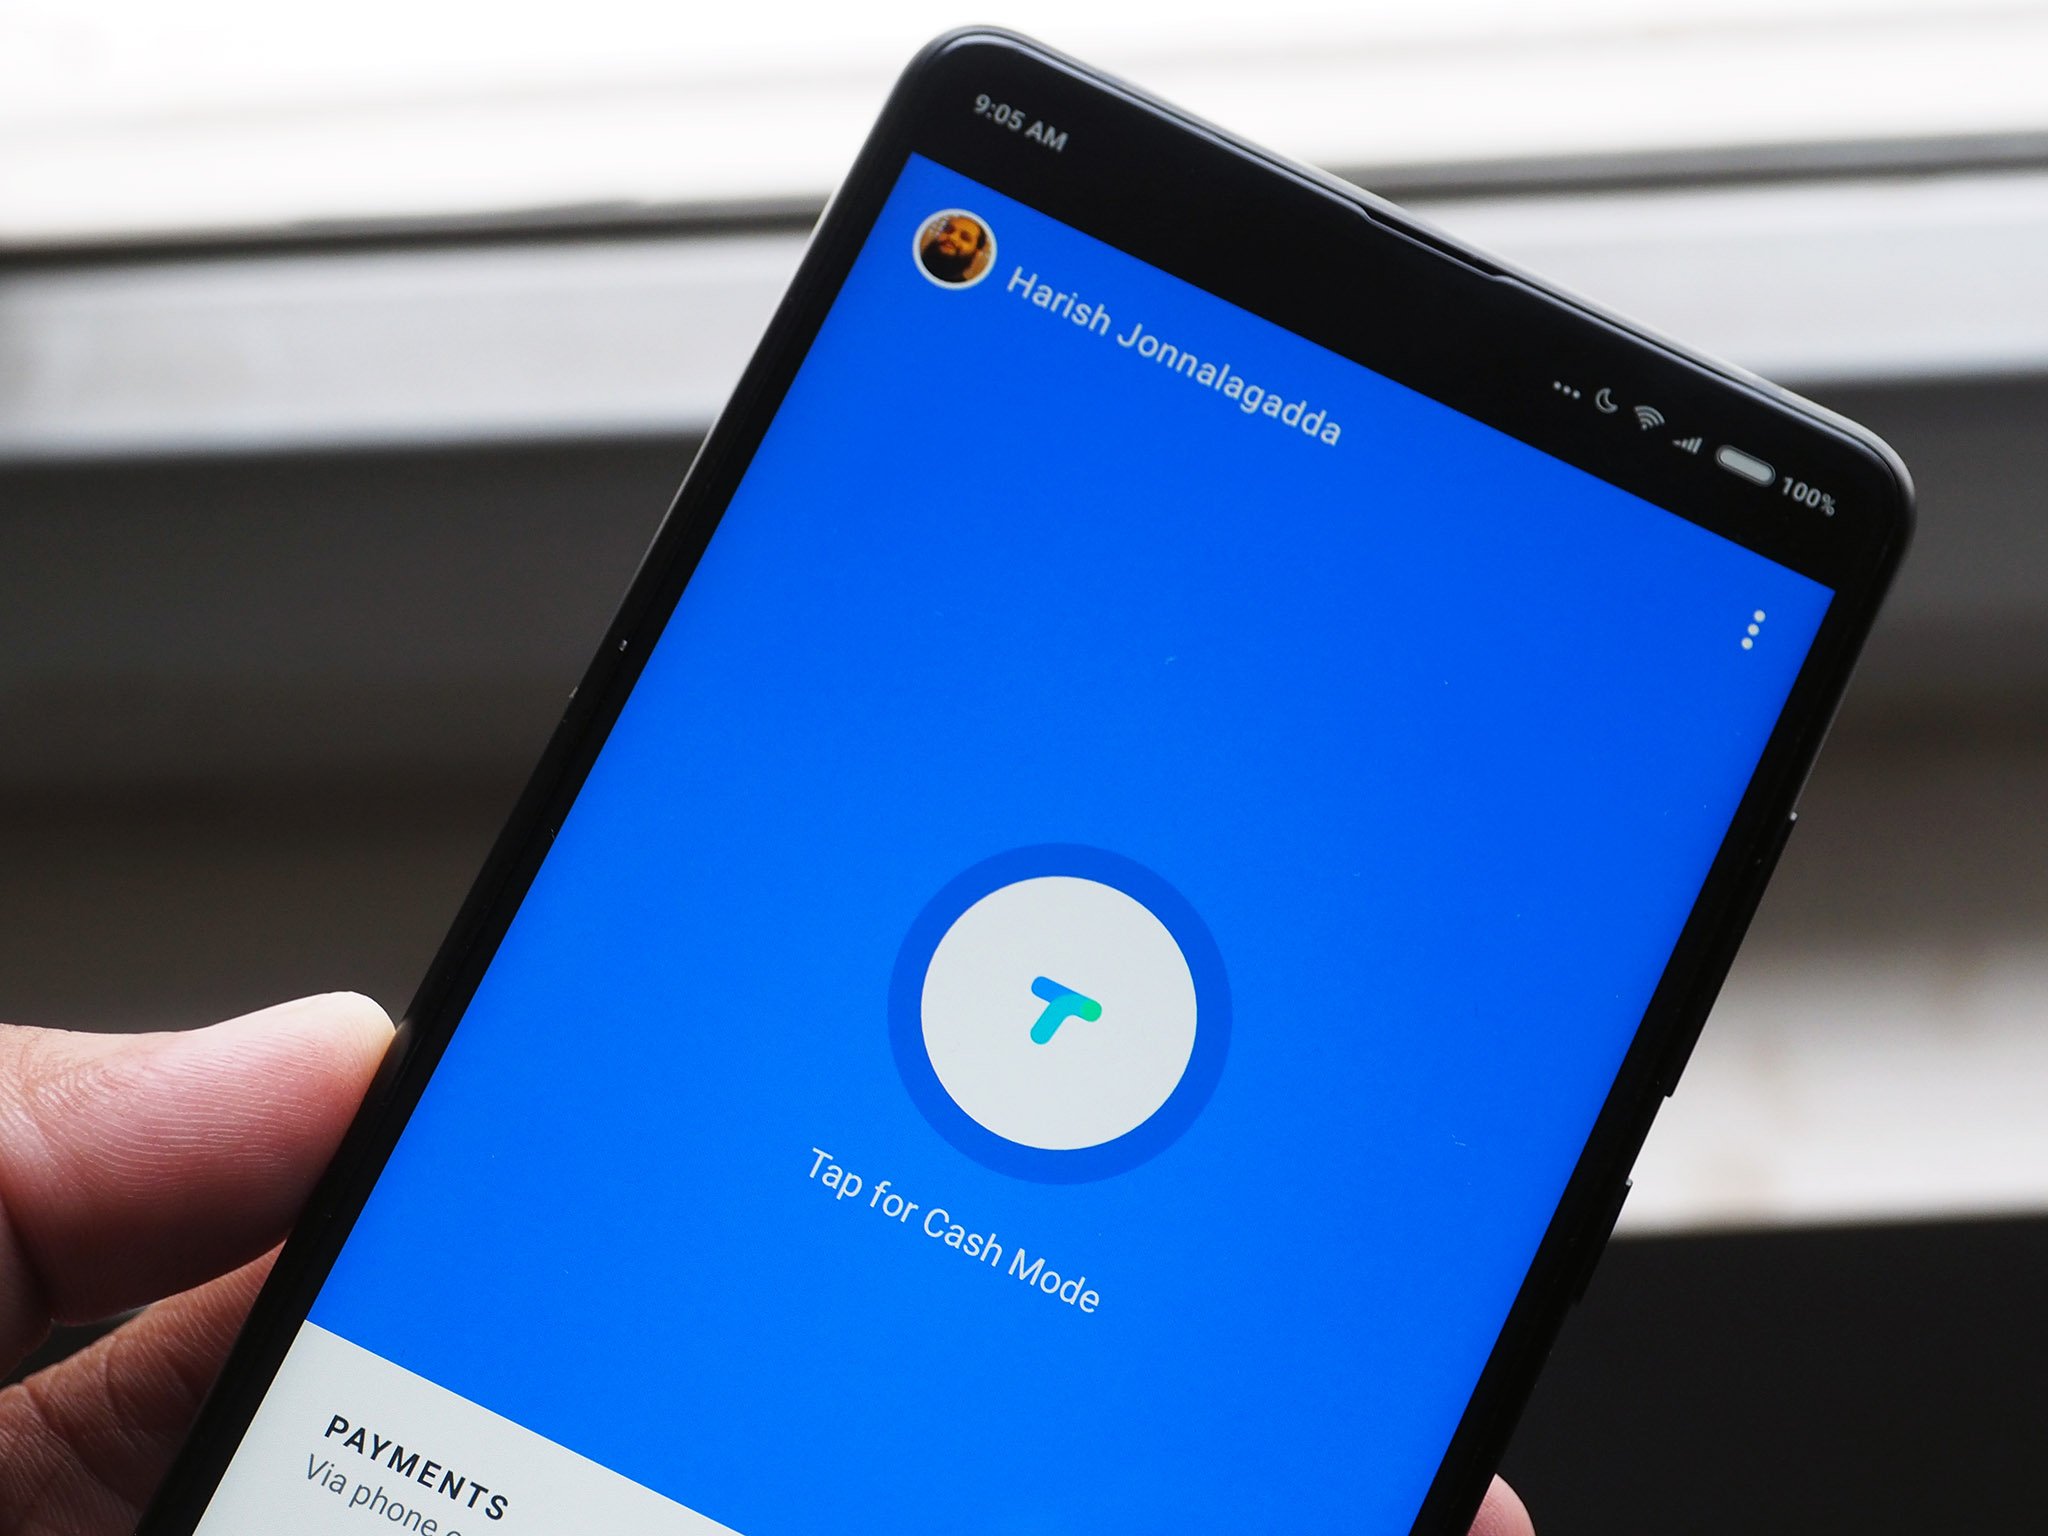
With digital payments on the rise in India, Google is making its foray into this segment with Tez, an all-new payments service designed for the Indian market. Tez stands for "fast" in Hindi, and the lightweight app has a minimal layout with easy-to-find options for transferring money using QR codes, UPI IDs, and a new Cash Mode that relies on audio QR to facilitate transfers.
The app comes in at 8MB, and is available in seven languages aside from English: Bengali, Gujarati, Hindi, Kannada, Marathi, Tamil, and Telugu. Tez works with all 55 banks that have registered with NPCI, the regulatory body overseeing Unified Payment Interface (UPI).
Google's payment service joins a crowded list of UPI apps already available in the market, including the government's own BHIM app. Banks have been offering their own UPI apps for some time now, with over 35 such apps available for download on the Play Store. For its part, Tez has a clean uncluttered layout along with a fraud detection service that ensures your transactions are secure. Here's how you can get started with Google's latest payments service:
How to install Google Tez
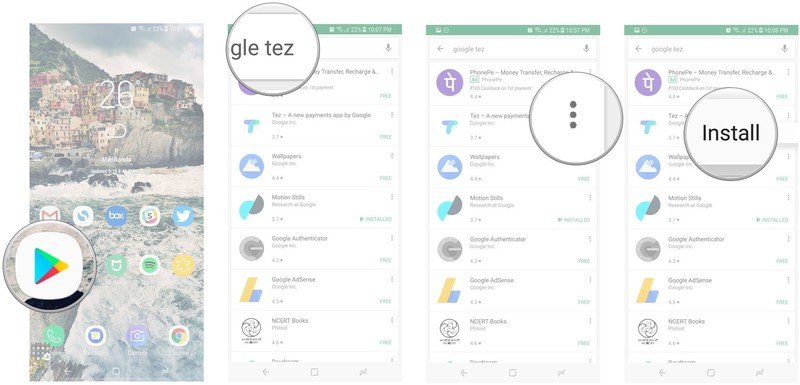
This part is straightforward. You can either go to g.co/tez from your phone to get the download link for the app, or head to the Play Store and manually search for Tez.
- Open the Play Store from your app drawer or the home screen.
- Search for Google Tez.
- Select the action overflow button (three vertical dots on the right) next to the Google Tez listing.
- Tap Install.
Hot to set up Google Tez
Once Tez is installed, we can get started with setting up the service. You'll need to provide a phone number during initial setup, and the number has to be the same as that registered with your bank account.
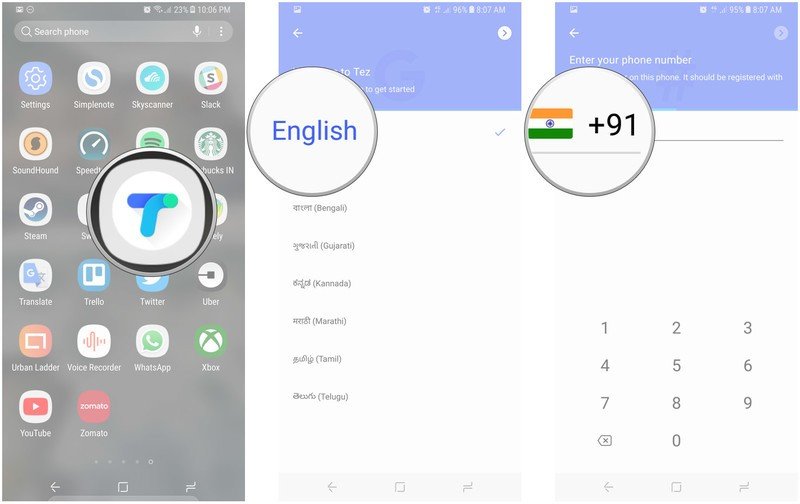
- Open Tez from your app drawer.
- Select a language from the list to get started.
- Enter your phone number.
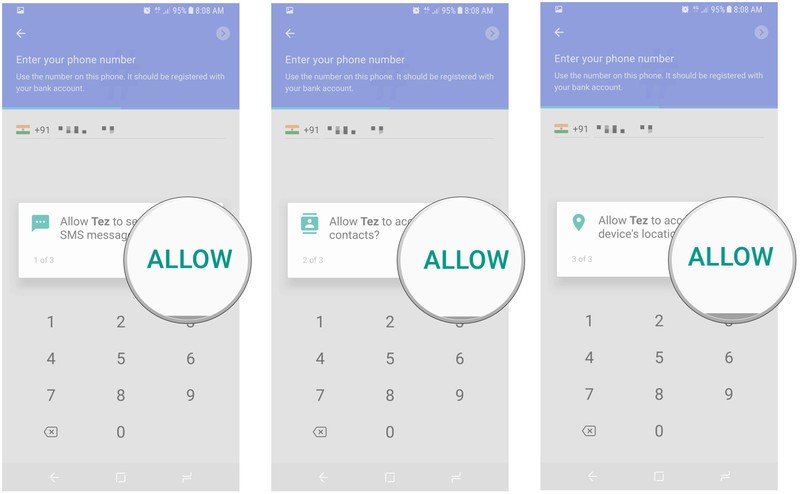
- Tez needs access to texts, contacts, and your device's location.
- After giving Tez access, you can choose the Google account you want associated with the service. If you're signed into a single account, it will be automatically selected.
- After selecting an account, tap Continue.
- Google will now send an OTP to verify your account. This process is automatic.
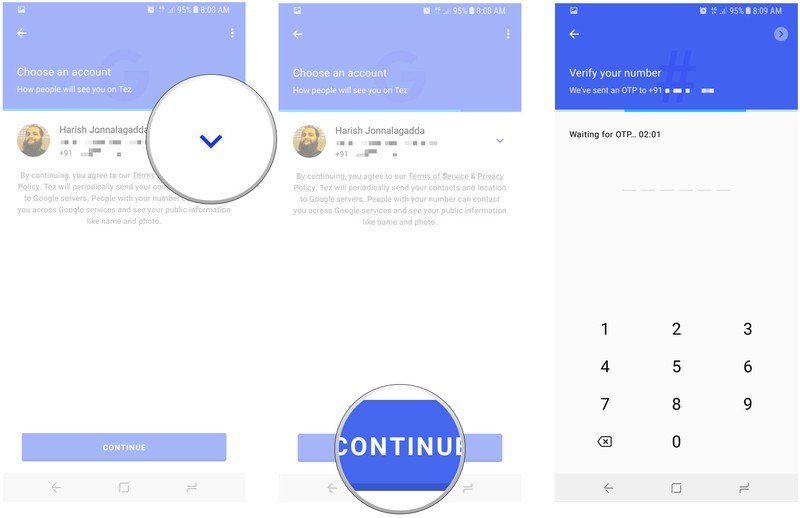
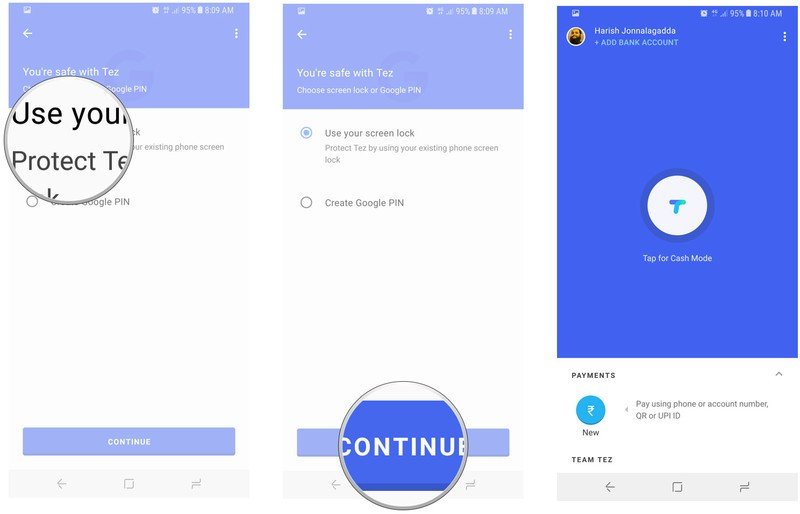
- After your phone number is verified, you'll be able to choose a PIN for Tez. You can select your existing screen lock or set up a new four-digit Google PIN just for the service.
- After choosing the screen lock, select Continue.
- The initial setup is now complete. You're directed to Tez's home screen, but before you can start sending or receiving money, you'll need to link your bank account with the service.
How to add your bank account in Google Tez
Tez needs two things to work — a phone number that's tied to your bank account, and a Google address. The former is to get your account details from your financial institution, and the latter is to pair your bank account to your Google account.
Once you set up Tez, you'll have to create a Virtual Payment Address (VPA). Unlike other banks, Tez doesn't give you the option to set up a customized address — the default is your Google account username followed by the issuing bank.
Get the latest news from Android Central, your trusted companion in the world of Android
For instance, if your Google account username is paymentsftw and your bank account is with ICICI, Tez will create a VPA along the lines of paymentsftw@okicici. The "ok" prefix seems to be common for all banks, as the HFDC account I added also had an "@okhdfc" address. Here's how to add your bank account in Google Tez:
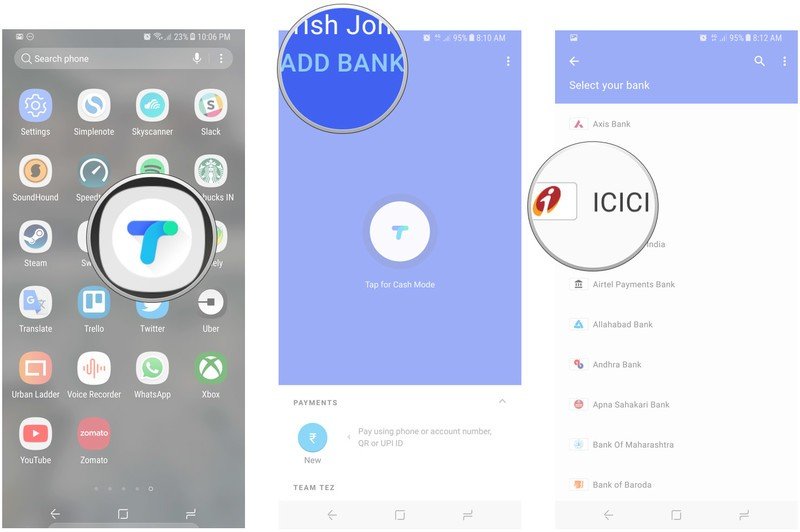
- Open Tez from the app drawer.
- In the home screen, select Add Bank Account.
- Choose your bank from the list.
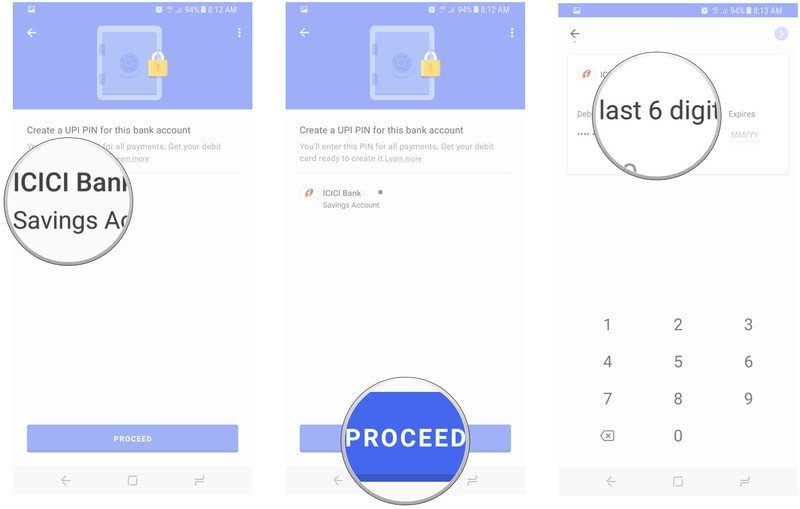
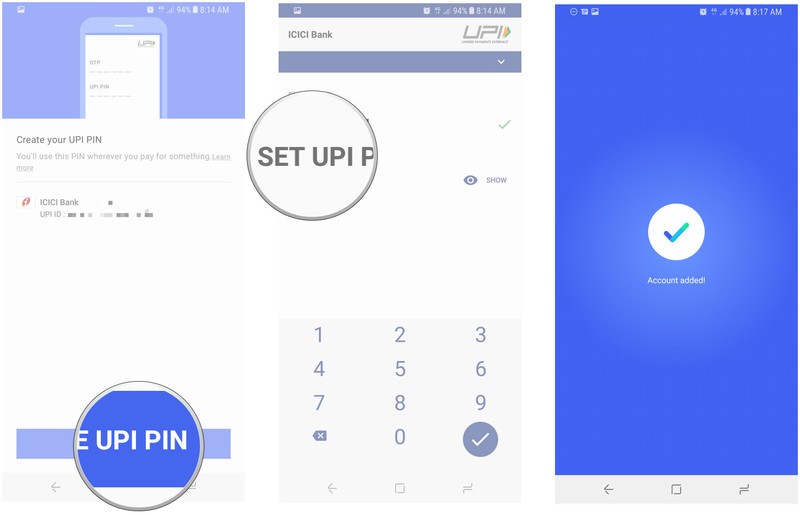
- Tez will create a UPI PIN for the bank account, which will be used every time you make a payment.
- To set up a PIN, tap Proceed.
- You'll need to authenticate your bank account by typing in the last six digits on your debit card and the expiry date.
- After adding your bank account, tap Create UPI PIN.
- You'll get an OTP to authenticate your card, after which you can key in the UPI PIN.
- After creating a PIN, you'll see a message that says that your account has been added successfully.
Now that your bank account is linked to Tez, you'll be able to send and receive money using the service. If you're having problems linking your bank account with Tez, you'll just need to try again after some time. I had some difficulties restoring my account details on another device, and it resolved itself after an hour.
How to transfer money in Google Tez
One of Tez's marquee features is the ability to transfer money without having to add payee details. Dubbed Cash Mode, the feature relies on audio QR to send out an ultrasound signal (inaudible to human ears) to locate nearby Tez users. The best thing about Cash Mode is that it works on all phones — all it needs is a speaker and a microphone.
Here's how to use Cash Mode in Tez:
- Tap the Tez logo in the middle of the home screen to initiate Cash Mode.
- Choose Pay to send funds, or Receive to get money from another user.
- After choosing an option, Tez will look for nearby users.
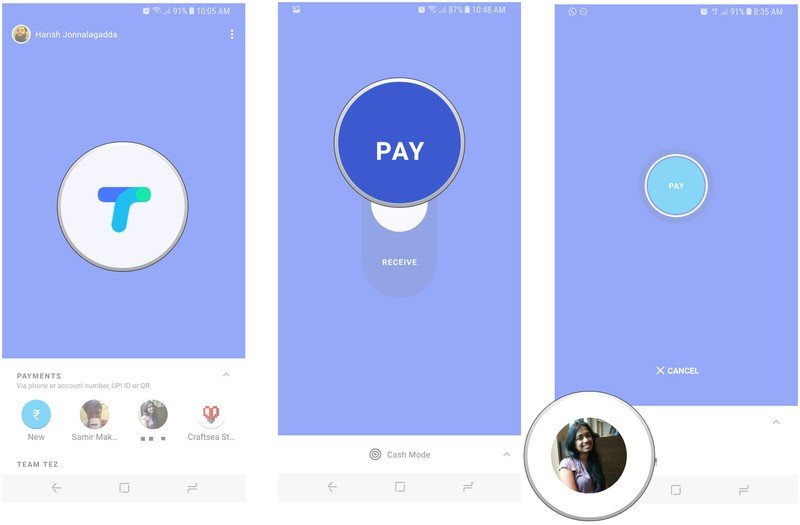
- Select a user to quickly transfer funds.
- Enter the desired amount, and tap Proceed to pay to initiate the transfer.
- Enter the UPI PIN to transfer the money.
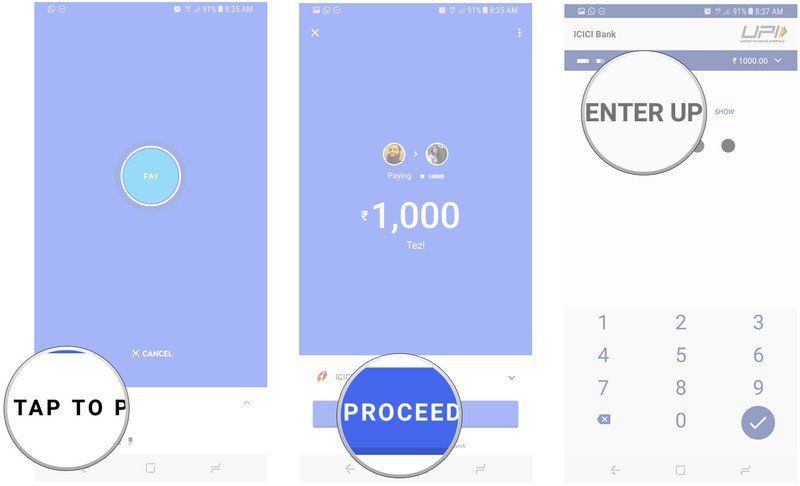
That's all there is to it. Cash Mode is incredibly convenient as it saves the hassle of entering account details or phone numbers.
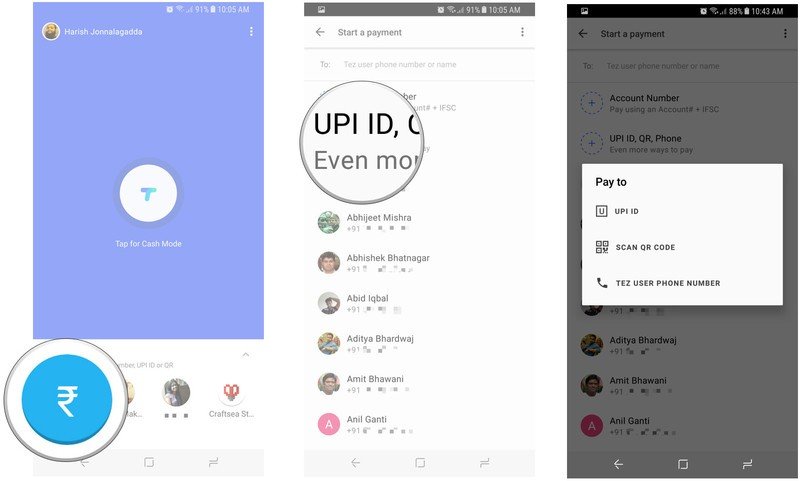
Aside from Cash Mode, you can send money via entering a Tez user's phone number, UPI ID, or QR code.
- Select the New Payment button in the bottom left corner.
- Tap Account Number to transfer money using an account number and IFSC code.
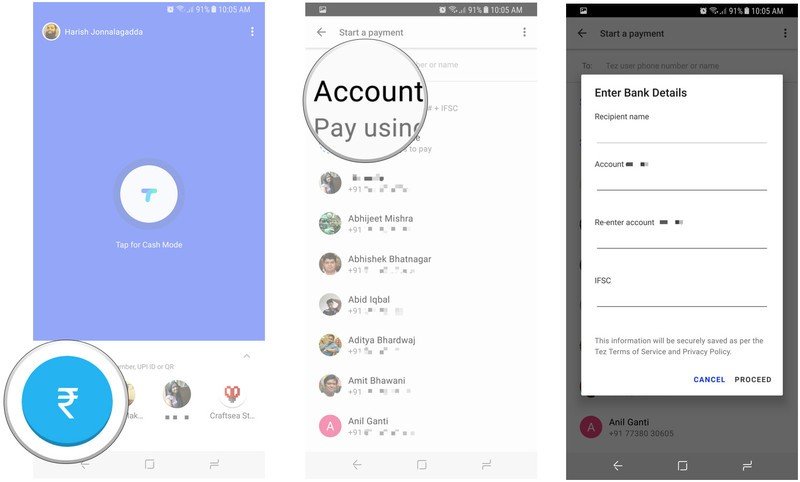
- Select UPI ID, QR, Phone to transfer funds either by entering a UPI ID, scanning a QR code, or by keying in a Tez user's phone number.
That's a quick look at what's possible with Tez. The app offers a seamless way to transfer money, but it's lacking some of the features that other services in this space offer. For instance, the ability to pay utility and phone bills is a major draw for consumers, and a lot of the apps available in this segment offer such a feature. Hopefully Google will bring more functionality to Tez in the coming months.
Did you manage to install Tez? What are your thoughts on Google's latest payments service?

Harish Jonnalagadda is Android Central's Senior Editor overseeing mobile coverage. In his current role, he leads the site's coverage of Chinese phone brands, networking products, and AV gear. He has been testing phones for over a decade, and has extensive experience in mobile hardware and the global semiconductor industry. Contact him on Twitter at @chunkynerd.
