Nine things to do with your new OnePlus Nord N20
Just because it's inexpensive doesn't mean there isn't plenty to do.
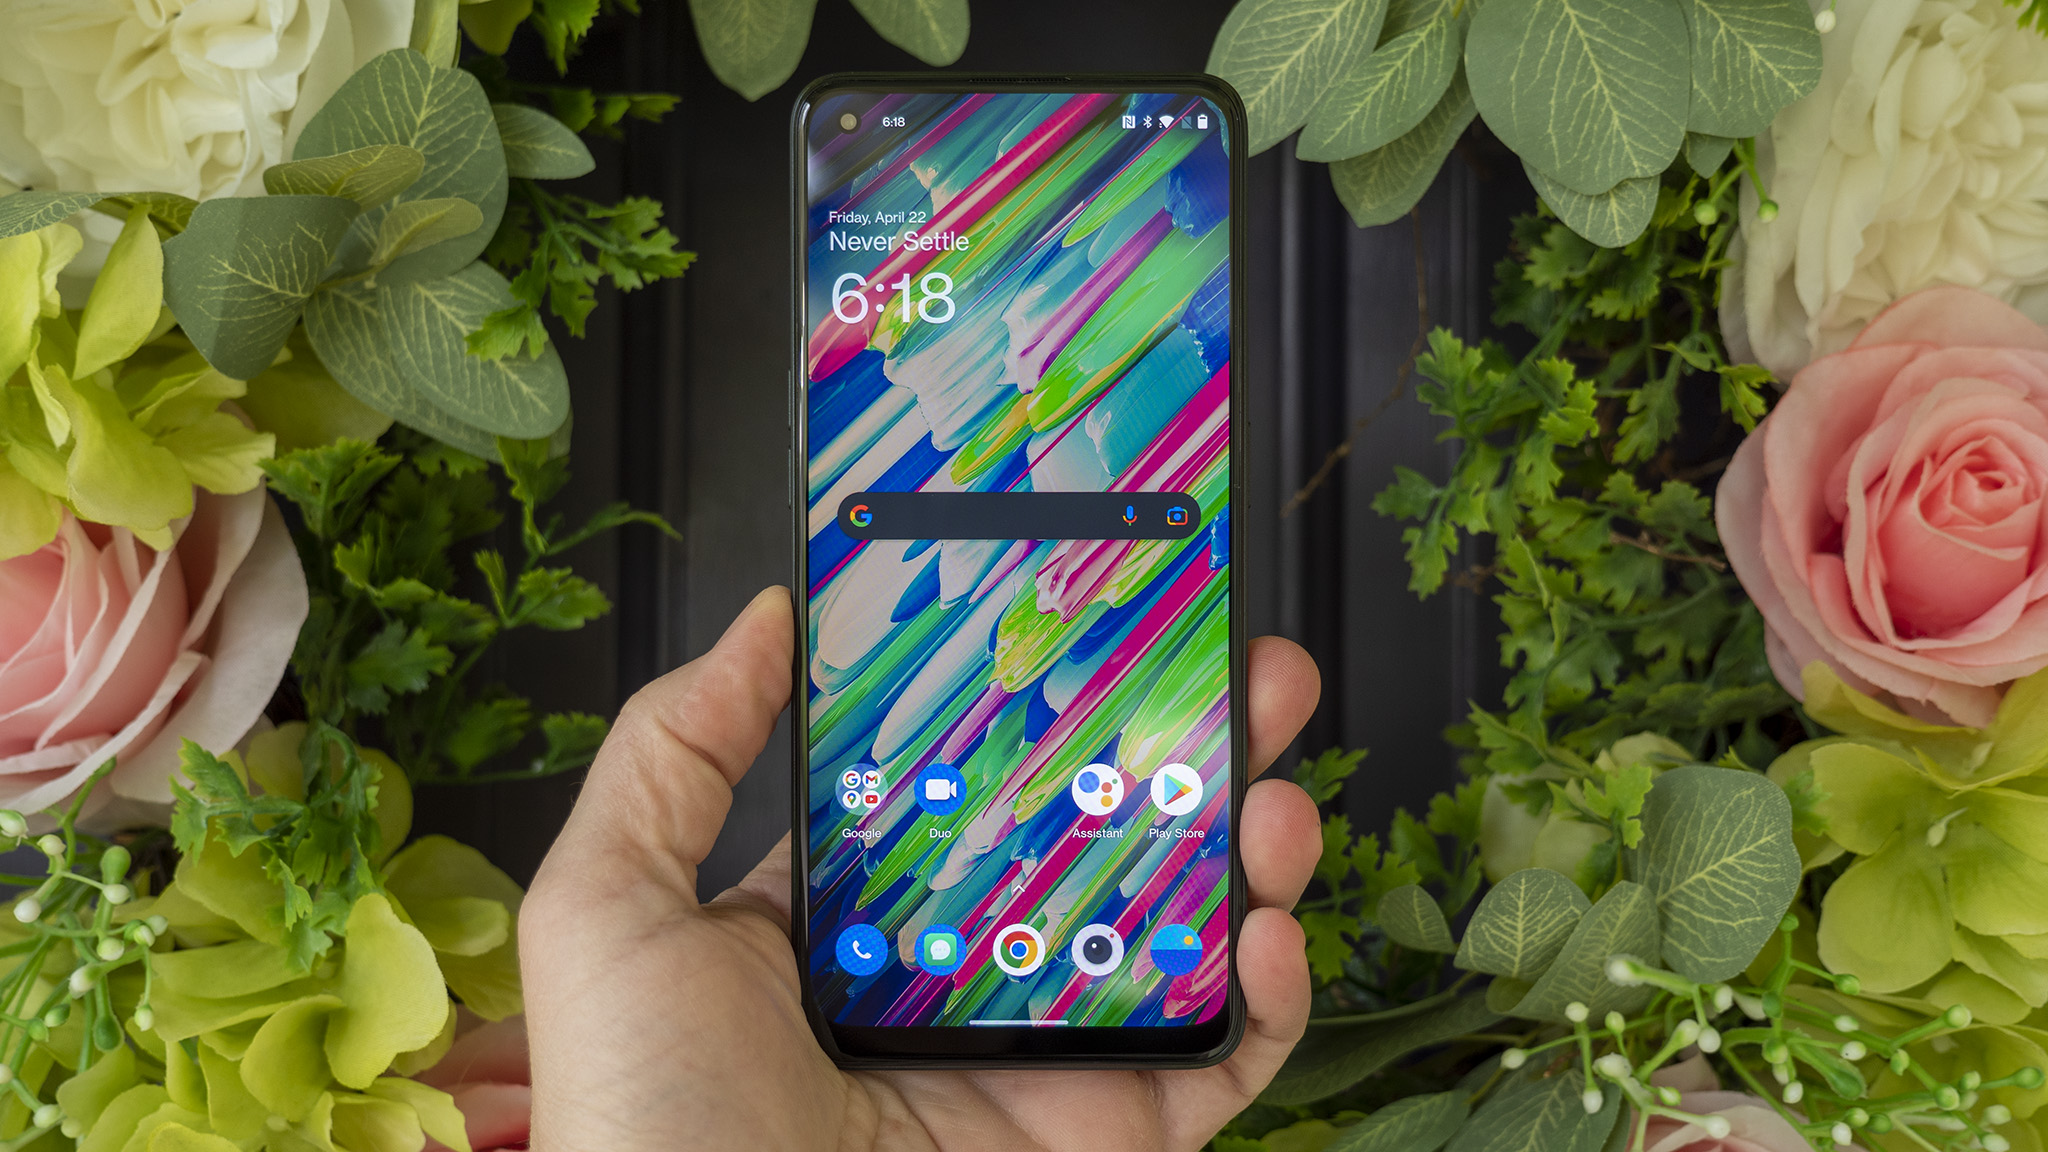
The Nord N20 is our new favorite budget Android phone for lots of reasons. Aside from having some pretty unbelievable hardware specs and design for the price, it also includes the feature-rich Oxygen OS 11.3 at launch with the promise of an upgrade to Oxygen OS 12 in the near future.
As good as the out-of-box experience can be, we’ve got a few tips that’ll make your experience even better. Here are the first things to do with the OnePlus Nord N20 5G.
Volume button woes
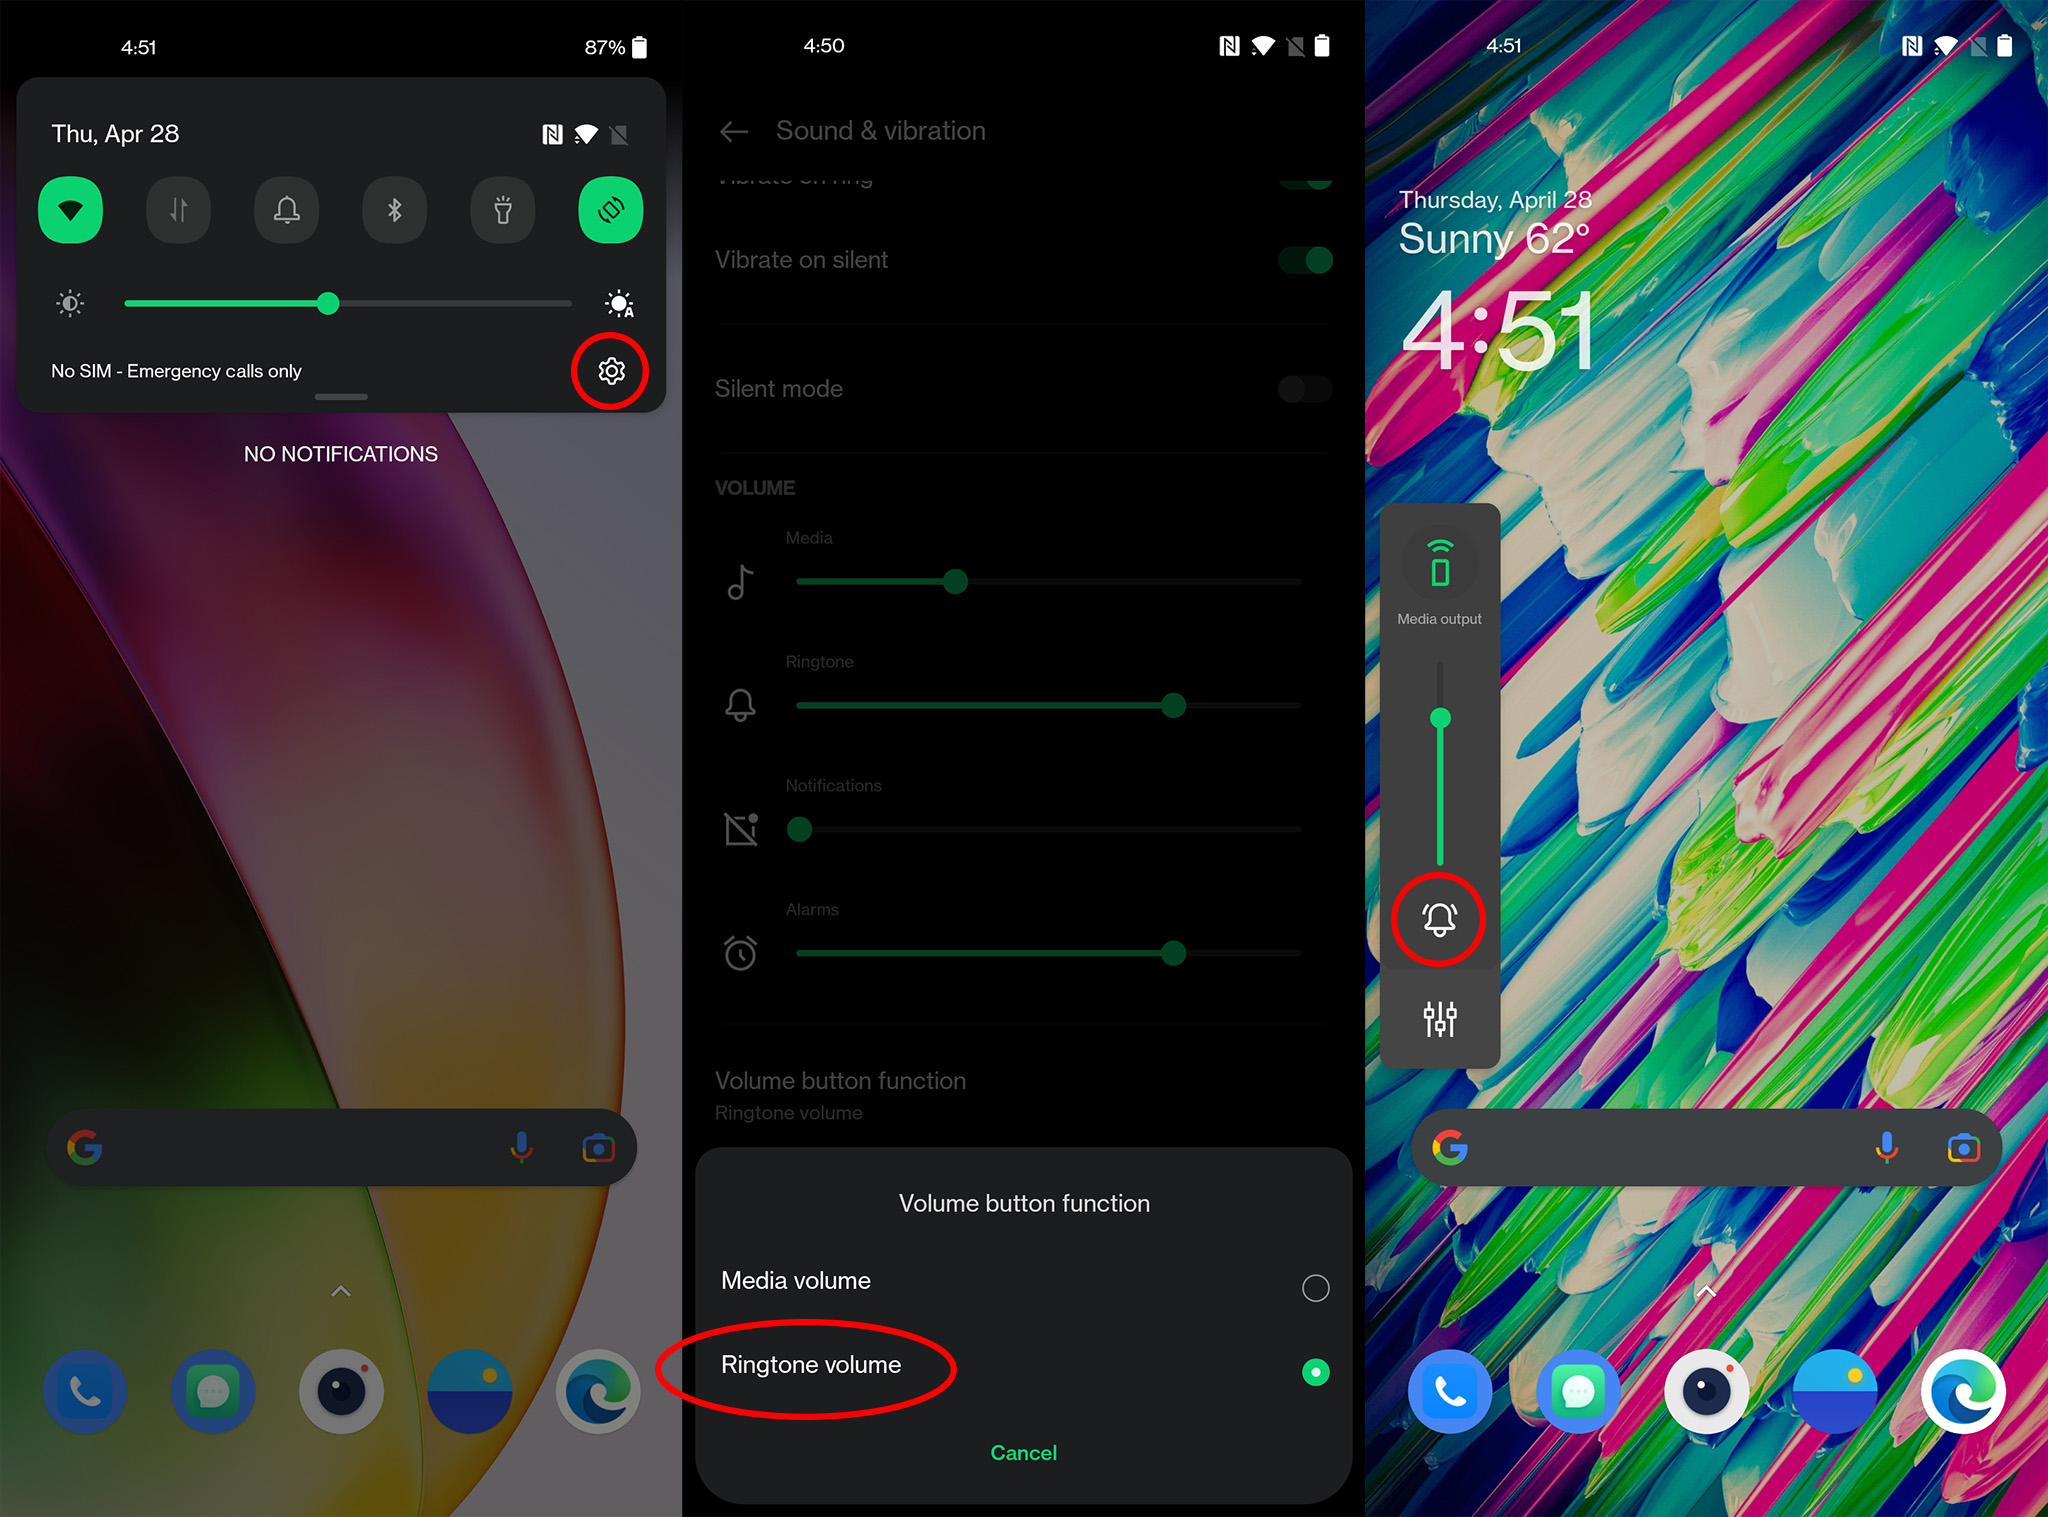
Without the dedicated alert slider from more expensive OnePlus phones, switching between ring and vibrate modes can be a pain in the you-know-what. But that’s not just because of the lack of a slider, it’s because the default functionality of the volume buttons doesn’t give you the option to quickly toggle between these modes. Here’s how to fix that.
- Head over to settings by pulling down on the status bar and then clicking the gear icon below the brightness slider.
- Select sound & vibration from the menu.
- Scroll down to select the volume button function.
- Select ringtone volume from the list of options.
Now when you tap either volume button, it’ll bring up a quick volume panel that’ll let you one-tap swap between ring and vibrate modes by tapping either the phone icon or the bell icon, depending on which mode the phone is currently in.
Clean up that status bar
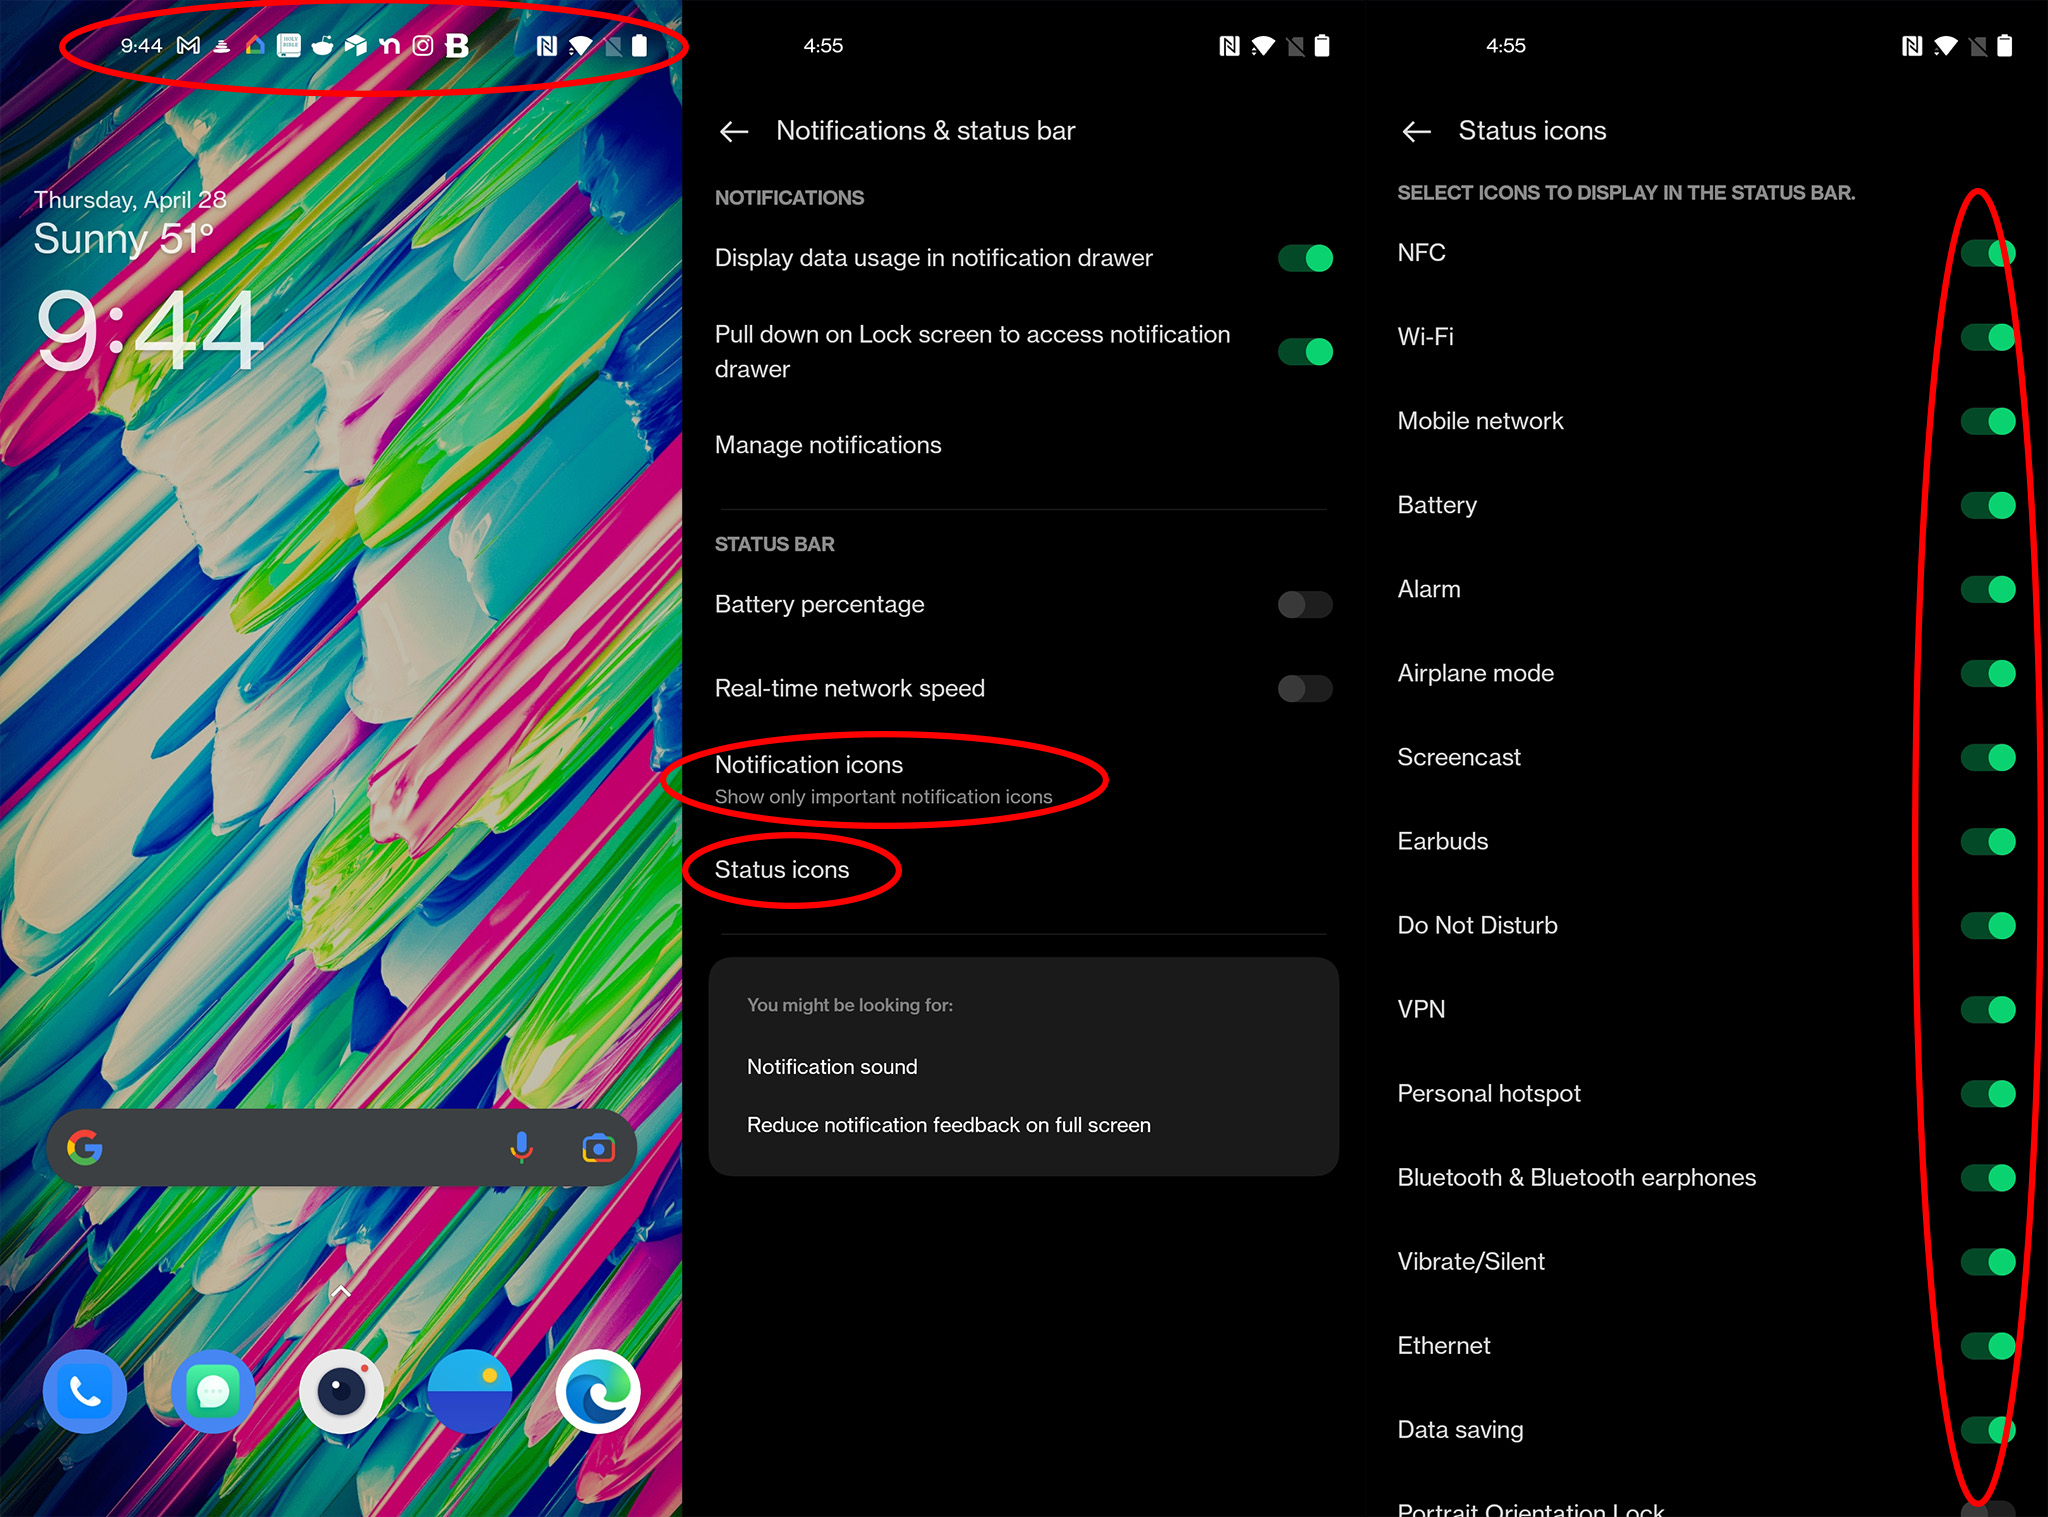
See all those icons at the top of the screen? Sometimes it’s nice to quickly glance at the time or see how good of a cell signal you have, but most of these icons are superfluous and can cause unwanted stress. If a busy status bar drives you crazy, hiding those extra icons is a breeze and will make your Nord N20 experience feel a lot cleaner.
- Head over to settings by pulling down on the status bar and then clicking the gear icon below the brightness slider.
- Scroll down to select the notifications & status bar.
- Select status icons from the list of options.
- Remove any unwanted icons from the long list of possibilities.
Most people will probably only want to see a battery icon, Wi-Fi icon, and mobile network icon. If you’re an earbud wearer, the earbuds icon might also be a good one to keep. The rest can probably be safely hidden. If you ever find you need one of the hidden icons, just come back to this section and unhide it!
Similarly, if you really want a super clean status bar, you can select a more restrictive display setting.
Get the latest news from Android Central, your trusted companion in the world of Android
- Head back to the main notifications & status bar section.
- Tap notification icons.
- Select notification count or do not show for a less busy look.
Get your theme on
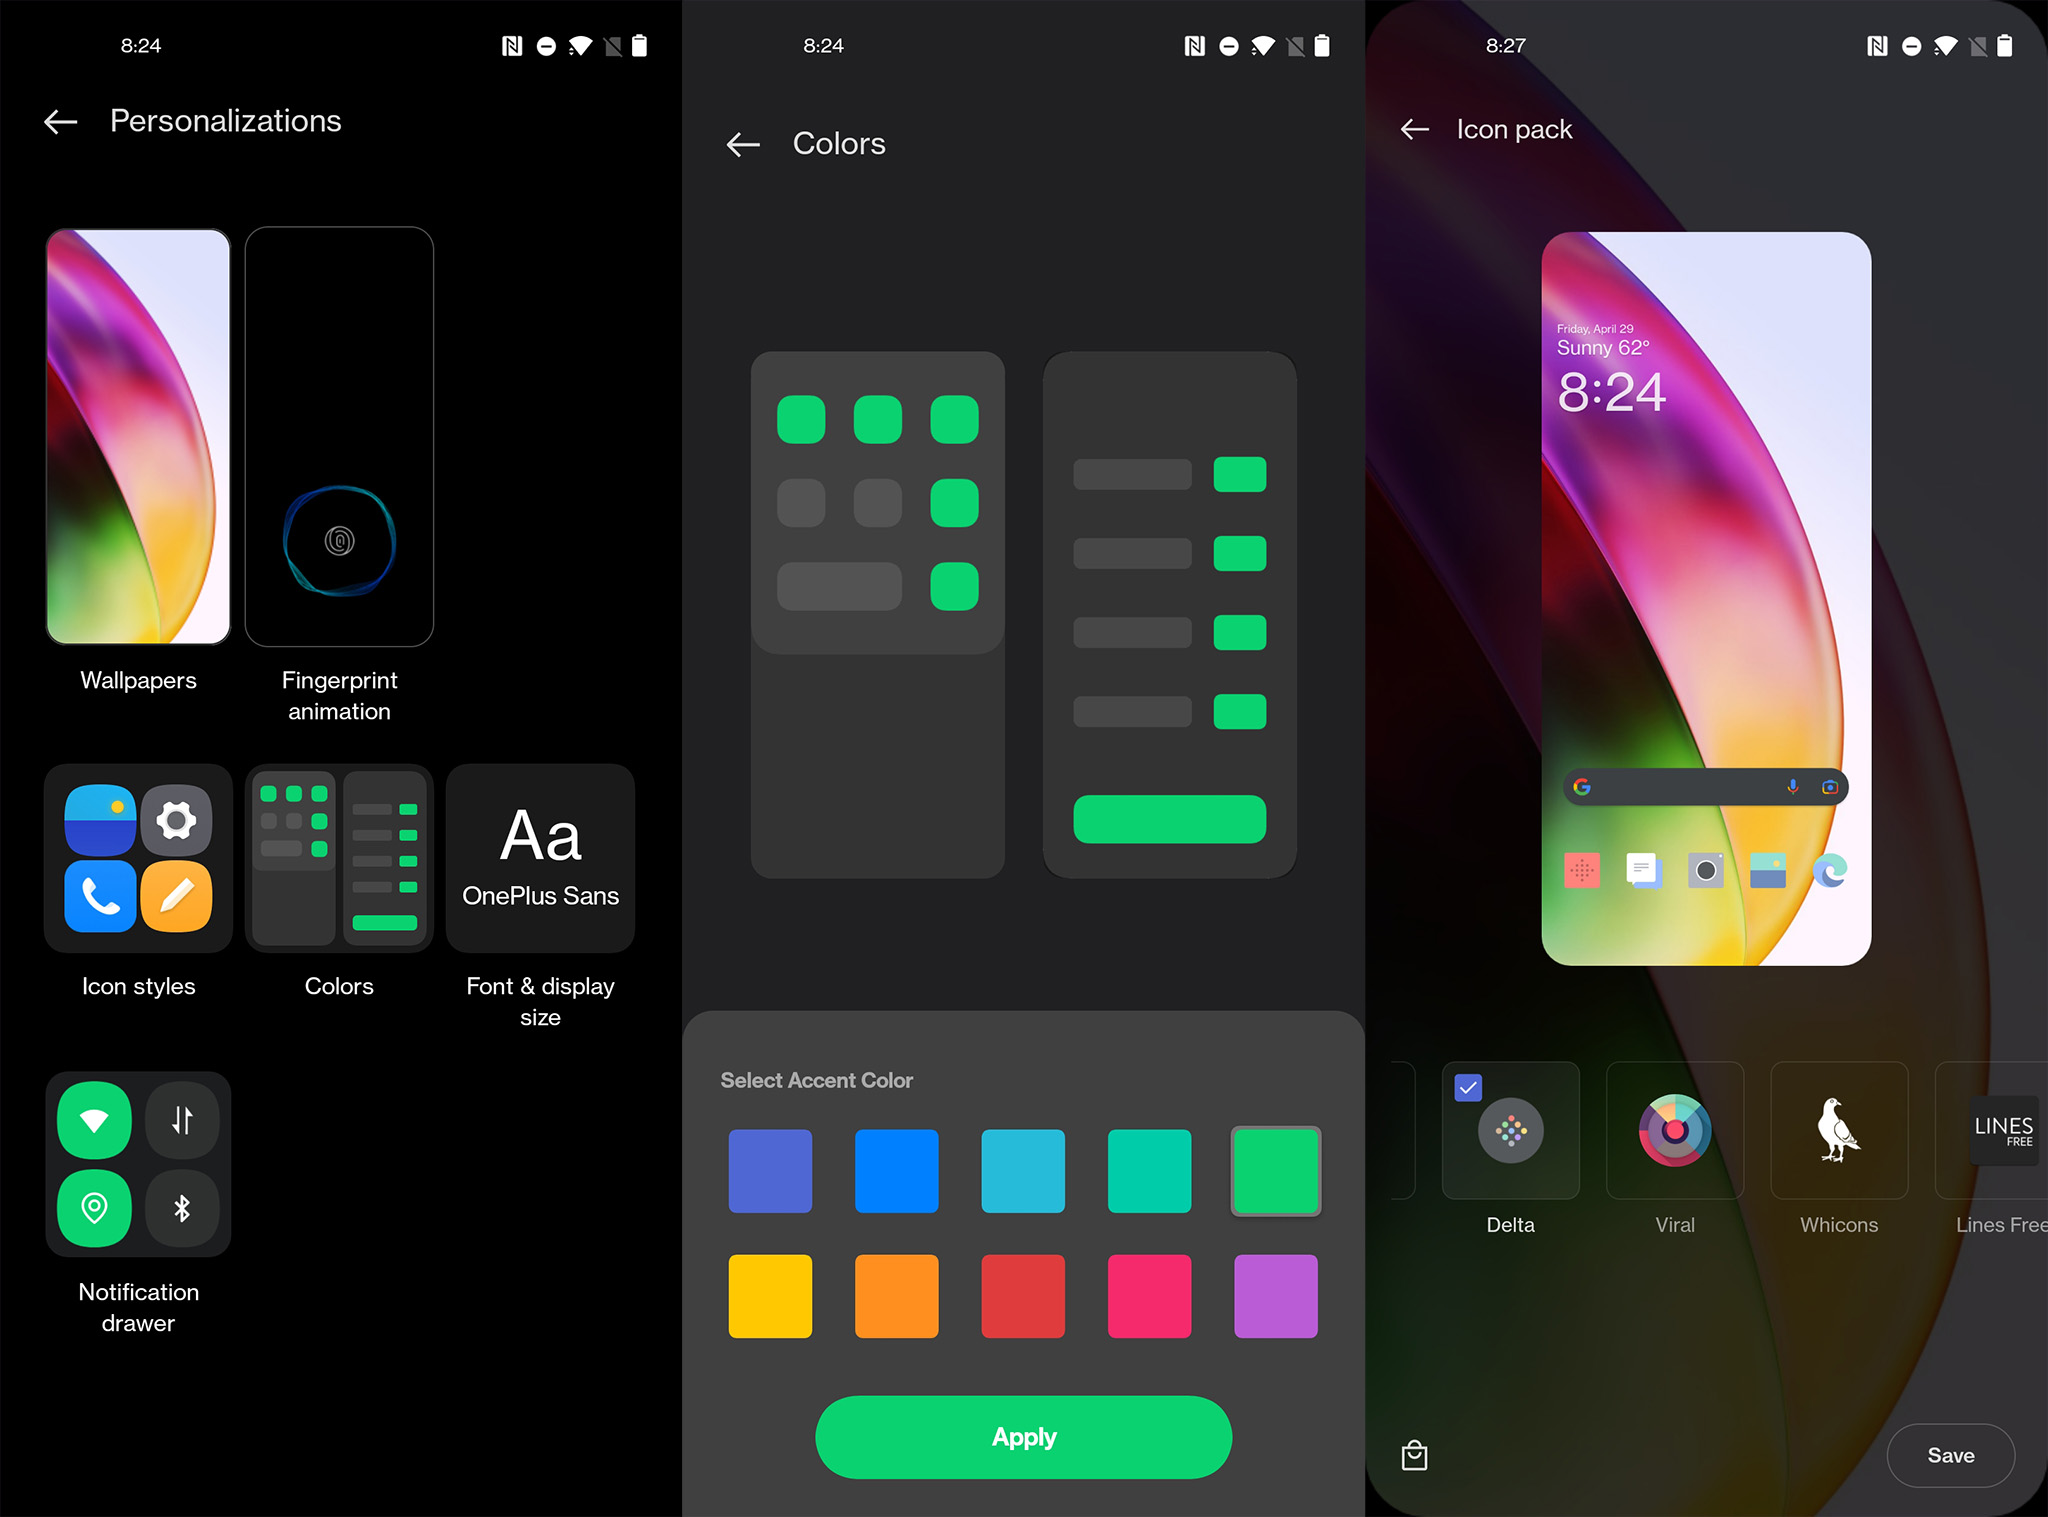
OxygenOS has been known for its customizability for some time now, and while OxygenOS 11 doesn’t automatically theme apps like Android 12 can, you can still heavily customize your home screen and system icons, colors, fingerprint scanner animation, and more. Here’s how to get started:
- Head over to settings by pulling down on the status bar and then clicking the gear icon below the brightness slider.
- Tap personalizations.
- Pick a snazzy wallpaper.
- Select from eight fingerprint animations to make your phone feel fresh every time you unlock it.
- Swap out those boring old icons with one from our pick of best Android icon packs.
- Choose a snazzy new color to accent your whole UI with.
- Bored of the same old font? One of the three available options might be more your style, and don’t forget to change the size to best fit your preferences.
- Make those quick toggles in the notification drawer look better with a shape that matches your theme.
Gestures save the day
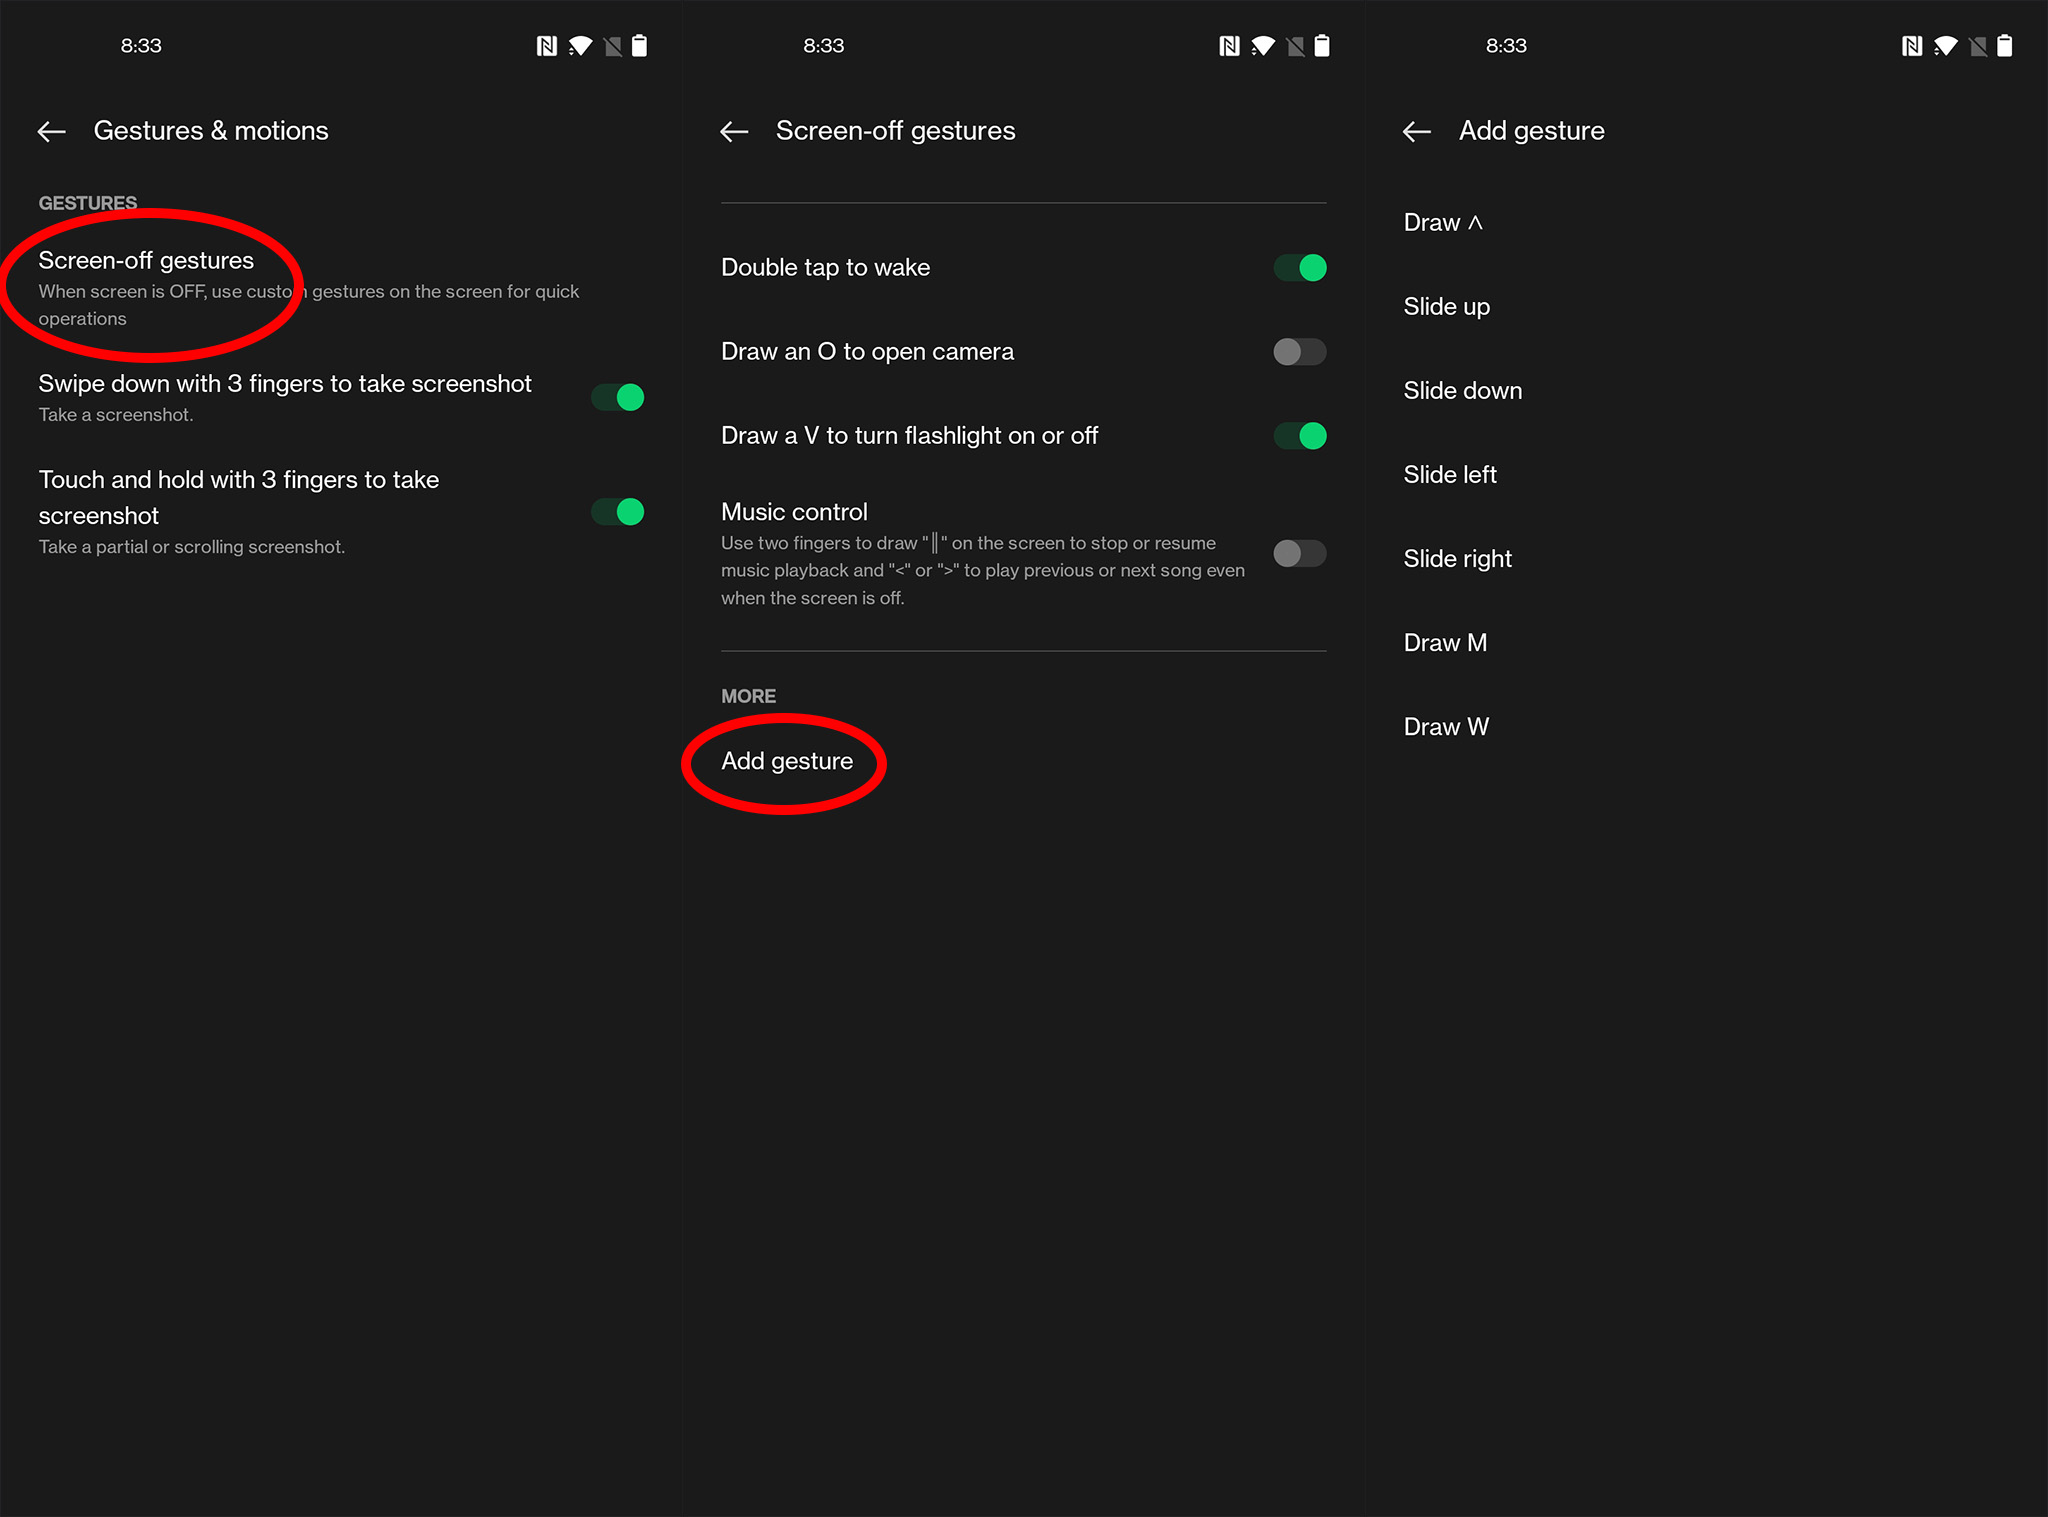
OnePlus was one of the first companies to begin using gestures back in the day, but they didn’t quite work like the ones we have today. Specifically, I’m talking about screen-off gestures, which allow a user to draw some specific shapes to quickly perform common actions without unlocking the phone. Need to toggle the flashlight real quick? How about pausing or playing music again? You’ll just draw a shape on that dark screen and the magic happens. Here’s how to do it:
- Head over to settings by pulling down on the status bar and then clicking the gear icon below the brightness slider.
- Scroll down to and tap convenience tools.
- Select gestures & motions.
- Tap screen-off gestures.
- Enable any of the prebuilt gestures that you find handy.
- You can also add your own actions by tapping add gesture, followed by selecting one of the seven available options.
- From here, you can choose to have the gesture unlock, call, or even open an app when it’s drawn on the dark screen.
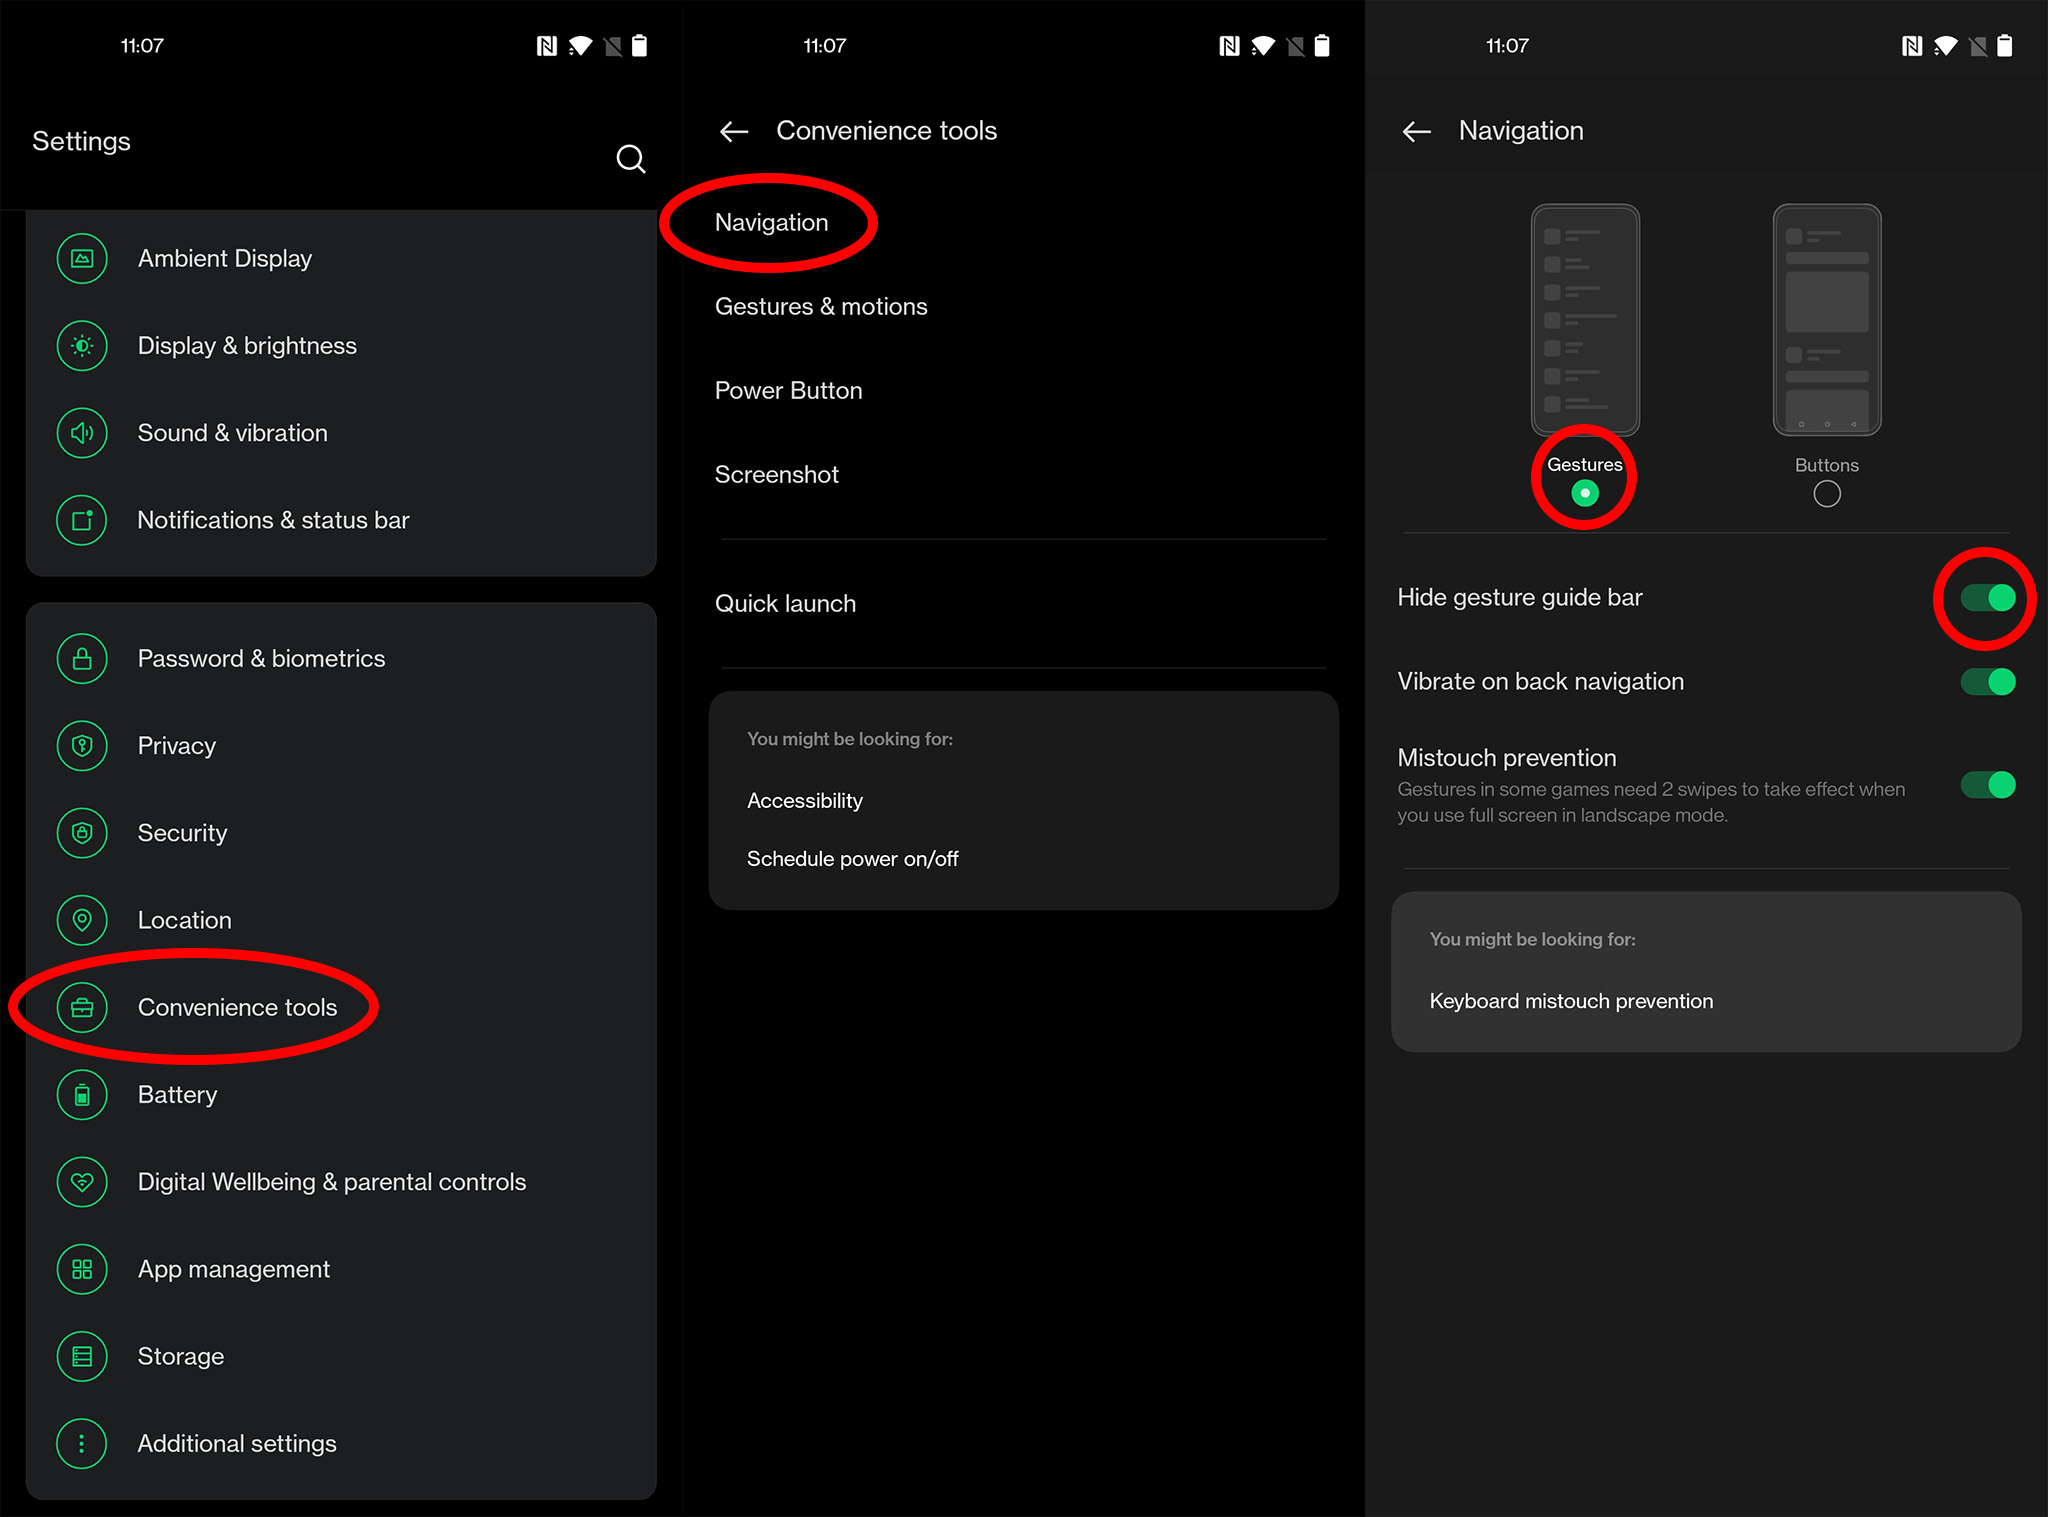
Gestural navigation is another excellent gesture feature to enable, and it will swap out those persistent software buttons on the bottom of the phone with a single bar (or nothing at all, if you’d like), freeing up screen space for more content. It also makes multitasking easier and faster than with buttons. Here’s how to set that up:
- Head over to settings by pulling down on the status bar and then clicking the gear icon below the brightness slider.
- Scroll down to and tap convenience tools.
- Select navigation.
- Select gestures from the two options at the top.
- If you want to hide the gesture bar at the bottom of the screen, select the option for hide gesture guide bar.
Just be aware that, if you do hide the gesture bar, you’ll probably have to swipe up and over in an arc to multitask between apps. Otherwise, swiping left and right on the bottom of the screen will likely just perform a swipe action in the app that’s open on the screen. If this bothers you, make sure to keep that gesture bar enabled.
Turn on RAM boost
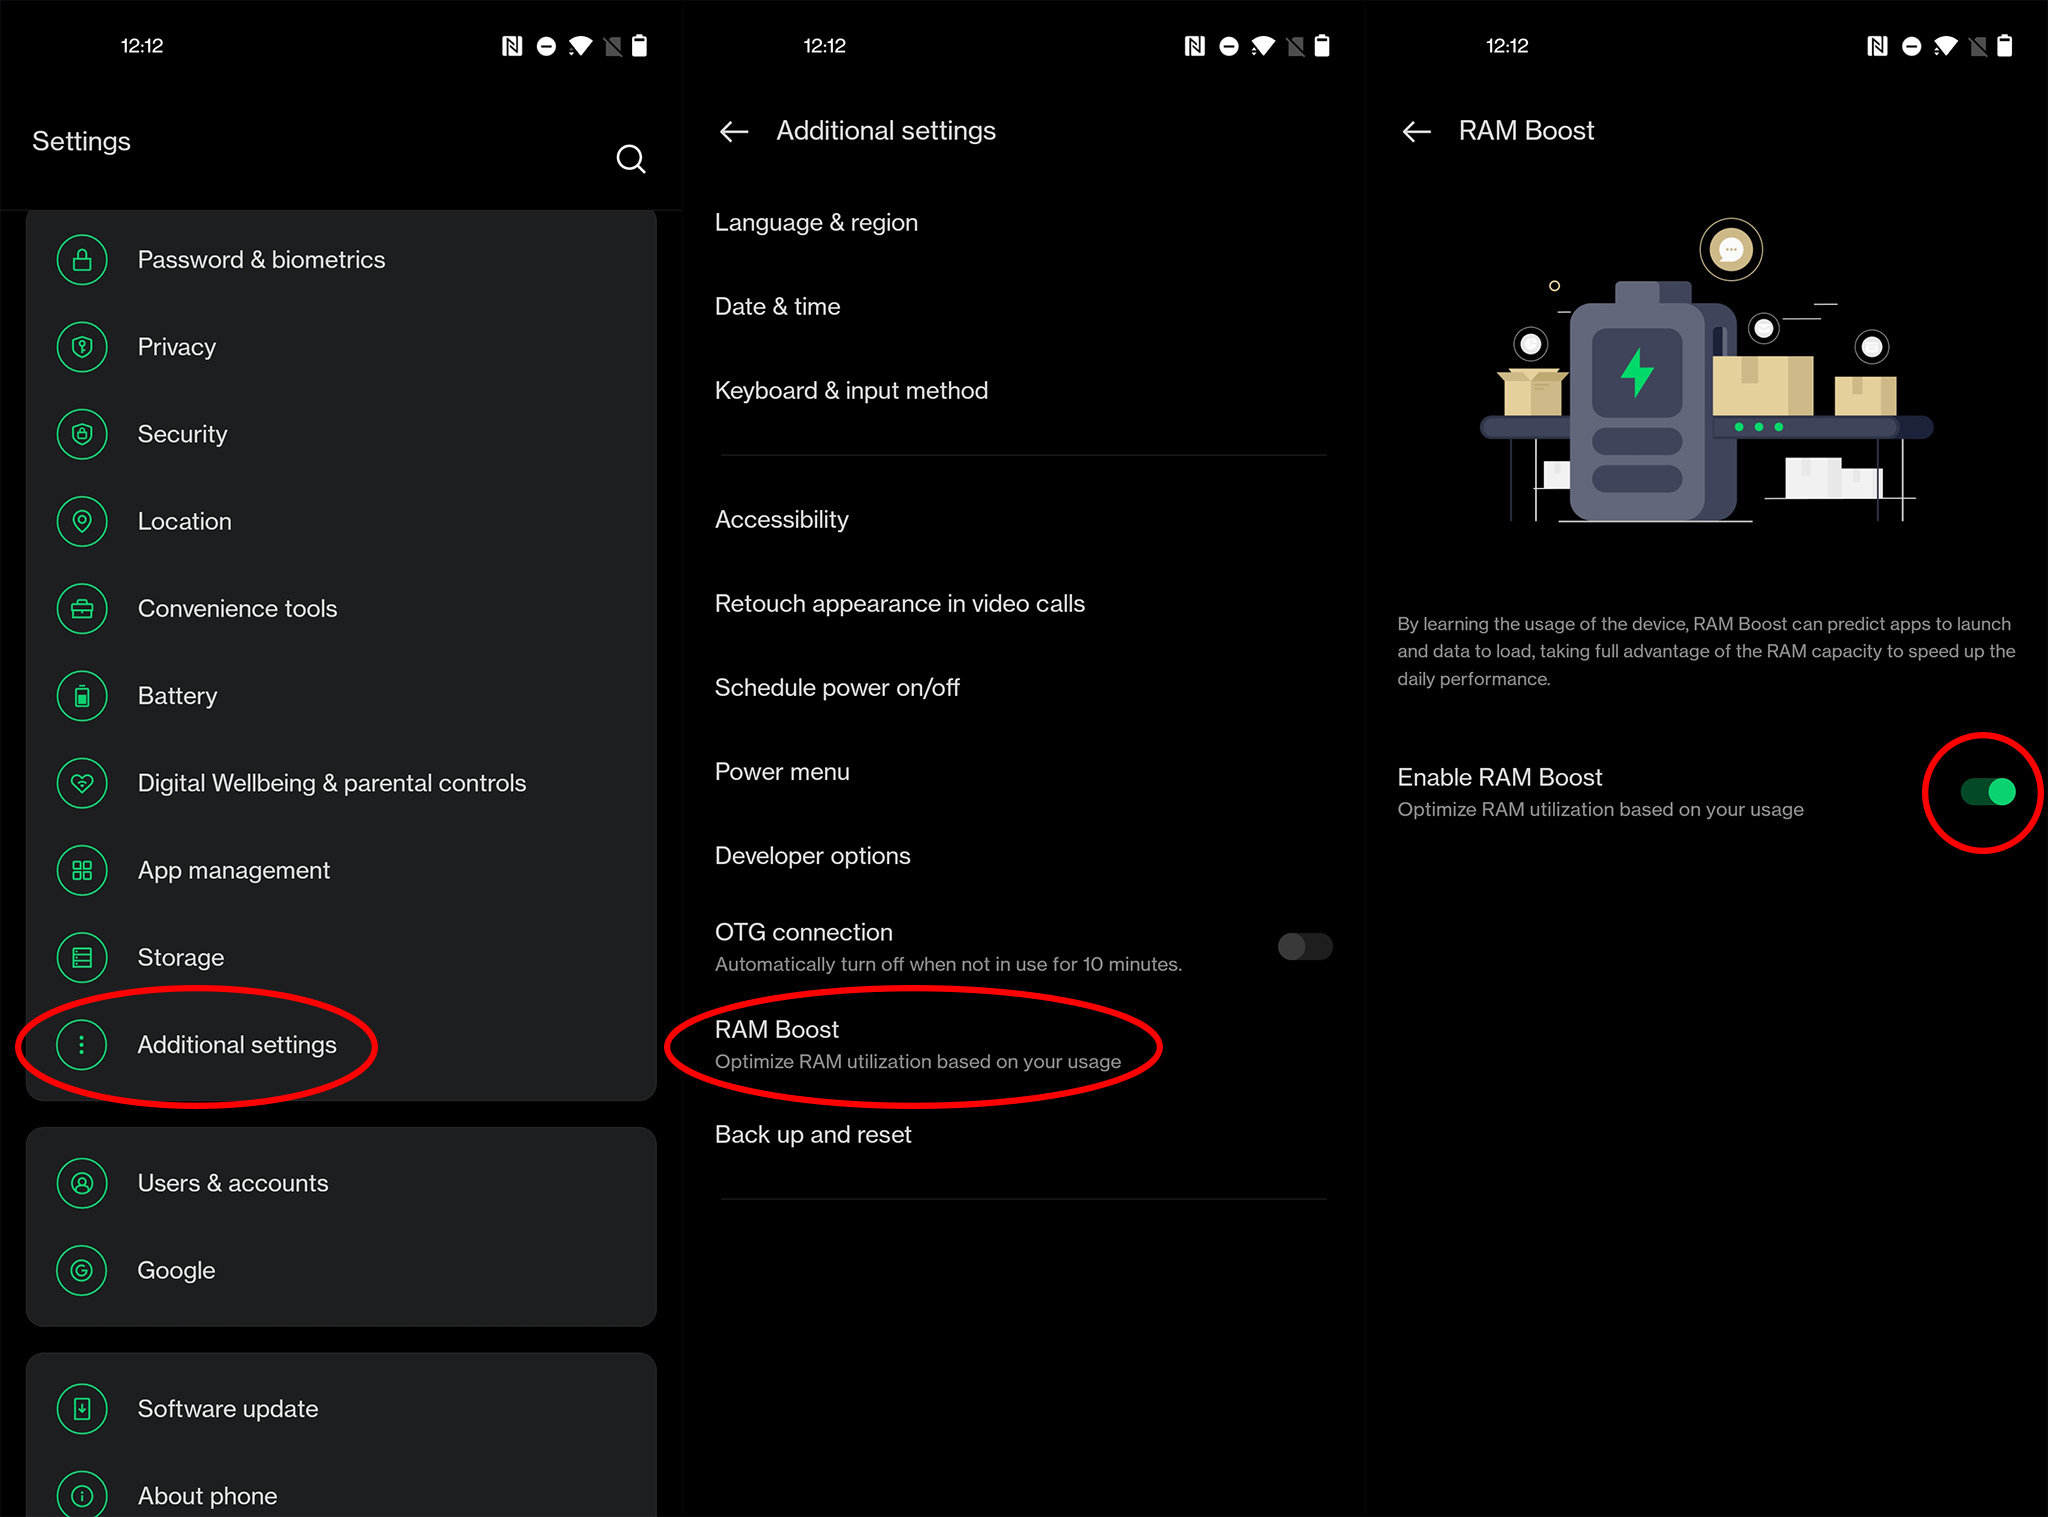
The OnePlus Nord N20 5G comes with 6GB or 8GB of RAM which, at this screen resolution, is plenty for most users. But power users might find that switching between apps takes a bit too long when they constantly have to reload. RAM boost is a clever way that OnePlus uses to “add” more RAM by using the phone’s storage to keep apps ready to go for longer periods of time. If you find that switching between apps regularly causes them to reload, this should help.
- Head over to settings by pulling down on the status bar and then clicking the gear icon below the brightness slider.
- Scroll down to and tap additional settings.
- Select RAM Boost from the list.
- Tap to enable RAM Boost.
- Be sure to reboot after enabling by holding the power button and tapping restart.
RAM Boost could take a few days to learn your habits and which apps you regularly use, so if you don’t see a difference immediately, don’t panic! It just takes a bit of time.
Check out the Shelf
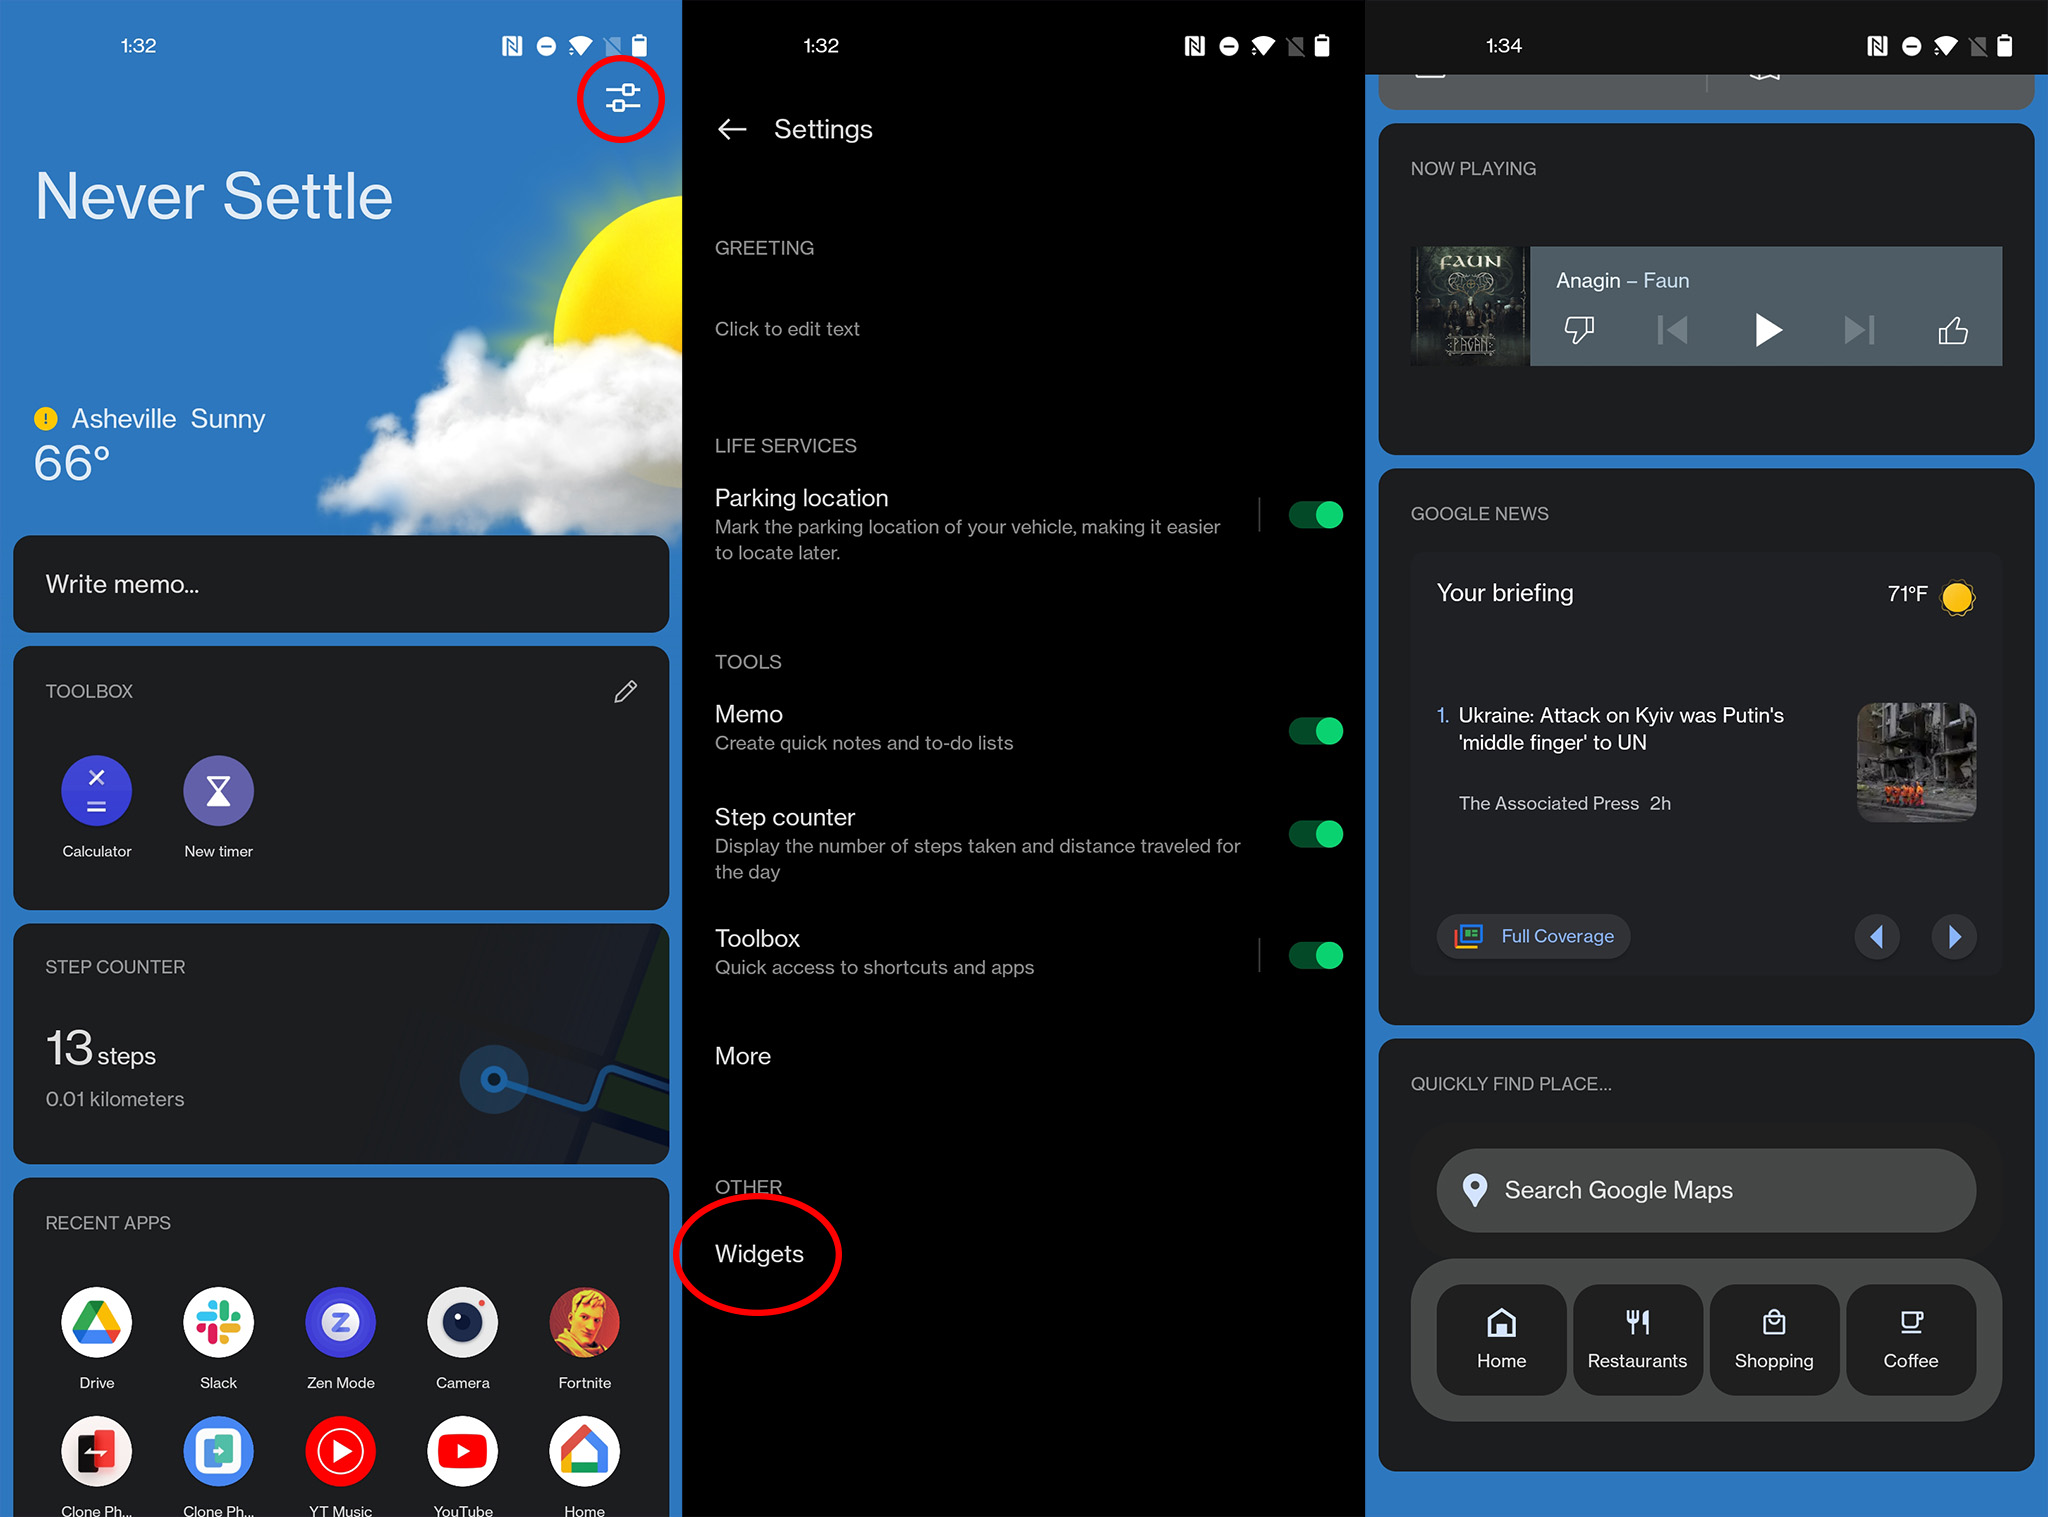
OnePlus built its own Shelf into its home launcher which acts like an additional home screen full of information, quick tasks, and even the ability to add tons of widgets. If you’re someone who loves a clean home screen but still wants the convenience of widgets, Shelf is exactly what you’ve been looking for, and it couldn’t be easier to access.
- On the home screen, swipe down on your wallpaper.
That’s it. That’s the whole instruction set. From here, you’ll find a quick way to view the weather, write a memo, launch quick tools like calculator and timer, see your steps, launch recent apps, and even save your parking location for when you’re out and about. If you want to add custom widgets to the Shelf, you’ll need to do a little bit more work.
- On the home screen, swipe down on your wallpaper to access Shelf.
- Tap the settings button in the top right corner of Shelf.
- Select widgets at the bottom of the options menu.
- Tap any widget to add it to the bottom of your Shelf.
If you want to reorganize your Shelf, just tap and hold the widget, then drag it up or down to reorganize.
Explore the extra camera modes
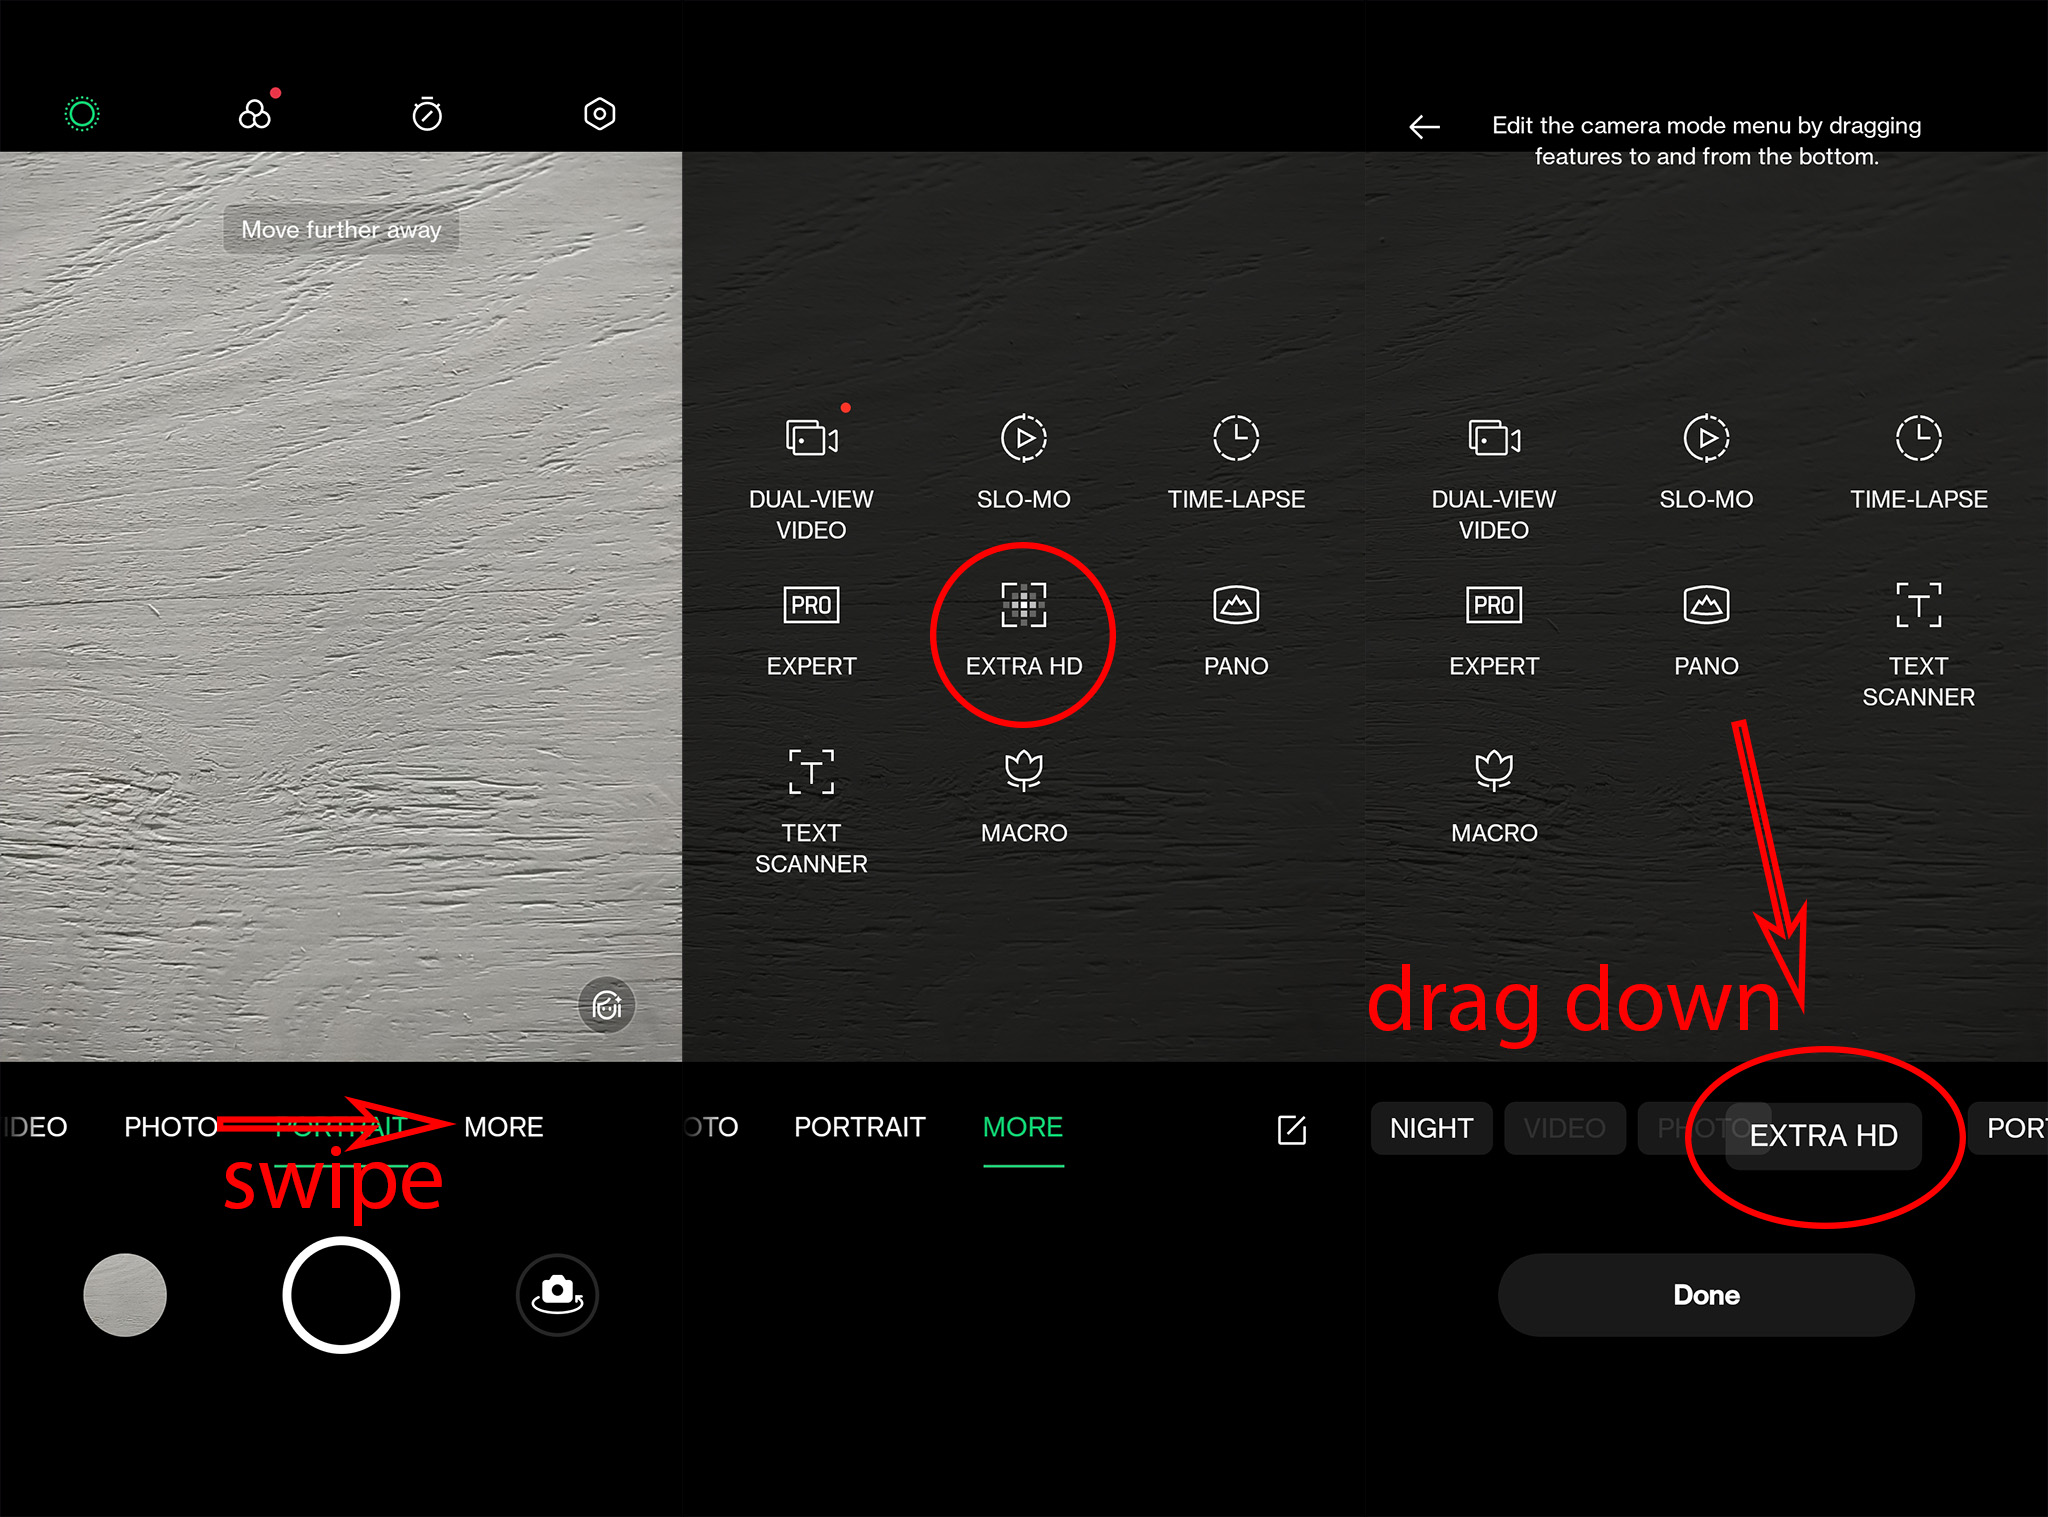
OnePlus outfitted the Nord N20 5G with a rather spectacular camera for this price range, but some of the coolest modes are a bit hidden in the camera UI. Here’s how to resurface them for quicker use.
- Open the camera app by double-tapping the power button, sliding the icon on the lock screen, or selecting the camera icon on the home screen launcher.
- Swipe over to the more section of the camera by dragging the words to the left.
- Press and hold any of the modes you see here, then drag them down into the carousel of modes below.
- You can always rearrange modes by swiping over to the more section and tapping the edit button on the right side. It sort of looks like a pencil on paper.
Some of the most fun modes are the dual camera mode, macro mode, and extra HD mode.
Set up T-Mobile Scam Shield
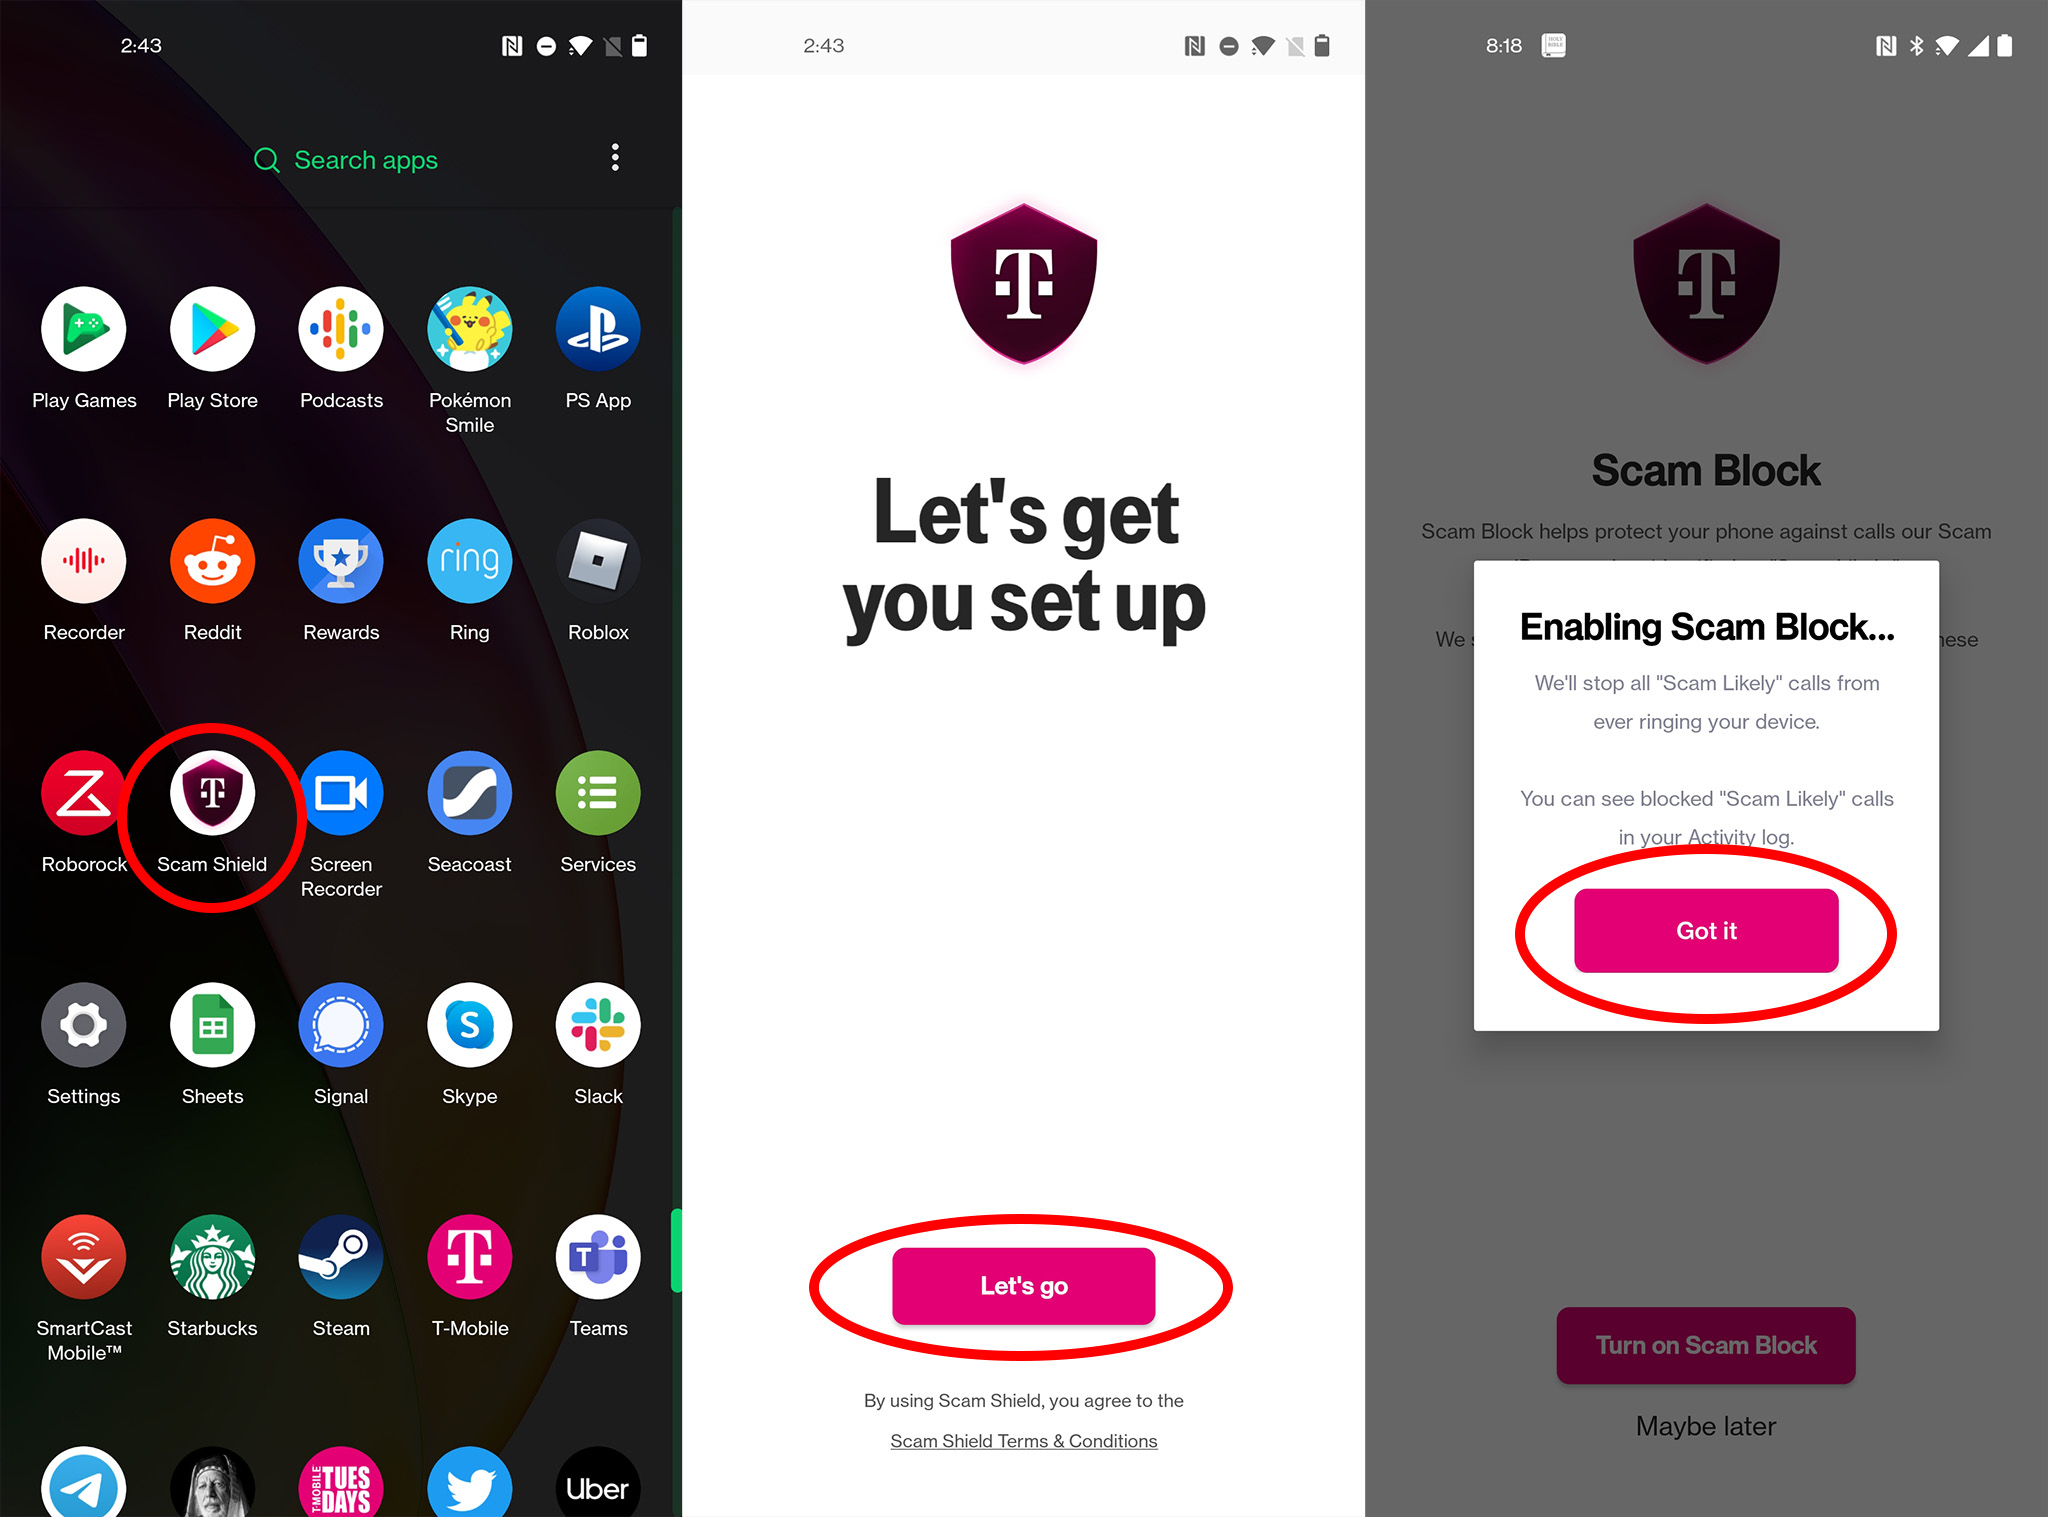
Seeing as this is a T-Mobile-exclusive phone at launch, T-Mobile saw fit to preinstall a few utilities. While some of these apps are junk, the handiest one is T-Mobile Scam Shield, which will help keep those irritating sales calls at bay most of the day, but you’ll need to enable it for it to work. Keep in mind this app will only work for T-Mobile postpaid plan customers. If you’re rocking a prepaid plan, you’ll, unfortunately, have to skip this one.
- Open the app drawer on your home screen, scroll down, and tap the T-Mobile Scam Shield icon.
- Follow the on-screen prompts to enter your phone number to register the app with T-Mobile.
- Accept any permission prompts that appear if you’re comfortable with them.
Included for free with the App on any postpaid T-Mobile plan, you can:
- View the number of Scam Likely calls
- Turn on Scam Block
- Report telemarketer, fraud, and scam calls
- Report unwanted or misidentified calls
- Turn on inbound Caller ID
- View your outbound Caller ID name
- Allow specific numbers to always ring through
Additionally, for a monthly fee, T-Mobile will include the following premium features:
- Block whole categories of calls, like Telemarketers or Political Solicitors
- Blocked number lists are stored on network and automatically transfer to new devices
- Perform a Reverse Number Lookup for unknown callers
- Includes voicemail-to-text, providing voicemail transcripts in the Visual Voicemail app or via text.
T-Mobile’s support page for Scam Shield helps you learn all the great stuff you can do with the app, including how to block numbers, see the amount of spam that was prevented, and more.
Get your Zen on
Zen mode is one of the most unique apps included on a OnePlus phone, and it can be a real joy to use. The idea behind Zen mode is that everyone needs at least a quick 20-minute break every day to recharge their batteries. Zen mode turns your phone into a peaceful soundbox, disabling everything else on the phone and creating an environment where you can actually unplug, sit, and just relax. That means, when you turn on Zen mode, you quite literally can’t do anything else on your phone during the downtime. Use it wisely!
- Open the app drawer on your phone’s home screen, scroll all the way down and tap Zen Mode.
- Accept any permission prompts that appear so that Zen Mode can control your phone and disable normal functions.
- Select the amount of time you want to use to enter zen time.
- Swipe left and right on the screen to select different themes.
- Tap the music icon in the top right to enable or disable audio during zen time.
- Tap let’s go when you’re ready to begin.
- Breathe.
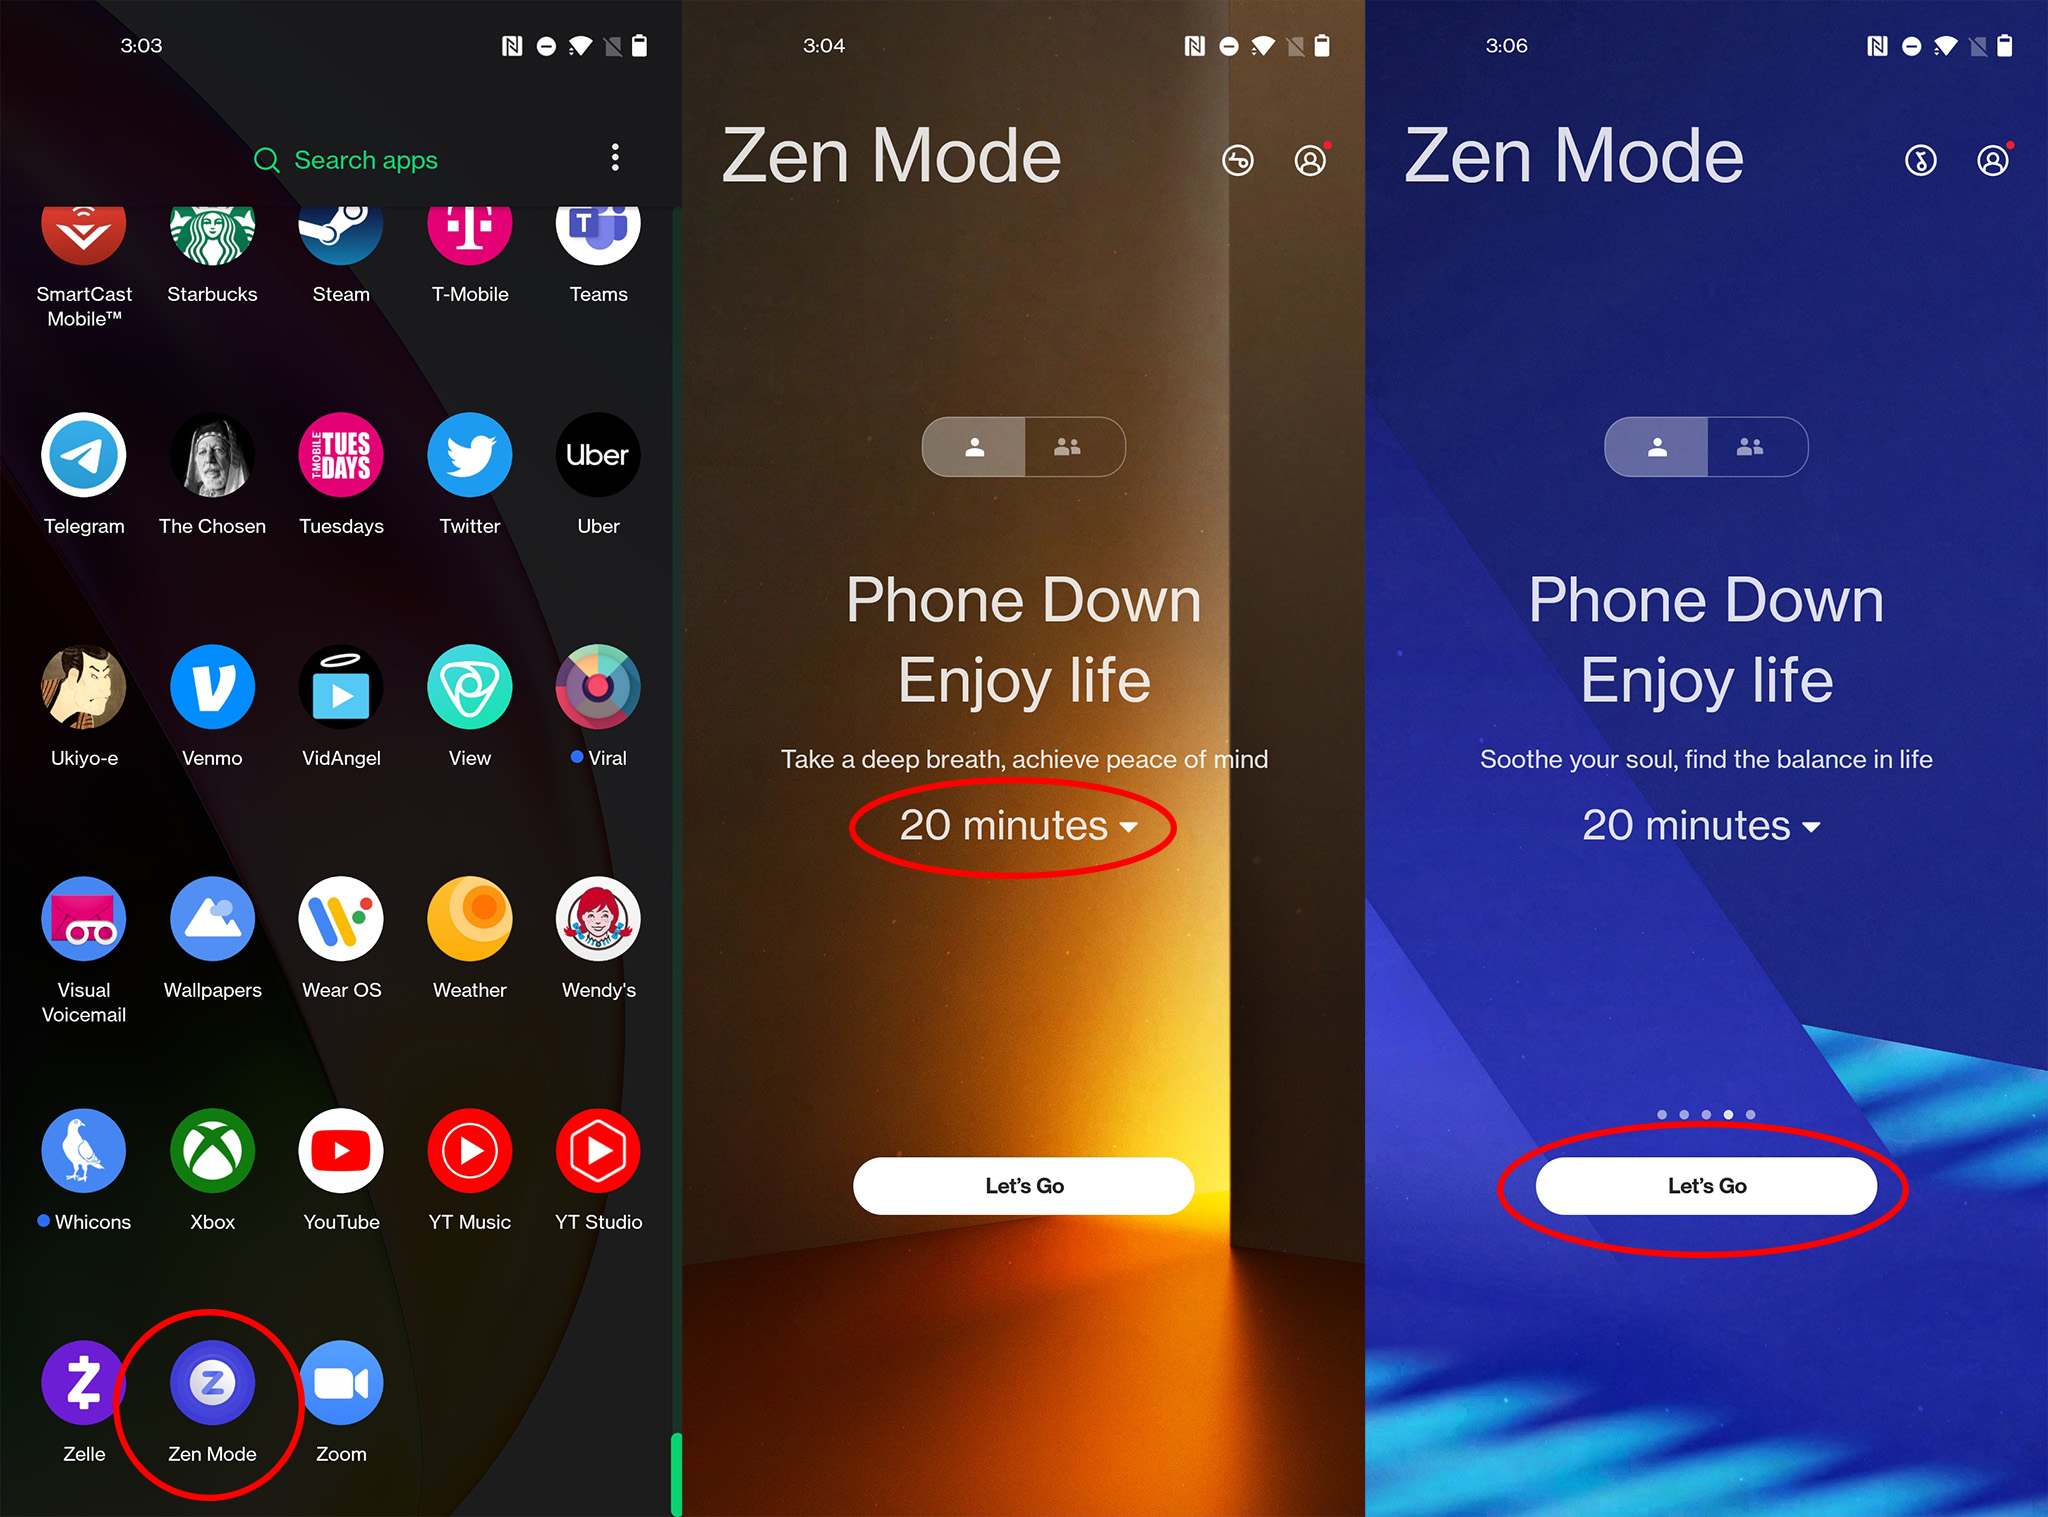
Since this is probably your first time using Zen Mode, go ahead and pick 20 minutes to try. If nothing, it’s a great way to give yourself just 20 minutes of downtime during lunch when you’ve got a busy workday.
So many features, such a low price

We love the OnePlus Nord N20 5G for all its great features, but the best part is the low cost of entry. While most phones in this price range feel like they had to give up something huge in order to stay affordable, OnePlus seems to have made all the right choices to keep the phone affordable without feeling like a cheap device. It’s the best affordable phone we’ve used in ages, and it’ll be even better now that you’ve gone through this list!

