
Like the Quest 2, the Meta Quest Pro can use the cameras on the front of the headset to display your surroundings in-headset. That makes it easy to see what's happening around you without having to take the headset off. But the Quest Pro can do so much more than just show you what's happening around you. It can even be used to map your walls and other furniture in VR.
But why would you want to do this? Setting up your home on the Meta Quest Pro for mixed reality makes apps that use mixed reality features work better and more effectively, especially with some great Quest Pro accessories. If you set up your desk, you can easily walk over to it and start working without having to reconfigure things. Setting up your couch makes seated VR much simpler, and setting up your walls allows virtual objects to interact with your actual physical space. Here's how to get that done.
Beginning room setup
Right now, room setup is still considered an "experimental" feature in the Quest ecosystem. When launching a mixed reality app for the first time, the Quest Pro will ask you to set up your room. You can also trigger this room setup at any time, which can be handy if you need to move your desk or make other adjustments. Here's how to start room setup.

- While wearing your Meta Quest Pro, press the Meta/Oculus button on the right controller to bring up the universal home bar.
- Select the leftmost part of the bar, which includes the block, battery, and Wi-Fi icons.
- Select settings from the top-right corner of the next menu.
- Select Experimental from the grid of options that appears in the settings menu.
- Scroll down and tap Set Up next to the Room Setup section.

Mapping the room
Once you initiate room setup, you can begin the process of mapping your room. The Quest Pro will have you start with the walls. You'll want to ensure that you fully enclose your space when making walls, as it ensures that mixed reality experiences can work properly. Here's how to do that:
- On the "Set up your room in VR" screen, select continue to begin mapping.
- First, you'll draw your walls. Start at the bottom corner of a wall and click the trigger to add an anchor.
- Draw a line upward until the line meets the ceiling, then click the trigger to complete the line.
- Drag the square outward to outline the full shape of your wall. Click the trigger when you line up the end of the square with the top corner of the end of your wall.
- Continue this process to map all the walls in the room you're currently in. Feel free to move into other rooms and map out those spaces, if you desire.
- Once you've made your way around the room and finish mapping it, you'll move on to adding furniture.
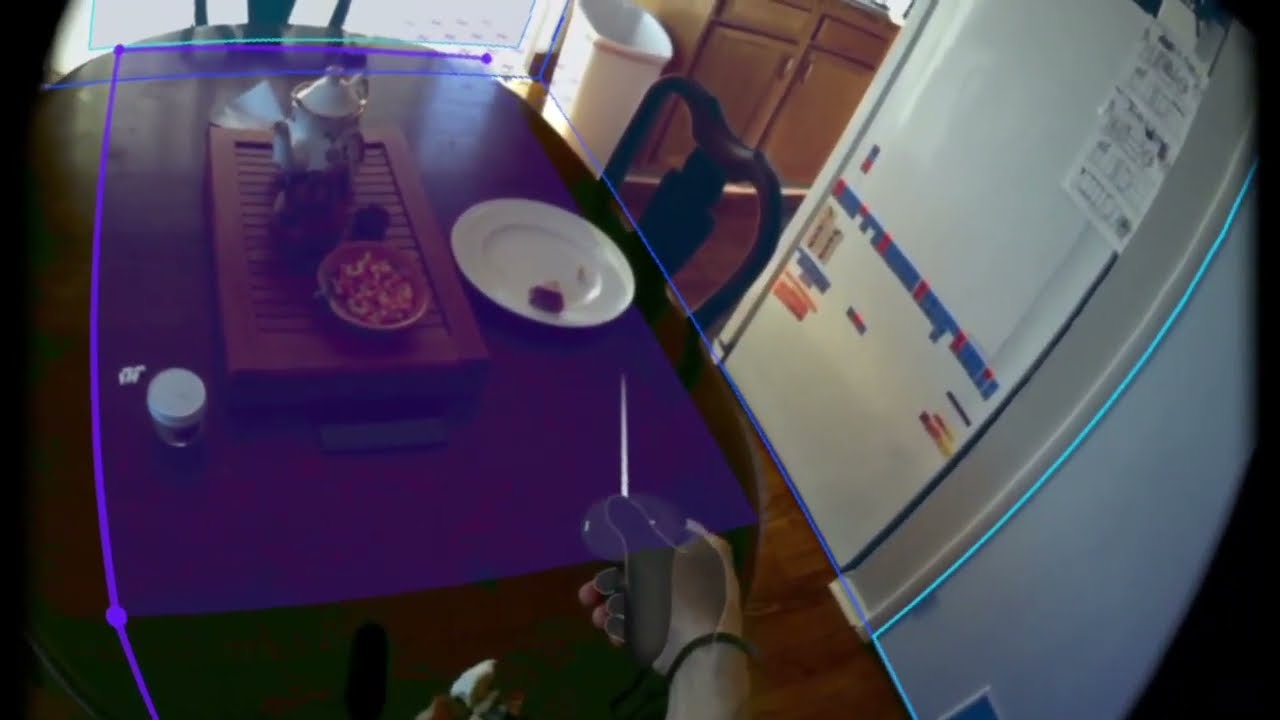
Watch the video above to see mapping in action. In my house, I mapped my living room, dining room, and the attached hallway. In order to make a fully complete room, I ended up closing off the kitchen with a virtual wall instead of mapping it, which you can see in the above video.
Adding a desk, couch, window, door, or other furniture in VR
Once your walls are mapped, you'll be presented with a menu to add a desk, couch, window, door, or other furniture to VR. Adding these elements to your virtual room will help the Quest better understand your surrounding, which will come in handy in some mixed-reality apps like Figmin XR. Here's how to add those.
- Select which component you want to add next from the displayed list.
- The desk, couch, and other furniture options all measure the same way. The method is similar to drawing your first wall.
- First, you'll add an anchor to the bottom-front-left corner of the furniture by clicking the trigger, then draw a line up to the top of that corner and click the trigger to finish the line.

- Next, measure the front side by drawing a line from the top-left corner to the top-right corner, then clicking the trigger to finish the line.
- Last, measure the depth of the furniture by dragging the controller from the front-right corner to the back-right corner, then clicking the trigger to finish measuring.

Continue this process until all major pieces of furniture are mapped. The more furniture you map, the more virtual objects are able to interact with. If you don't map a piece of furniture, there's a chance a virtual object could go "behind" it, and it would look weird in-headset.
Measuring a window or a door is much simpler. Here's how to do that.
- Select window or door from the list to get started.
- Aim your controller's laser pointer to the top-left corner of any window or door and click the trigger to start outlining it.
- Drag the box to the opposite corner to fully outline the window or door, then click the trigger to finish measuring it.

Once you've got all the pieces in place, give a mixed-reality app a try. Figmin XR is a great example of how virtual objects can interact with physical space. Likewise, games like Demeo can use passthrough vision to map the entire level to your table or floor, making it feel more like playing a tabletop game of D&D.

