The difference between archiving and deleting in Gmail
Get the latest news from Android Central, your trusted companion in the world of Android
You are now subscribed
Your newsletter sign-up was successful
Know what to do with everything you receive in Gmail

For most people, Gmail is one of the most important tools in their daily lives. The problem is that most get so many emails that it is hard to keep your inbox organized and not full of random, unnecessary emails. Gmail offers users multiple ways to organize and sort their emails into different folders, tabs, and tags but in a time where Google's search can scan millions of words per second why is it necessary to put so much effort into keeping your Gmail organized? Luckily, Gmail has an archiving tool that will help you clean up the interface without causing you to spend several days placing each email into a distinct folder.
What is archiving?
The act of archiving an email in Gmail is taking it and placing it in a folder where it will continue to exist but will no longer be cluttering your inbox. The best part about this is that it will still be accessible in the future if needed. Gmail handles this task fantastically as it allows users to quickly and easily archive their emails.
What is deleting?
When you decide to delete an email, it is sent to a trash folder. This folder acts as a backup just incase you did not mean to actually get rid of an email. Some people also use the trash folder as a dumping place for emails they do not view as important enough to have in their inbox. The problem with this is that Gmail automatically deletes mail placed in the trash after 30 days. So while using the trash folder as a tool to clean up your inbox might seem like a good idea, just know that you will most likely lose an email you that might need in the future.
Why you should archive your emails
Say you're having a conversation with someone and information like an address or phone number is exchanged. At that moment you are able to write down or save anything needed so you decide to delete the conversation as you do not see a point to have it cluttering up your inbox any longer.
Now imagine some amount of time in which you would have never needed to look back at that conversation or retrieve information from those emails but for some reason, now you do. If you deleted the email thread, you wouldn't be able to look back and easily find what you're looking for. If you archive an email, you will no longer have to see it sitting in your inbox but will also have the peace of mind knowing that if you need to, a quick search will bring it back to you.
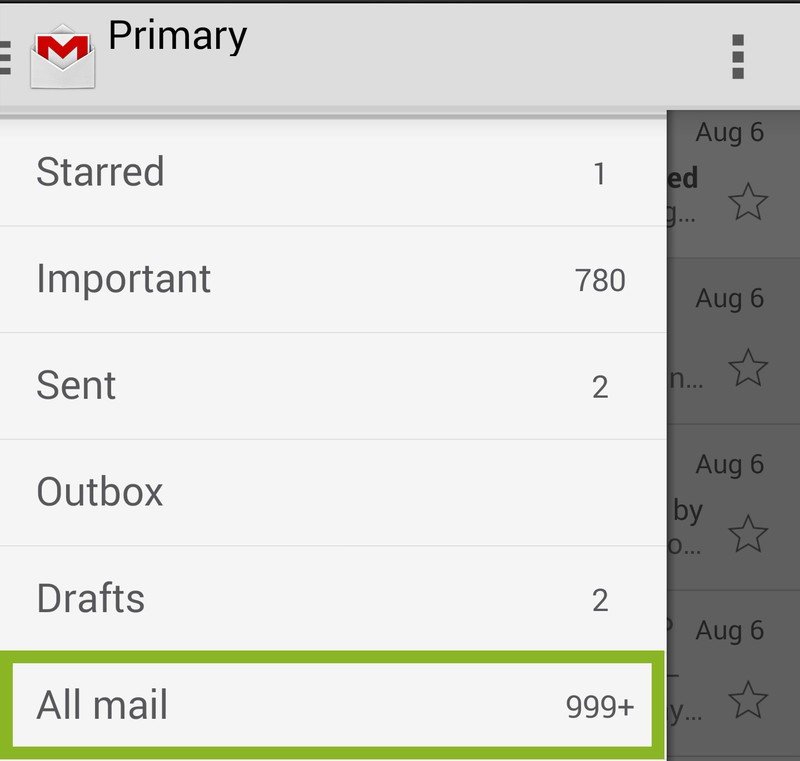
Additionally, all of your archived emails are located in the "All Mail" folder which can be found in navigation drawer. Emails are not organized once archived but if you need quick access to a recently archived email, it will be near the top of the list.
How to archive an email in Gmail on Android
There are three quick and easy ways to archive your emails. Two of these methods are for archiving individual emails and the third is a way to select multiple emails and archive them for later use.
Get the latest news from Android Central, your trusted companion in the world of Android
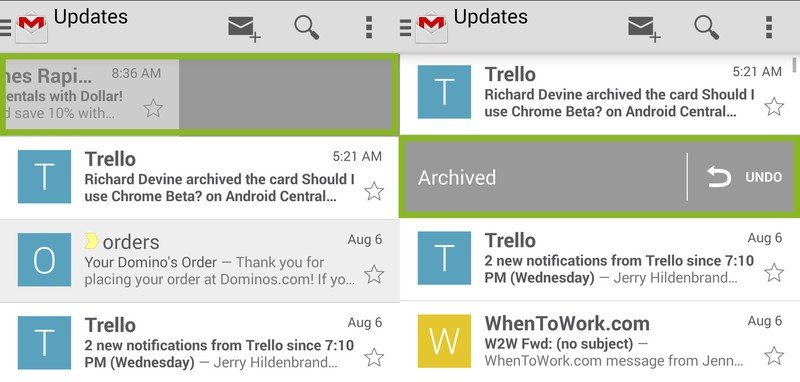
The quickest, easiest, and most accident-prone way to archive an email is to swipe it away while looking at the list view of all your emails in your inbox. Since most Android users are used to accessing the navigation drawer from swiping from the left edge of the screen, it is easy to accidentally send emails off to be archived. Luckily, right after swiping an email away, Gmail allows you to undo your action just by pressing an undo button that appears for several moments after archiving.
In Gmail's settings you can quickly turn this feature off if you do it a lot on accident or just do not have a need for the feature. To do this, open up the navigation drawer, scroll down to the bottom where settings is located, enter general settings, and the option second from the top will give you the choice to turn on or off "swipe to archive."
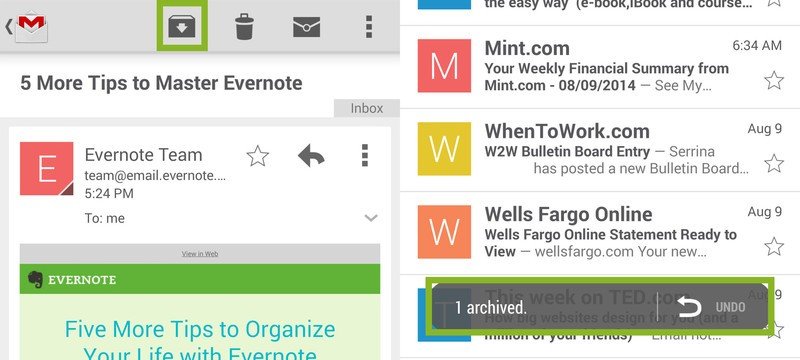
The second way to archive an email is while viewing an individual message thread. Once you have finished reading the contents of an email you are greeted with several options on the taskbar. One of the multiple icons waiting for you is one that appears to be a box with an arrow pointing downwards. This is the archive button. If you select this while viewing the email, you will be send back to your inbox and a status will appear at the bottom of your screen for several seconds telling you that the email was archived. If you did not mean to archive an email, again there is an undo button that you can select to bring your email back to its original location.
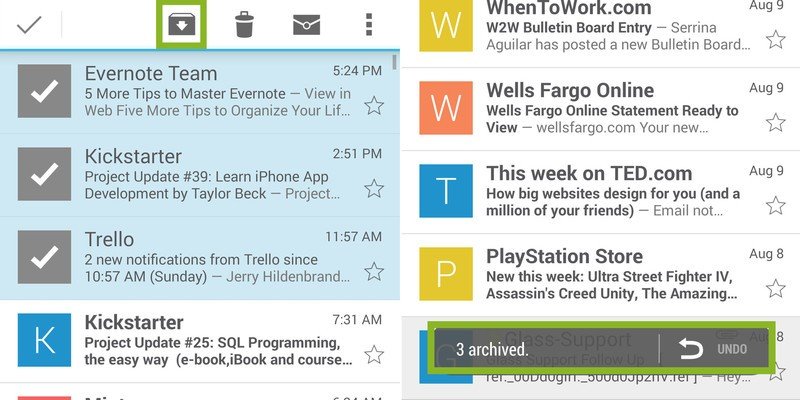
Finally, if you are going through your inbox and decide it is time to really clean it up, the last method will make this quick and easy to do. While looking at your inbox in the list view, you can click on the sender's image (normally a colored box with the first letter of the sender's name inside of it) or long press on an email to select it.
Continue the process of selecting more emails and once everything you want archived is selected, click on the same box icon with the downward facing arrow which is sitting in the taskbar. Just like the last method, right after archiving emails, a status will appear at the bottom of the screen informing you that you archiving numerous emails and gives you the option to undo your action.
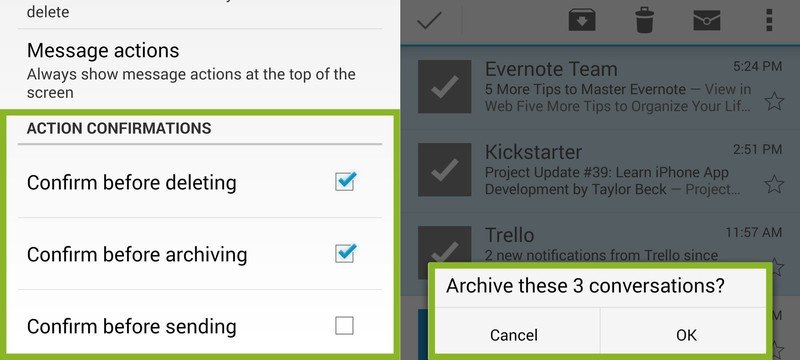
If you are ever worried that you might accidentally archive or delete any emails by any of the above methods, Gmail allows you to turn on a feature that adds another step to archiving or deleting emails. This authorization adds a pop-up dialog box that appears when you attempt to delete or archive an email which will ask for a confirmation that you do in fact want to complete your chosen action.
To turn this on, open the navigation drawer, scroll down to settings, select general settings, and at the bottom of the menu there are two checkboxes to enable confirmation before deleting and archiving.
With this new knowledge on archiving and deleting, you'll have your Gmail inbox cleaned up and running more efficiently, all while never getting rid of information that you may need some day.

