
So you've encountered an issue with your Oculus Go. Well, here I've collected solutions to a number of issues you may be dealing with. From corrosion in your batteries to a broken screen, here's everything you're going to need to help get yourself back to your games and experiences. Have you come across a problem that isn't listed here? Make sure you leave a comment below so we can help you out and update this article!
Products Used In This Guide
- We've found that Amazon is the best place to buy these accessories:
- Oculus Go Standalone Headset ($199)
- MagicFiber Microfiber Cleaning Cloths ($9)
- Q-Tips ($4.59)
- 2-Pack Arm & Hammer Baking Soda ($8.40)
- Hard EVA Travel Case ($20)
- UltraClear Screen Protector ($8)
- Amazon 5W USB Official OEM Charger ($20)
- Surge Protector Power Strip 6 Outlets with 6 USB Ports ($23)
- Small Vinyl Sickers ($16.67)
- Oculus Store: The Fitted Interface ($20)
How to handle battery corrosion
- Remove the cover and battery from the controller.
- Mix a solution of baking soda and water to create a very thick mixture.

- Dip your Q-Tip in the solution. You only need the smallest amount.
- Wiggle your Q-Tip around inside of the controller to loosen up the corrosion. Be careful not to push the battery button down, as that will cause the mixture to get into your controller.

- Get your dry microfiber cloth and wrap it around another Q-Tip.
- Use the microfiber cloth to clean up the solution you created and the remains of the corrosion.
You may still experience issues turning on your controller for the first few uses. If the problems keep occurring just remove your battery, give it a wipe down with a dry microfiber cloth and try again.
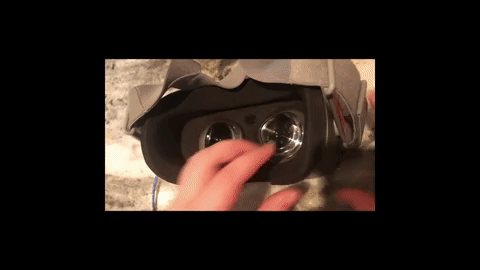
What to do with scratched or damaged lenses
- Use a sticker to stick and peel from your device to catch any dust.
- Clean your lenses with a dry microfiber cloth. Do not use chemicals or alcohols, even if they came in the pack with the product.

- Peel the first layer of the lenses and stick them to your headset.
- Use your fingers to smooth over the protectors and wipe them off again when you're done.
Ninety-nine percent of the scratches you'll find on your phone will disappear when you put on a screen protector. They're still there, but they're significantly harder to notice. This is the same logic we've used here. If your lenses are far too cracked or damaged for this to work it is time to put in a ticket with Oculus Support. Remember, we don't use chemicals on lenses because they can damage and warp them.
What to do if your interface gets damaged, or doesn't fit
- Pull on the edges of your interface to the side and not straight up.
- Once it's released from the edges of your lenses, pull in the opposite direction. It should now be fully removed.
- Get your new interface to line up on your headset.
- Push the interface down on half of the lenses and then pull them over the other sides to lock them in place.

- Just to be sure that it's all locked into place push on the interface around the edges of your lenses.
If you've damaged the default interface and just needed a new replacement, these instructions are the right one for you. If your problem lies in the interface not fitting properly in the first place you'll need to use these instructions to install fitted interface that the Oculus Store offers.
Help! My headset won't charge!
- First, check to make sure all your cables are properly connected.
- If you're using an off-brand charger cube try to switch it out for a higher quality charger, or plug it directly into a USB port extension cord.

- Turn your device on and get to your home screen, then plug it in again.
- If all else still fails, contact Oculus Support.
I honestly have no idea why turning on your headset and getting to the home screen changes why the orange light doesn't come on. But, I've noticed multiple times that it works for me. Other times it comes down to the types of chargers you're using. Sometimes an upgrade on your ports or cubes is necessary.
Scrapes and bumps on the surface of your Oculus Go headset
- Customize your Oculus Go with stickers.
- When using stickers, make sure to use smaller ones and don't cover the entire surface. You still want the surface to be able to breathe to avoid over-heating.

- Another option you have is to give your Oculus Go a custom paint job.
- You want to use alcohol paints (that get nowhere near your lenses) and use a heat-resistant sealant.

- Your final option is to get a decal kit that covers up the entire surface of your Oculus Go.
- With 25 options I'm sure you'll find the right one for you. Since these decal kits are made to cover the entire surface you should be perfectly fine against the battle of over-heating.
Unfortunately, with the surface type of the Oculus Go, it's impossible to fix those accidental scrapes and bruises. Customizing your Oculus Go helps turn those hiccups into beautiful art! To check out your options check out the shopping guide shown above to make your decisions or see the perfect travel case. If none of the options shown above tickle your fancy you can always contact support to see if they'll replace your headset instead.
Contacting Oculus Support
- Go to the Oculus Support Page.
- Select Request to Return my Oculus Hardware.


- Fill out the rest of the form with your information and the problems you are experiencing.
- Press Submit.
Oculus usually takes 2-5 business days to get back to you on your request to return your hardware. When they respond back to you with repair or return options you'll be able to finish out the process however you feel comfortable. Whether that's returning your headset to buy a new one, sending your current one for repairs, or even just requesting a swap-out.
Then if all else fails...
If your equipment is too far gone it might be best to just go for a full replacement. No worries, most of the Oculus Go replacement parts are actually for an extremely fair price. Even I was impressed when I needed to replace my interface, and I'm basically a human Mr. Krabs.

The alternate edition of the interface
If Oculus Support isn't able to give you the help you need, and the answers found in this guide aren't working, it might be best to replace your entire headset. You can find this on Amazon for $199. For what the headset is, it's absolutely worth keeping on your shelves.

Get yourself a better outlet to work with
If you're struggling to get a proper charge and notice that it isn't just with your Oculus Go headset, the cords might not be the problem. You can get a surge protecting power strip off Amazon for $22.99. This will eliminate your charger cube problem entirely by giving you a direct plug-in option.

Go a bit more portable with your option
If you're the type of person who's always on the go you may want to opt into a better charger cube instead. It's not convenient in any way to carry around an entire power strip just to charge your devices. The Amazon brand charger may have a steep price at $19.99, but it's worth every penny. As someone who owns one themselves, I've never regretted the purchase.

Sometimes a replacement is the only option
If you have tried your best to repair your controller, and you're still experiencing problems, then it might be time to admit defeat. Don't worry, the replacement controller is sold as an accessory on the Oculus Store for just $25.

The standard edition of the interface
If you need to replace your interface make sure you're purchasing the right one. If the interface that originally came with your device is the one that is comfortable, you want the "Relaxed Interface". You can find this on the Oculus Store for just $20.

The alternate edition of the interface
The alternate edition of the interface was made for people with low nose bridges and high or wide cheekbones. If your Oculus Go doesn't fit you just right, you may need to switch to this interface instead. You can find this on the Oculus Store for just $20.

