Whether you're planning to run Linux or just need more space to work with, an SSD upgrade is easy and cost-effective. {.intro}
Chromebooks are all about working in the cloud, and we admit there's not a whole lot you can do on one without an active internet connection. But sometimes you want to have a local copy of those cloud backed-up files. Or maybe you want to carry around 20GB worth of movies and music to watch offline when streaming isn't an option. And let's not forget how simple it can be to load up your favorite copy of Linux onto your Chromebook if you want to break out of just using Chrome OS.
Whatever the reason, you may find the paltry offering of a 16GB SSD on the Acer C720 Chromebook to be lacking for some use cases out there. You can pick up a C720P model with 32GB of internal storage — and a touchscreen — for $50 more than the regular C720, but what if you already have one or need more than 32GB? Well, it turns out it's extremely simple to replace the SSD in the Acer C720, and we're going to show you how to do it.
Article continues belowHit the break for the entire step-by-step process.
The tools

While the entire process is generally simple and doesn't involve dramatically expensive parts, we feel anything worth doing is worth doing right the first time. In our case that means using real tools, not just some random screwdriver we pick up out of your utility drawer. We have a full electronics-focused toolkit from Belkin that's basically overkill for such a project, but it did the job fantastically.
Truth be told, for this specific project you simply need a prying device, the right sized Phillips head screwdriver and an anti-static wrist strap (if you're smart). But there's nothing wrong with having a good screwdriver set. Small electronics screws are notoriously easy to strip, so be careful.
The replacement SSD

While the Acer C720 makes use of a standardized SSD slot, it uses a format called M.2 (or NGFF) that is a bit less common than the regular mSATA standard found in other laptops. The upsides of this SSD type are size and speed, and as you can see from the picture above these drives are absolutely tiny.
On recommendation of others who have done similar upgrades — as well as a set of Amazon searches — we landed on a MyDigitalSSD drive. It comes in three different sizes — 32GB for $39, 64GB for $59 and 128GB for $99 — and has all of the right specs for the job.
- More: Buy MyDigitalSSD SC2 42mm SATA III 6G M.2 NGFF SSD on Amazon ($39 - $99)
We're sure there are other drives out there that would work for this process, but we can only speak for the one we chose and used for this install. We chose to go all-out with the 128GB option, but the process should be the exact same for the smaller versions — you'll simply get less formatted storage in the end.
Your warranty is now void

Before we start break out the screwdriver, it's necessary that we remind folks the process of opening up your Chromebook and replacing the drive will void any factory warranty you have. The hard-to-remove sticker covering the last screw to remove the bottom plate tells you as such, but it's important to reiterate.
Now that we're past that, let's get started.
The process

Since we're going to replacing the only drive in the laptop with one that has no operating system on it, it's extremely important that we make a recovery disk before we open anything up. The process is extremely simple:
- Open your Chromebook and type chrome://imageburner into the omnibox
- Insert a USB drive or SDcard with at least 4GB of empty space on it (the drive will be erased)
- Follow the on-screen prompts to download and turn the removable storage into a recovery disk
Once you've created the recovery disk successfully, remove the drive from your Chromebook and shut it down completely from the system bar.

The first step of this install is removing the screws that hold the bottom plate onto the chassis. Close the laptop lid, flip over the Chromebook and check out the screw holes. You'll notice a total of 12 screws visible, and one hidden by that aforementioned warranty sticker in the middle. The screws don't take much force to remove, so be careful. As we said before, these types of screws are easy to strip out, and that's when you really run into troubles.
One by one, remove each of the screws, in no particular order. The screws are all identical sizes and lengths, which is nice. Get a small container of some sort (preferably with a sealable top) to store the screws in as you remove them — these things are small and easy to lose if you drop them on the carpet.

Some people claim to be able to remove these types of warranty stickers without damaging them, but that's something we neither condone nor have the skills to do. Suck it up. Get a small, flat tool of some sort — like a flat head screwdriver — to remove the sticker.


With the sticker removed, you can take out the 13th and final screw keeping the bottom plate attached to the rest of the laptop. Don't worry, nothing is spring-loaded here — the screw will come out just like the rest.

Here's the fun, yet terrifying, part. Now that you've removed all of the screws, you must pry the bottom plate from the base. The plate is held on by a good number of hard plastic clips that go around all four edges. You'll have to open up the case at some point along the edge to get things started.

We chose to use a flat head screwdriver, but any sort of relatively thin plastic or metal separation tool will do. We picked a spot just to the right of the fan vent on the hinge portion of the laptop as our starting point. Once you have the body separated, you will have to slide your tool in either direction until you hit the first snap point. Once you pop one out, the case will open wide enough that you can simply use your fingers to pull the plate off one snap at a time around all four edges.
Be as careful as possible with these snap points, as they are extremely fragile. We managed to break (just) one of the snaps on our own Chromebook — luckily it isn't noticeable when put back together — and you definitely wouldn't want to break many more than that. These aren't the sort of flexible snaps you find on a removable back cover of your Samsung Galaxy S4, they're meant to be clipped on once and never let go.

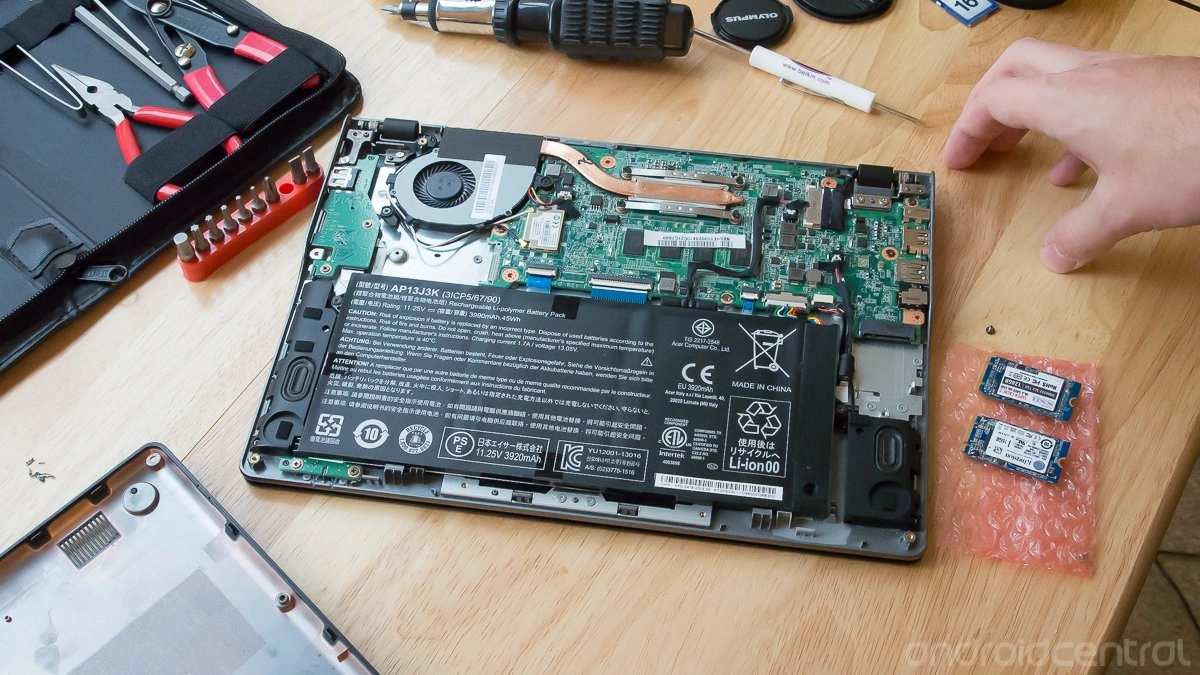
Once the bottom plate is off, the SSD definitely isn't hiding. Look on the right side (if the hinge is facing away from you) next to the battery and you'll see a blue Kingston SSD wedged into a slot on one end and held down with a single Phillips screw on the other.


Remove the screw from the SSD and you'll have no trouble gently pulling it out of its socket — there should be no additional springs or tension holding it in aside from the screw. Place the drive off to the side, preferably in a safe place, where you can get to it later to store it carefully. Remember this is still a fully functioning drive with Chrome OS on it.

Take your newly acquired larger-capacity M.2 (NGFF) SSD and place it in the slot, minding the positioning of the pins on the drive. If you purchased the same drive as we did, the sticker indicating the brand and size will be facing the same direction as the stock Kingston one.
Replace the screw with the one that was there in the first place (the drive comes with a screw, but there should be no need to switch to that one). Double check that the drive is seated properly — we don't want to open this back up if we don't have to — and you're ready to close up the Chromebook.

Following the same process as earlier, but in reverse, you need to clip the bottom plate into place. Position the plate loosely to where it will eventually rest, and move your hand along the edges, pressing down hard until you hear each of the clips click into place.
Once you think you've put them in place, go around the edges another time or two pressing harder to really make sure the clips have activated and held on. It took us a few minutes to make sure every clip was connected — better safe than sorry here before you start putting screws back in.

With the bottom plate secured by its clips, open up your container of screws and get to work putting them back in. Just as it was important to be gentle with the screws when removing them, it's doubly important to be gentle in tightening them back down again. Apply less pressure than you think you need, and make small turns until the screw is snug — they don't need to be plastic-stressing tight. It can be helpful to loosely screw in each one to make sure you use them all and then return to check them for proper tightness after, but that all depends on the kind of perfectionist you are.
If you finish filling each hole on the bottom of your Chromebook and don't have any empty spots or extra screws on your desk, you've successfully locked everything back up. Aside from the missing warranty sticker, you should notice no difference in the way things look.

Now that everything is put back together, flip the Chromebook back over, open the lid and hit the power button. You'll be greeted by the above screen, which (understandably) informs you that there was an issue booting into Chrome OS. Remember that recovery disk that we made before we started this whole process? Pop that into the USB port or SDcard slot.

The Chromebook will automatically recognize the disk as a recovery media and start the restore process. It will take a handful of minutes, but you'll be able to watch a nice progress bar while it does its magic. As it says on the screen, make sure to plug your Chromebook back into its power supply just in case the battery was low before you started the drive replacement.
When the recovery is complete, remove the USB drive or SDcard and your Chromebook will automatically reboot and greet you with a fresh start screen. Move through the setup process just as you normally would, add in your Google credentials and you'll be logged in.
You'll likely be greeted by a pending system update just minutes after you power the computer on, and it will take a handful of minutes (depending on your internet connection, of course) after that point to download your settings, extensions and preferences, but you'll be up and running identically to the minute you powered it off to replace the drive. That's the beauty of Chrome OS.

Now you'll probably want to confirm that you're getting the drive storage you paid for, right? Open up the Files app, hit the settings button in the top right corner of the window and you'll see down at the bottom a reading of how much available storage you have. Due to formatting and the space Chrome OS takes up you'll of course have less than the number advertised on the SSD, but it will be far more than what you had before.
Our 128GB SSD yielded 107.2GB of available storage after our Chromebook was signed in and synced our settings, extensions and a (small) handful of Google Drive items. That's nothing to shake a stick at for a $99 drive upgrade.
After 30 minutes with a few tools, you're done

Altogether our SSD upgrade took about 30 minutes, even with taking our time to make sure things were just right every step of the way. In terms of a percentage of the total cost of the machine — our C720 with 4GB of RAM cost $249 — a $99 storage upgrade may seem a bit crazy. But if you're willing to put in a little bit of your own time and tools to do this job, you can have a Chromebook that's ready for anything you can throw at it — even if you're offline or wanting to install another operating system alongside Chrome OS.

