How to transfer photos from iPhone to Android

Like most of us, your phone is likely your primary camera and thanks to ease-of-use, you probably capture at least a few photos a day. Those add up over time, and it'd suck to lose them all just because you're switching from iPhone to Android. Thanks to Google Photos, you don't have to!
How to transfer iPhone photos to Android using Google Photos
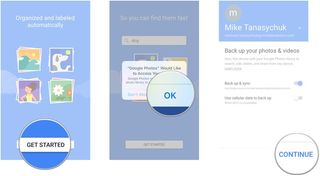
- Download Google Photos from the App Store.
- Launch Google Photos from your Home screen.
- Tap Get started.
- Tap OK when asked to allow Google Photos to access your photos.
- Tap the switch next to Use cellular data to back up if you want to back up your photos over cellular. If you don't want to rack up a serious data bill, leave this off.
- Tap Continue.

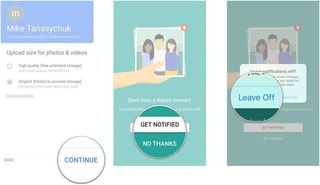
- Tap the circle next to either High quality or Original. Tapping High quality will compress your photos to 16 megapixels reduce file size, but you get "unlimited storage" (2PB). Original will maintain the original file size and will count toward your Google Drive storage (15GB).
- Tap Continue.
- Tap Get notified if you want notifications when someone shares photos with you. Otherwise tap No thanks.
- Tap Leave Off to leave notifications off if you selected No thanks.

That's it! Google Photos will automatically sync your photo library and you'll be able to access them on your Android phone or virtually any device with an internet connection.
Don't expect to see your photos on a different device right away. The sync could take quite a while, especially if you have many photos.
Questions?
Questions about transferring photos with Google Photos? Let us know in the comments below!
Be an expert in 5 minutes
Get the latest news from Android Central, your trusted companion in the world of Android

